The following article outlines the main differences between ControlUp Monitors in ControlUp On-premises (COP) environments, or Monitors in Hybrid Cloud environments before version 9.0, from Monitors in Hybrid Cloud environments after version 9.0.
Prerequisites for ControlUp Monitor
Verify that the machine that you deploy the monitor on meets the following requirements:
- Windows Server 2012 R2 or higher. Windows client OS are not supported.
- .NET Framework installed
- For ControlUp version 8.6.5 or higher: NET Framework 4.8
- ControlUp version 8.6 or lower: .NET Framework 4.5 or higher
- Allowed RPC inbound traffic
- Powershell 5.x
To allow the ControlUp Monitor to connect to managed machines, you need to assign domain credentials to the monitor service as described below in the Domain Identity section.
Note
For any Sizing Recommendations, see ControlUp Sizing Guidelines.
Configure the Monitor
Before you install a monitor on a machine, you first need to configure the monitor settings in the Real-Time Console.
To configure the monitor:
In the console, go to Home > Add Monitor.
As you need to provide a service account credential for the Primary domain credential, make sure that you already you prepared this account prior to the installation of the monitor.
In the Monitors tab, click Monitors Settings. The Sites and Monitors - Configuration Wizard opens.
Add Monitor Credentials
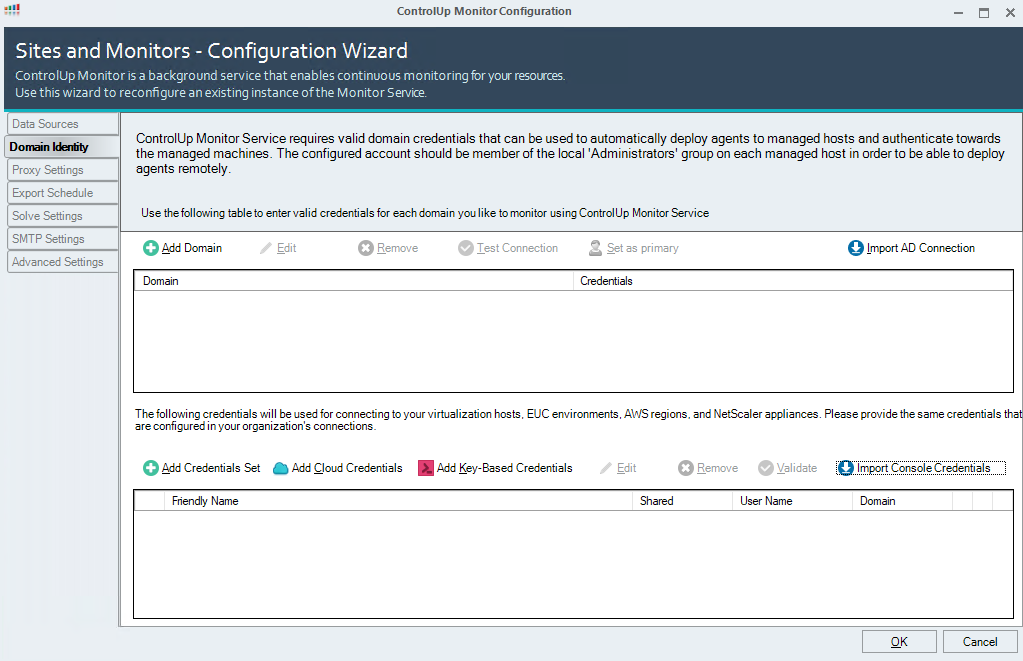
For COP environments, you need to assign domain credentials to the monitor service to enable the ControlUp Monitor to connect to managed machines, as described below.
In the Domain Identity tab, add credentials so your monitors can connect to your environment and resources, such as hypervisors, EUC environments, cloud environments, NetScaler applicances.
To add monitor service account credentials:
Click Add Domain. The Add New Domain Identity popup appears.
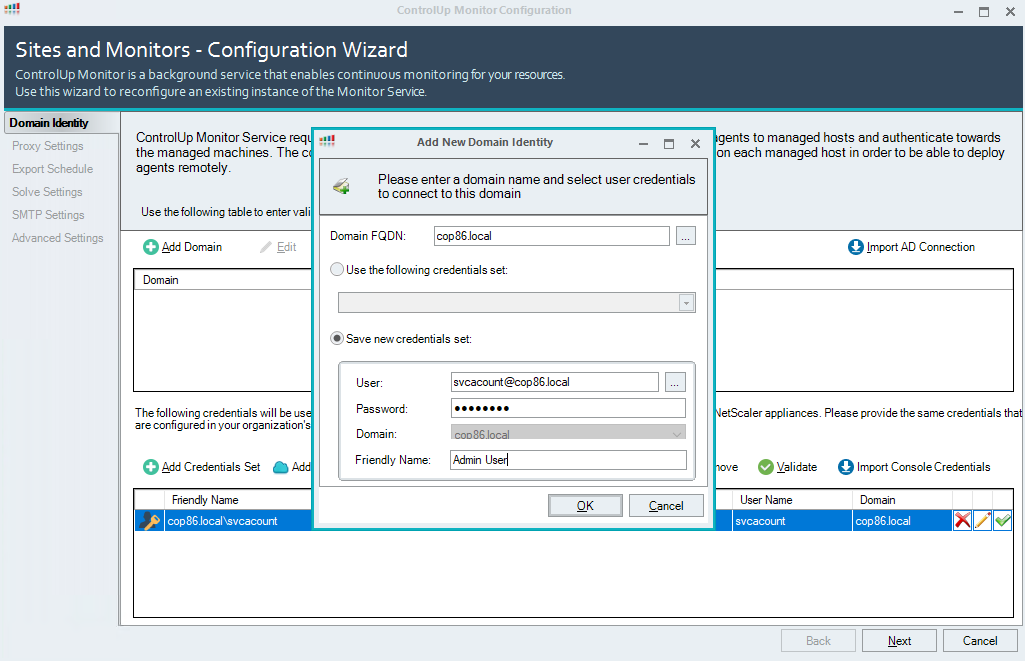
Enter or select the Domain FQDN from the Domain Selection list, enter valid domain credentials, and click OK. We recommend that the domain account be a member of the local administrator group to deploy agents remotely.
Optionally, to save new credentials, select Save a new credentials set, enter the new credentials into each field as required, and click OK.
Select Shared credentials for each credential set. To learn more about this option, see Configuring Shared Credentials.
Shared Credentials
Note that all monitors and consoles in your environment must use the same credentials when connecting to your resources. You can share your credentials in your Monitor Settings so that all ControlUp users can easily connect to your resources without having to know the service account username and password. For more information, see Configuring Shared Credentials.
Optionally, to add additional credentials for hypervisor connections or EUC environment connections:
Click Add Credentials Set and the Add New Credentials popup appears.
Enter the new credentials into each field as required, click OK, and the credentials are added.
Repeat the process as needed to add credentials for all of the resources that you connect to ControlUp.
Optionally, click the Proxy Settings tab to configure any proxy settings for the default site, if required.
Proxy Settings
You can configure the proxy settings option separately for each site.
Optionally, click the Export Schedule tab to configure an Export Schedule.
If you already configured export rules in the console, and not on a monitor, you can select Import Settings to import those rules so that the export occurs even when no console is running. Set the Reports Directory path on the monitor machines where the reports are saved. Enter Credentials that have permission to write to the directory you entered.Optionally, click the SMTP Settings tab to configure Trigger Alerts. Follow the instructions to configure a priorty list of SMTP servers and their connection details and click OK.
Optionally, click the Advanced Settings tab to change the default monitor service resource settings. For more information about changing the default settings, see Performance Optimization for Real-Time Console & Monitor.
Global Settings
The Export Schedule , SMTP Settings, and Advanced Settings are global and aren't set per site.
Install Monitor
After you configure your monitor settings, any user with the Manage Monitor permission can install a monitor from the Real-Time Console with the following steps:
In the Console, go to Home > Add Monitor > Monitors > Add Monitors to Site.

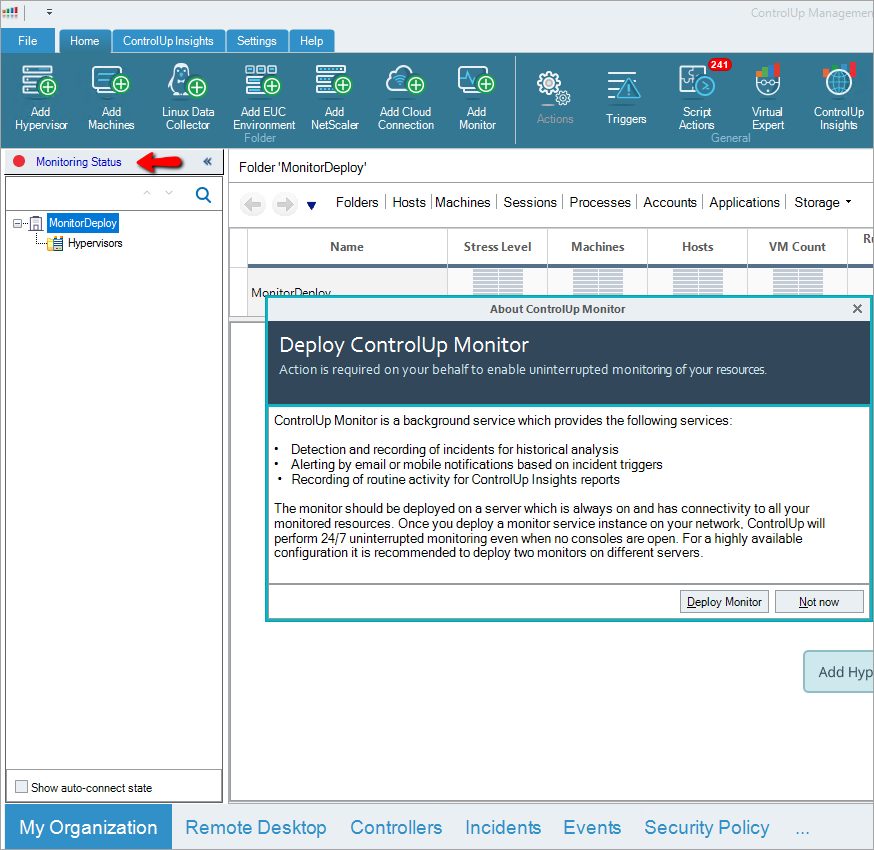
Alternatively, you can install a new monitor by clicking Monitoring Status > Deploy Monitor in the ControlUp Monitors area to install and configure a monitor:
Select a machine from one of your managed domains to install the monitor on. By default, the port that the monitor listens on local port TCP 40706. Console machines and other monitors use this port for internal communication.
Click Install. The installation process might take a few seconds.
The monitor installation wizard tests various components of the target machine before deploying the service to ensure that it will be able to run. See below for more details of the installation wizard components.After the installation completes, click Finish > OK.
The monitor(s) you installed appear in the Monitors tab next to a green icon.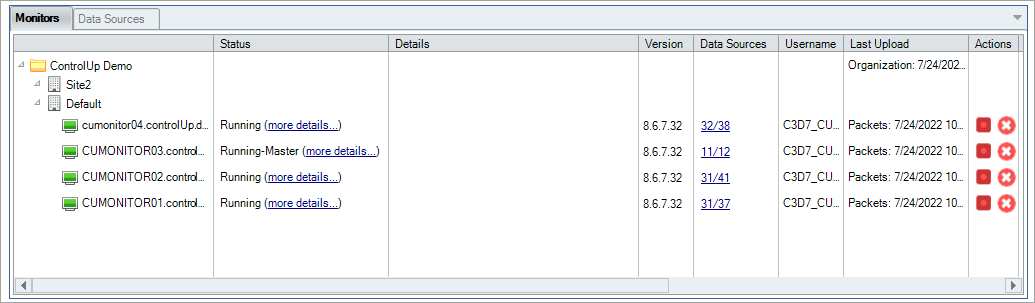
Domain Identity
In the Domain Identity page, the wizard offers to import your currently saved credentials for use by the monitor service. If you agree, then your current list of AD Connections and Credentials Store is imported. Note that you need to click Edit for each entry to confirm that the correct credentials are used for each AD Connection.
If you connect to more than one AD domain, choose one of the connections to be the primary one. If you decline to import your personal credentials, you will be prompted to create at least one set of valid AD credentials for the monitor instance to use when connecting to your resources.
The monitor service needs valid credentials to establish connections with all of your managed machines. It is also responsible for deploying ControlUp Agents to the managed machines, in case they have no agent installed. By default, the ControlUp Monitor service is configured to start using the Network Service account, which is not sufficient for administrative connections to your managed machines. In addition, if your organization includes several Active Directory domains, the Monitor will need valid administrative credentials to access all these domains.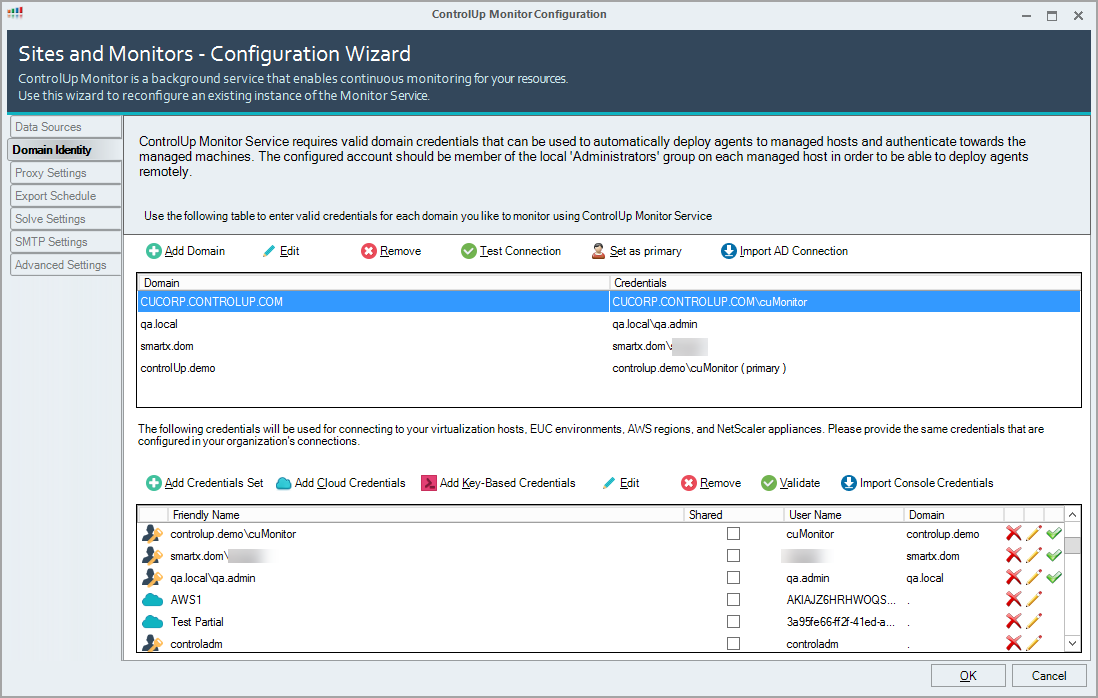
We recommend that you create a dedicated account for the ControlUp Monitor in each of your Active Directory domains. This account requires:
Local administrative privileges on all your managed computers. Only required if your monitor is expected to deploy agents to systems.
Modify permissions on the directory used for scheduled data export (see below).
Shared Credentials Store. ControlUp allows managing credentials centrally so all authorized users can use shared credentials sets. This enables for more streamlined management of credentials and a quicker onboarding process for new ControlUp users which does not require them to know the service usernames and passwords.
Note that the Shared Credentials permission is set by the roles in the Security Policy Panel
Note
Local Admins and Organization Members roles are not allowed to manage the Shared Credentials store, you must create a new role.
The bottom of the Domain Identity page hosts the credentials saved with the Monitor instance in order to enable it to connect to your virtualization infrastructure. In order to monitor virtualization hosts, ControlUp requires that consoles and monitors to use the same credentials. In order to enable continuous monitoring of the virtualization hosts using the monitor, use this page to save the same service account credentials used by other ControlUp users in your organization to connect to your hosts. Saving those credentials is optional.
However, if no credentials are provided for hypervisor connections, the monitor will not be able to connect to the hypervisor infrastructure. For more information on monitoring virtualization hosts with ControlUp, see Connect to the Virtualization Infrastructure.
Login Mode
If your organization uses COP, your ControlUp Monitor requires a COP license file.
Solve Settings
Solve On-Premises uses the ControlUp Monitor to retrieve data from your data sources. This dialog links to the Solve web interface in which you can configure SAML SSO. If you use Solve, you can check the Ignore SSL Certificate Errors checkbox.
To learn more about the configuration in Solve, see Solve On-Premises configuration.
Insights
If your organization uses Insights to store and analyze historical data, the monitor uploads the aggregated data to our cloud-hosted Insights platform and for exporting activity files to Insights On-Premises. Before relaying data to Insights, the monitor reduces it to a manageable size by decreasing the resolution and calculating average values for each data point.
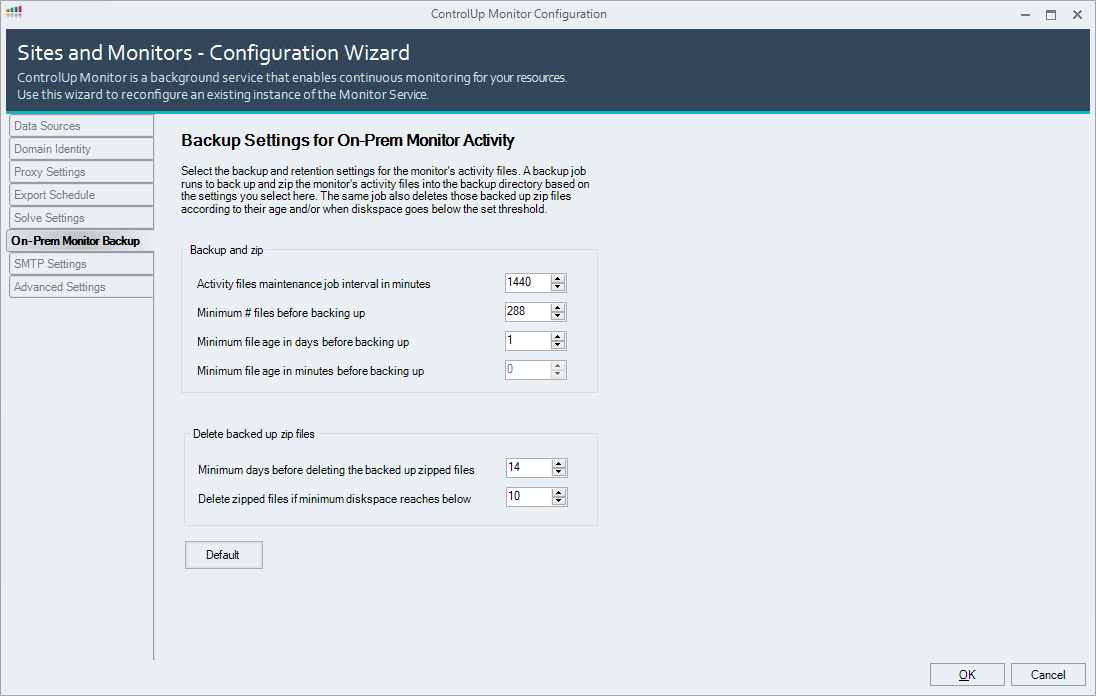
On-Premises Monitor Backup
In an on-premises environment, the ControlUp Monitor creates Activity Files for the Insights On-Premises appliance. This screen allows you to define intervals for backing up IOP activity files on the monitor machine's local hard drive, simplifying the update process of Insights On-Premises.