If you have Manage Web Application permission, you can add and manage Script-based Actions (SBA) from the VDI App using the Action Library.
You can:
- Browse community actions that have been compiled by ControlUp and the ControlUp community. Add community actions to your ControlUp organization so that you can use them in your own environment.
- Manage actions that have been added to your ControlUp organization, including exporting/importing, updating, sharing, and removing actions.
To access the Action Library:
- Open the VDI App with a user that has Manage Web Application permission.
- Go to the Details page.
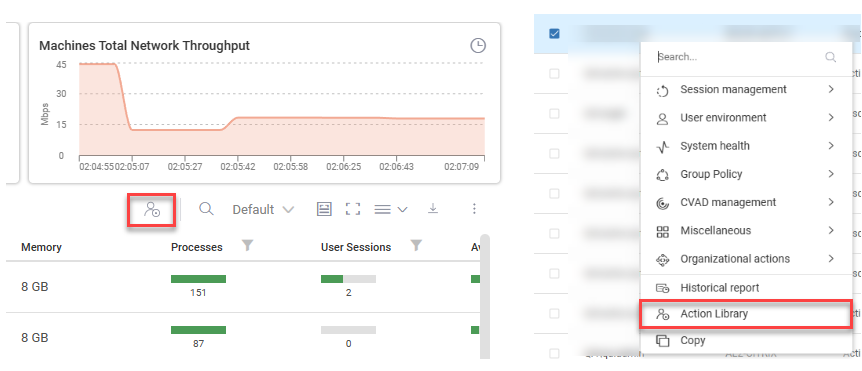
- Click the Action Library icon at the top-right of the real-time grid, or right-click on an item in the real-time grid and click Action Library.

Add Actions from Community Actions
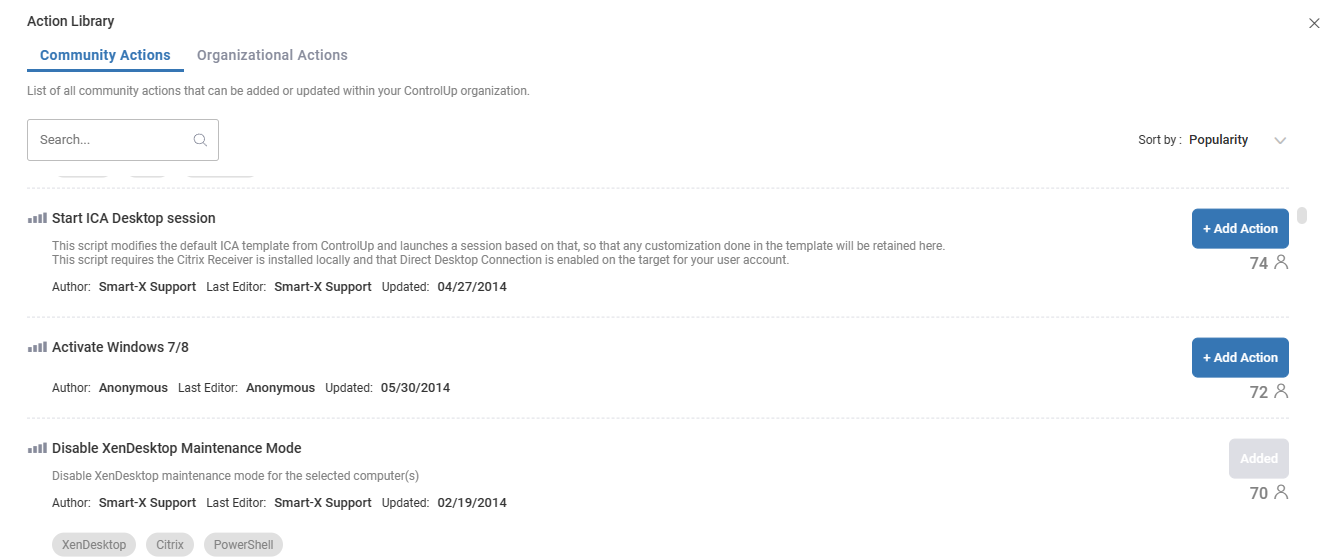
The Community Actions tab contains actions created by ControlUp and compiled from the ControlUp community.
When you add a community action to your organization, any user in the Local Admin or ControlUp Admins security group can perform the action. Note that a user can't perform actions if they belong only to the Local Admins group. See Permissions for details. You can edit your security policy in the Real-Time Console after adding the action to adjust permissions for the added action.
If you have deleted the ControlUp Admins group, you can either contact ControlUp Support or reset default permissions to restore the ControlUp Admins group.
To add community actions, perform the following steps:
- In the Action Library window, go to the Community tab.

- Search for the action you want to add. You can sort by popularity to see which actions the ControlUp community is using most often.
- Click Add Action.
After you have added an action, you can manage the action in your Organization tab of the Action Library.
Manage Organization Actions
Organization actions are actions that have been added to your ControlUp organization, including community actions, and actions added from the Real-Time Console.
Export and Import Actions
You can export your organization actions to a JSON file and import them later. You can use this to back up actions, or import them to a different ControlUp organization. Note that you can not export and import actions between the Real-Time DX Console and the web interface.
To export an action:
- In the Action Library window, go to the Organization tab.
- Select the action you want to export using the checkbox. You can select multiple actions to export them in a single file.
- Click Export.
The actions you selected are exported to a JSON file.
To import an action:
- In the Action Library window, go to the Organization tab.
- Click Import.
- Select a JSON file with one or more actions that were exported from the VDI App.
Imported actions are added directly to your organization actions, and can be used by any user that has the necessary permissions.
Update Actions
If an update is available for one of your organization actions, an update icon appears next to the action in your Organization tab. Click on the update icon to update the action.
To update multiple actions at the same time, select the actions you want to update and click the Update icon at the top of the list.
Remove Actions
If you remove an action from your organization, no ControlUp user can perform that action. You can add the action to your organization again.
If you remove an action that was originally created or imported to your organization actions using the Real-Time Console, then the action returns to your Draft Scripts in the Real-Time Console.
To remove an action from your organization:
- In the Action Library window, go to the Organization tab.
- Select one or more actions that you want to remove using the checkboxes.
- Click Remove.
Share Actions
If you have created an action that you want to share with the ControlUp community, you can submit it to ControlUp for review. If your action is suitable to be shared, ControlUp will add it to the community actions so that other ControlUp users can add your action to their own organization.
To share an action:
- In the Action Library window, go to the Organization tab.
- Select the action you want to share using the checkbox.
- Click Share.
- Enter information about your action, and submit it to be shared.