Automated Actions are Script-based Actions (SBAs) that you configure to run automatically as follow-up actions of triggers. The following guide explains how to use the Automated Actions feature. To learn how to create and configure Automated Actions, see Configure Automated Actions. From version 9.0.5 and higher, you can configure trigger actions with PowerShell cmdlets.
Use Cases
Examples of use cases for Automated Actions include:
Trigger | Follow-up Action to Run Script |
A specified process consumes over 90% CPU for more than 5 minutes. | Kills the process. |
The free disk space on a machine's C drive is less than 5%. | Finds large files or directories, and logs a Windows Event for further troubleshooting. |
A service that is supposed to run all the time stops running. | Restarts the service. |
A machine is added to a host. | Adds the machine to ControlUp and install the ControlUp Agent on it. |
A browser directs to a URL that is blocklisted (e.g., a gambling site). | Kills the browser tab. |
Securing Automation
The process of automation is sensitive, since any mistakes users make while setting it up can result in unexpected actions being taken by the system, sometimes without the users even being aware that it is happening. Accordingly, ControlUp limits automation via security policies and throttling.
Execution of Automated Actions
The ControlUp Monitor executes the Automated Actions feature. You must have at least one ControlUp Monitor running in your organization to use Automated Actions.
Automated Actions Setup Wizard
You can use the Automated Actions Setup Wizard to define which SBAs can be used as Automated Actions and which users and groups have the permissions required to configure Automated Actions.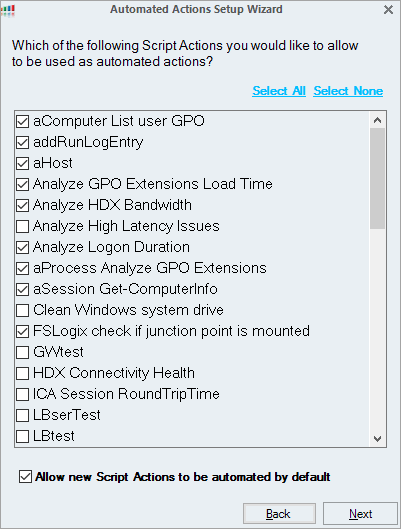
Prerequisites
Before you can use Automated Actions, you must meet the following prerequisites:
You have the required permissions to configure automated actions
There are Script-based Actions (SBAs) available in your organization that can be automated.
Verify that your license includes Automated Actions:
a. In the Real-Time DX Console, click the Help tab in the Home ribbon and click About.
b. Click Licensing to open the License window and check the value in the Automated Actions row.Using Automated Actions in Trial Mode
If you use the trial version, make sure the 21-days trial hasn't expired. If the trial expired, you can't use Automated Actions.
Setting Up the Automated Actions Feature
You can use the Automated Actions Setup Wizard to configure Automated Actions. Here you control which Script Actions can be automated and which users can create automated actions.
After you begin to configure Automated Actions, you can use the wizard as needed to edit the Automated Actions settings, enable or disable Script Actions to use as Automated Actions, and edit the list of users who can create automated actions.
Note
To create Automated Actions, users require both the Create Automated Actions permission and the Configure Incident Triggers permission. You can grant the Create Automated Actions permission to a user with the Automated Actions Setup Wizard by adding them to the Automation Admins role. For more details, see Assigning Automated-Actions Permissions to User Roles.
Configure Automated Actions
You can configure Automated Actions in the Real-Time Console. Perform the steps in the Configure Automated Actions article to automate Script Actions, and to set Script Actions as the follow-up actions for triggers.
Automated Actions and Trigger Follow-up Actions
You create an Automated Action by selecting an SBA as a follow-up action for a trigger in Trigger Settings. When an Automated Action is triggered, ControlUp records data about the script execution in the Windows Event Log of the monitor machine and in the ControlUp Audit Log.
Advanced Features and Topics
The following section provides additional details about Automated Actions and how to customize them for your organization.
Compatibility between the Scopes of Script Actions and Triggers
Compatibility of Mappings between Script Actions and Triggers
Assigning Automated-Actions Permissions to User Roles
A user can't set up an Automated Action unless the user group in which the user exists has both the Create Automated Actions and Configure Incident Triggers permissions.
Note
A user who has the Create Automated Actions and the Configure Incident Triggers permissions can set up an Automated Action that uses a Script Action for which they don't have the permission to run manually.
You can assign the Create Automated Actions permission to any roles that are locally created within the organization. By default, it is assigned to two roles:
Configuration owner
Automation Admins: This role is built-in, and has the Create Automated Actions permission by default. No users are assigned to it initially.
You can assign the Create Automated Actions permission to users or roles with the Automated Actions Setup Wizard, or manually in your organization’s Security Policy. You can only manage the Configure Incident Triggers permission manually in the Security Policy.
To assign the Create Automated Actions and Configure Incident Triggers permissions to a role in your organization:
In the Security Policy screen, at the organization level, under Perform organization-wide actions, locate the Create Automated Actions and Configure Incident Triggers rows. Select Allow for those roles.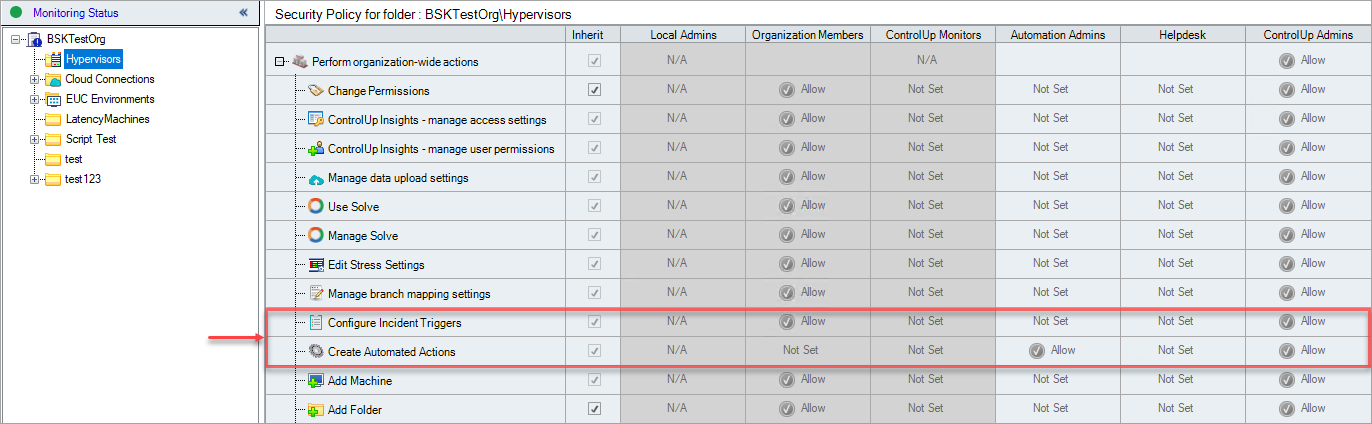
Throttling
Throttling limits the quantity of automated actions that can execute at a given time, in your entire system and on one target, for each trigger. The following throttling rules apply to the Automated Actions feature:
A ControlUp Monitor can run up to 50 automatically executed Script Actions simultaneously. If additional actions are generated, they are queued, and will run when the actions already in progress complete. The queue can contain a maximum of 10,000 actions.
A monitor can't run more than one automatically executed Script Action at a time on a single target. If additional actions are generated, they are queued, and will run one after the other. The queue can contain a maximum of 1,000 actions.
If a single trigger generates more than 50 automatically executed Script Actions, none of the Script Actions are executed, and an exception is logged in the monitor’s Windows Event Log and the ControlUp Audit Log.
Modifying Default Throttling Limits
You can modify the default values above using the keys listed in the table below, in the Windows Registry of the monitor machine under HKEY_USERS\S-1-5-20\SOFTWARE\Smart-X\ControlUp\MonitorSvc
By default, these keys don't exist. If a key doesn't exist, its default value is used. If a key exists, but its value is 0, no limit is used for that value. Otherwise, the value assigned to the key is used.
Throttling Limitation | Default Value | Registry Key |
|---|---|---|
Maximum number of simultaneous automatically executed Script Actions | 50 |
|
Maximum number of automatically executed Script Actions in the queue | 10000 |
|
Maximum number of simultaneous automatically executed Script Actions on a single target | 1 |
|
Maximum number of automatically executed Script Actions in the queue for a single target | 1000 |
|
Maximum number of automatically executed Script Actions generated by a single trigger | 50 |
|
Compatibility between the Scopes of Script Actions and Triggers
A Script Action can't be used as an Automated Action unless it is available for automation in the entire scope of the trigger.
If you use the Automated Actions Setup Wizard to configure which Script Actions are available for automation, they are always available in your entire organization. In this case, a situation where a Script Action isn't available for automation in the scope of an trigger shouldn't occur.
If you manually configure the security settings of a Script Action in the Security Policy pane, you can make it available for automation in some folders or subfolders, and unavailable in others. In this case, it is possible for a Script Action to be unavailable for automation in part or all of the scope of an trigger.
The following measures prevent a Script Action from running as an Automated Action when it is unavailable for automation in the scope of the trigger:
Script Actions that aren't fully available in the entire scope of a trigger appear grayed out in the list of available Script Actions for that trigger.
At runtime, the system checks if the Script Action is currently configured to be available for automation in the entire scope of the trigger. This prevents security violations if changes to the Security Policy are made after you configure the Automated Action. If the Script Action isn't available for automation at runtime, it won't run.
Compatibility of Mappings between Script Actions and Triggers
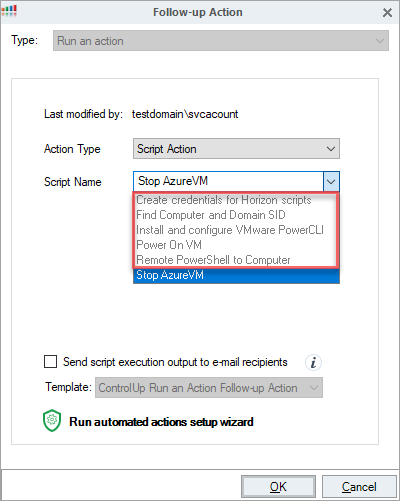
To map a Script Action to a trigger, the assigned type of the Script Action must match the record type of the trigger. For example, if the Script Action is assigned to machines, the record type of the trigger must be computer. However, the system is flexible in this regard, usually enabling mappings between Script Actions and triggers when the action’s assigned type is the parent of the trigger’s record type.
The following table shows the supported mappings between assigned types of Script Actions and record types of triggers: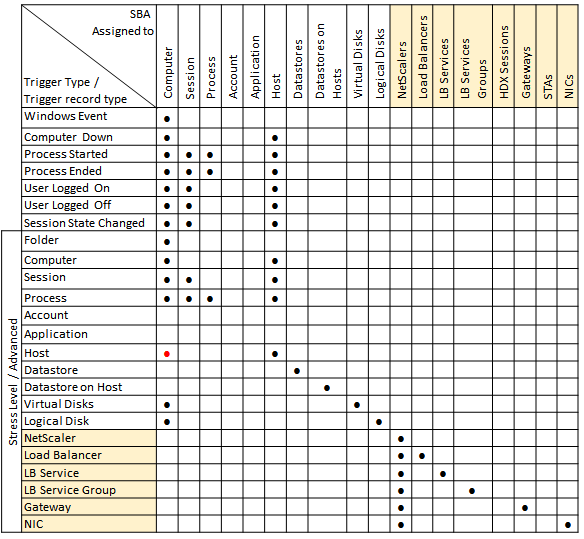
You don't need to know the rules that define which Script Actions can be mapped to which triggers, because only those scripts that meet the requirements are included in the list of scripts in the Follow-up Action settings:
Note that when you select a script for automation, the arguments that the script receives during its execution are of the script’s assigned type. For example, if a script is assigned to machines, and mapped to a session, the arguments it will receive are the properties of the machine on which the session is running, and not the session.
Troubleshooting
ControlUp provides the following PowerShell cmdlets to manage the Automated Actions job queues. In addition, to get more information about the Script Actions that have run automatically, you can check the Windows Event Logs on the monitor machine and the target machines.
Powershell Commands
If Automated Actions jobs are not running when you expect them to, there may be a backlog in your system. This can occur, for example, if the throttling limitations are exceeded.
You can use the following PowerShell cmdlets to see what jobs are in the job queue and to clear the queue if necessary. Make sure you run both commands as an administrator.
Get-CUAAQueue: Shows the Automated Actions job queue, per target machine, and the total number of jobs in the queue.
Clear-CUAAQueue: Clears the queue of all pending Automated Actions jobs.
To use the PowerShell scripts:
On the monitor machine, open Windows PowerShell as an administrator.
Enter the following two commands once at the beginning of each session:
Import-Module -Name .\ControlUp.PowerShell.Monitor.dll
Open-ControlUpMonitor
Enter the name of the cmdlet you want to run (Get-CUAAQueue or Clear-CUAAQueue). The cmdlet runs and the output is displayed.
The screenshot below shows running the Get-CUAAQueue cmdlet to see the queue, and the Clear-CUAAQueue cmdlet to cancel all pending jobs.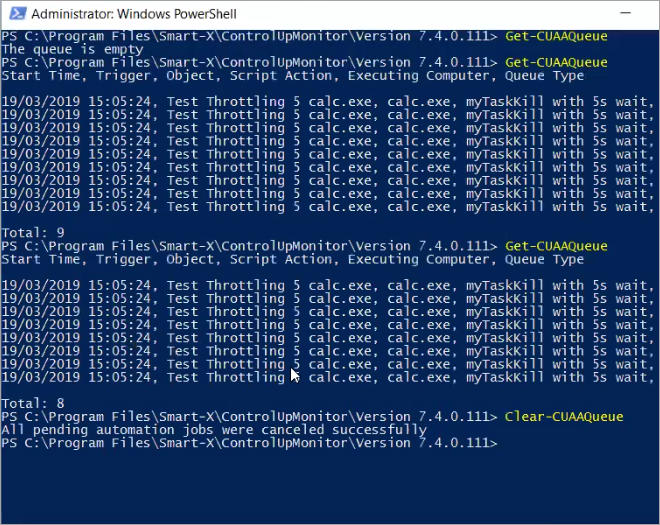
Windows Event Log
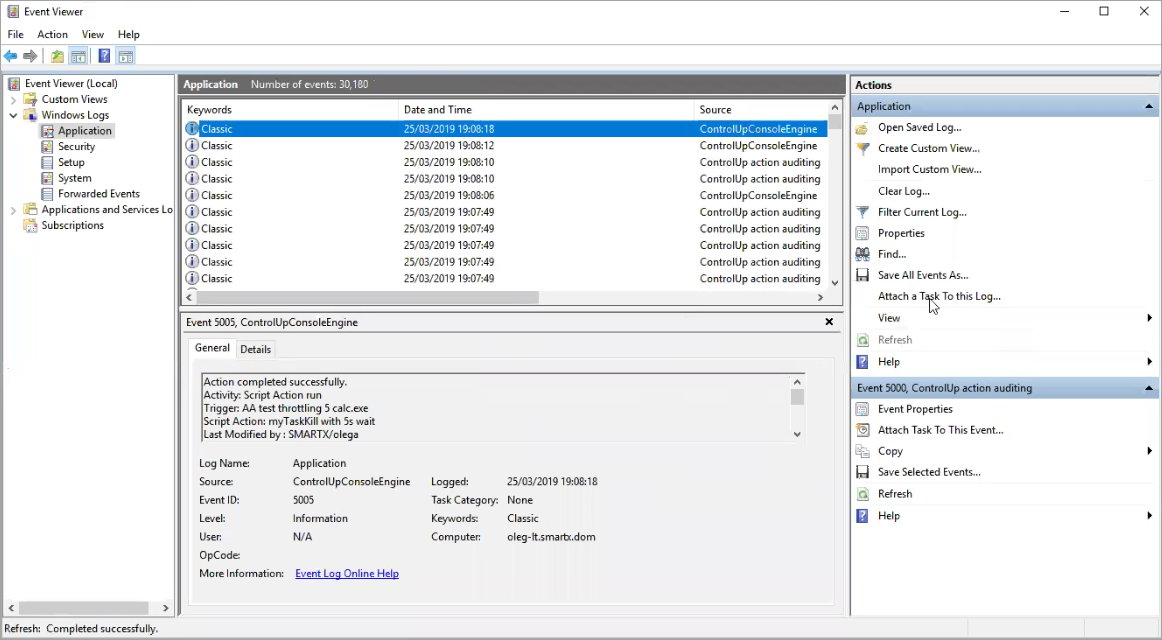
You can see information about every automated action performed by ControlUp in the Windows Event Logs of the Monitor’s machine and of the target machines on which the scripts ran. Automated actions appear in the Windows Event Viewer under Windows Logs > Applications.
Windows Event Viewer showing a list of ControlUp Events:
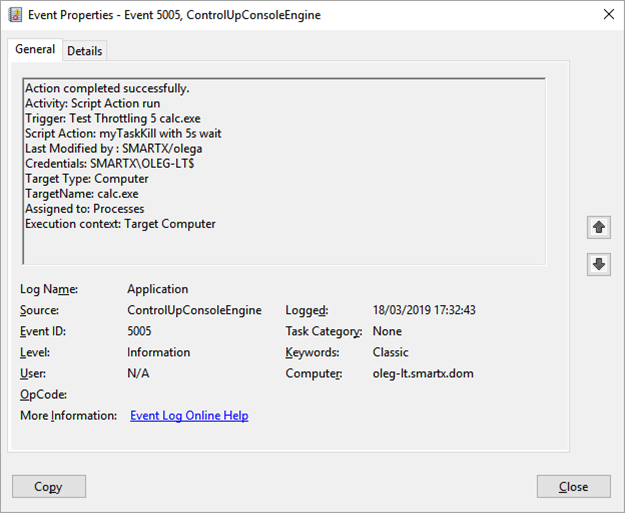
Log of an Automated Actions event on the monitor machine:
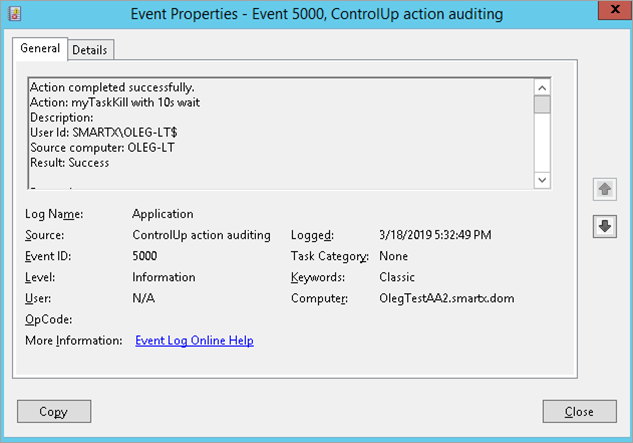
Log of an Automated Actions event on a target machine:
Known Issues
Event logging of Automated Actions isn't performed in some configurations. Normally, the Master ControlUp Monitor fires all triggers and executes all Automated Actions. Each attempt it makes to run an automated action, whether it succeeds or fails, is documented in the Windows Application Log of the ControlUp Monitor machine as Event ID 5005.
In some configurations, Event ID 5005 isn't added to the Windows Application Log of the Monitor machine as expected. To solve this issue, run the Real-Time DX Console on the machine on which the Master Monitor is running. After you do this once, the Console doesn't have to be open or even installed on the machine any more in order for the event-logging to be performed properly.
Under the following circumstances, an automated action will fail to run, with the error Exception: Failed to get environment block:
The Execution Context of a Script Action that is used as an automated action is User Session, and the Security Context of that Script Action is the same user account under which the User Session is running.
User account of session and of script are identical.
To avoid this issue, don't use the Default (Session’s User) option to run an automated action whose Execution Context is User Session.
Note
We don’t recommend to use the credentials of an actual user to run Script Actions. Instead, you can create a dedicated user account to run Script Actions.