You can use the Real-Time DX Console to synchronize folders and machines to your organization tree from your AVD or EUC environments, such as CVAD, Horizon, and Citrix Cloud. This means that you don’t need to use the PowerShell-based sync script to synchronize your environments. Folder mappings are also included in the built-in sync feature.
You can configure built-in sync for the following mappings:
Prerequisites
User actions to be allowed in the ControlUp Security Policy:
Add Folder
Add Machine
Remove Folder
Remove Machine
Monitors need to have an active connection to the cloud and EUC environments as the monitors that monitor the connections are responsible for automatically synchronizing the organization tree.
Step 1: Enable Built-in Synchronization
Important
We advise choosing a single method for folder synchronization to avoid conflicts. Should you decide to use the built-in synchronization feature, ensure you are not also using a scheduled trigger for the PowerShell script. If any scheduled triggers for the sync script are active, disable or remove them before activating built-in synchronization.
To enable built-in synchronization:
Right-click on a connection under your organization's folder. Select Connection Settings and click Edit Sync Options.
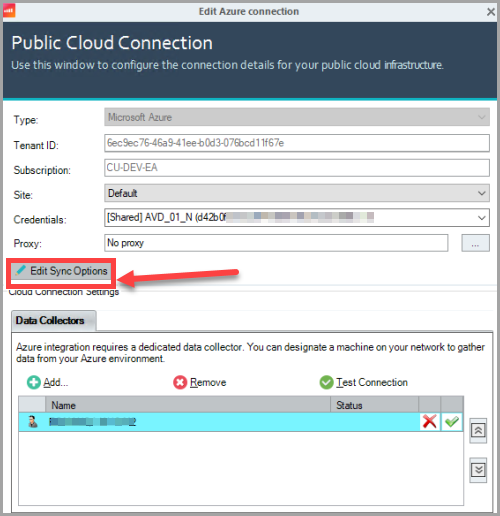
Select the Enable built-in synchronization option and adjust your synchronization settings as needed.

Optionally, make the following adjustments:
Check Include existing computers to enable computer movements between any folders. Unchecked, only machines within the synced Cloud Connection/EUC Environment folders can be moved; those outside remain untouched.
Adjust the Run synchronization every (X) hour(s):Sets the frequency of the synchronization. In the GUI, the minimum value is one hour. However, you can use PowerShell to set this to a lower interval.
Modify the Remove machine when absent more than (X) hour(s) setting as needed. Machines not found in the source path after the specified duration will be automatically removed.
Enter your desired mapping syntax into the DNS, Site, or Folder text boxes (see steps below).
Click OK on both configuration popups.
Right-click the connection again and select Sync Folder to apply your changes.
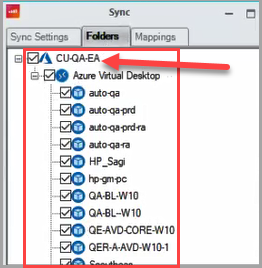
Select folders to synchronized
If you want to synchronize only specific folders, such as AVD resource groups, Horizon Desktop Pools or Citrix Delivery Groups, you can do so by changing the settings in the Folders tab:
Make sure you are connected to the extension in the console. Navigate to the Folders tab and select the checkboxes of the folders you want to synchronize.
To sync DNS, site mappings, or folder mappings, follow these steps:
Confirm your choices by clicking OK in the Sync popup, then again in the Cloud Connection popup.
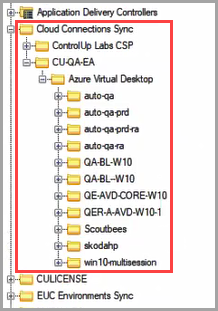
Right-click the connection mentioned in step 1 and select Sync Folder. A Cloud Connections Sync folder will be created under your organization's folder, containing the synchronized structure of folders and machines from the cloud connections.
Mapping Rules & Syntax
Whether you are mapping folders, DNS suffixes, or sites, the system uses a universal, comma-separated syntax: <MappingMode>,<WildcardPattern>,<Target>
When configuring your mappings, all types adhere to the following rules:
Mapping Modes: Use
0or*to match both machines and folders,1for machines only, and2for folders only.Wildcards: Patterns are case-insensitive and support the
*wildcard for free-text matching. A wildcard pattern can’t be left empty.Processing Order: Mappings are processed top-to-bottom. First match wins.
Specificity: Always list specific, detailed patterns (e.g.,
1,WEB-PRD-01) at the top, and broader general patterns (e.g.,1,WEB-*) underneath.Target Folder Path (String): Destination path in your organization tree. Uses backslash
\as separator. Can’t end with backslash. Can’t contain any of the following characters:/,:,*,?,",<,>,|,{,}
Note that changes to mapping settings don’t retroactively apply to currently synced resources. To apply new mappings, remove the existing machines or folders from the tree, then right-click your connection and perform a manual folder sync.
Mapping Modes
Mode 0: All
Matches against both machine names AND their parent folder paths.
Use case: Apply the same redirection rule regardless of whether you are matching a specific machine name pattern or folder structure.
Example: 0,*test*,Organization\Testing\AllTestResources
This example moves any machine with "test" in its name OR any machine in a folder containing "test" to the specified location.
Mode 1: ComputersOnly
Matches only against machine names.
Use case: Redirect specific machines based on naming conventions, regardless of their source folder.
Example:
1,WEB-*,Organization\WebServers
1,DB-*,Organization\DatabaseServers
1,*-PRD-*,Organization\Production\Servers
Mode 1: FoldersOnly
Matches against the parent folder path of the machine.
Use case: Redirect all machines from specific source folders/pools/resource groups.
Example:
2,*ProductionPool*,Organization\Production\VDI
2,*DevHostPool*,Organization\Development\VirtualDesktops
2,*/ResourceGroups/RG-HR-*,Organization\Departments\HumanResources
Processing Order and Behavior
First Match Wins: Mappings are processed in the order they appear. Once a match is found, processing stops.
Original Structure Preservation: When using FoldersOnly mode, the system maintains folder hierarchy below the matched point.
Override Behavior: Mapped paths completely override the default synchronization path.
Validation Rules
Note
If you change a folder mapping in the Sync popup, it won’t be updated for machines or folders that are already synced in the folder tree. You must first remove existing machines or folders from the tree, right-click the connection from step 1 above, and click Sync Folder to add them with the updated folder mapping settings.
Required Validations
Each mapping must have exactly 3 parameters.
Mapping Mode must be 0/*, 1, or 2 (0/* = Machines and Folders, 1 = Machines only, 2 = Folders only.)
Wildcard Pattern can’t be empty.
Target Folder Path can’t be empty
Target Folder Path can’t end with backslash
Target Folder Path can’t contain forbidden characters
Sync Folder Mappings
You can map the names of folders or FQDN of machines to a specific folder path, for greater flexibility and better organization to sync folder mappings. Sync folder mappings automatically place your synced machines and folders into specific locations in your organization tree from external AVD or EUC environments.
Use folder mappings for the following tasks:
Reorganizing imported structures: When the source platform's folder structure doesn't match your required ControlUp organization.
Consolidating resources: Move machines from multiple sources into unified management folders.
Environment segregation: Automatically separate production, development, and test resources.
Compliance requirements: Ensure specific machines are placed in folders with the appropriate security policies.
Folder mappings are a flexible and powerful method to organize synchronized machines according to your organizational needs. By understanding the mapping modes, validation rules, and best practices, you can maintain clean, logical folder structures that enhance management efficiency and support compliance requirements.
Folder Mapping Format: <MappingMode>,<WildcardPattern>,<TargetFolderPath>
Important!
If any target folder path specified in a folder mapping doesn’t already exist, the sync will automatically create the target folder in your organization tree.
Configure Sync Folder Mappings
To configure sync folder mappings:
In the Mappings tab Folder mappings text box, enter folder or machine mapping patterns as needed. Consider this example:
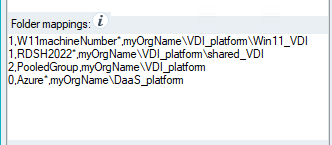
Line 1 places all machines matching the pattern “W11machineNumber*” to the folder path “myOrgName\VDI_platform\Win11_VDI”
Line 2 places all machines matching the pattern “RDSH2022*” to the folder path “myOrgName\VDI_platform\shared_VDI”
Line 3 places all folders matching the pattern “PooledGroup” to the folder path “myOrgName\VDI_platform”
Line 4 places both all machines and all folders matching the pattern “PooledGroup” to the folder path “myOrgName\DaaS_platform”
Click OK in the Sync popup and click OK in the Cloud Connection popup.
Right-click the connection from step 1 and click Sync Folder. The folder or machine is added to the new folder path under your Cloud Connections Sync folder. All machines under the same delivery group (Citrix), resource group (AVD), or desktop pool (Horizon) will be synced to this folder.
Best Practices
Order mappings from specific to general, for example:
1,WEB-PRD-01,Organization\Critical\WebServers
1,WEB-PRD-*,Organization\Production\WebServers
1,WEB-*,Organization\WebServers
Use consistent naming conventions:
Establish clear naming patterns in source systems
Document your mapping strategy
First test mappings in non-production environments
Avoid overlapping patterns
Instead of:
1,*-PROD-*,Organization\Production
1,WEB-PROD-*,Organization\WebServers
Use:
1,WEB-PROD-*,Organization\Production\WebServers
1,*-PROD-*,Organization\Production\Other
Regular review and maintenance:
Periodically review mappings for relevance
Remove obsolete mappings
Update mappings when naming conventions change
Sync Non-domain Joined AVD Machines
To sync non-domain joined AVD machines with your folders:
Right-click on a connection under your organization folder, select Add, and click Cloud Connection.
Enter the Tenant ID, select the Credentials of the non-domain joined AVD machine you want to join, and click Add.
Select a machine to add as a data collection agent:
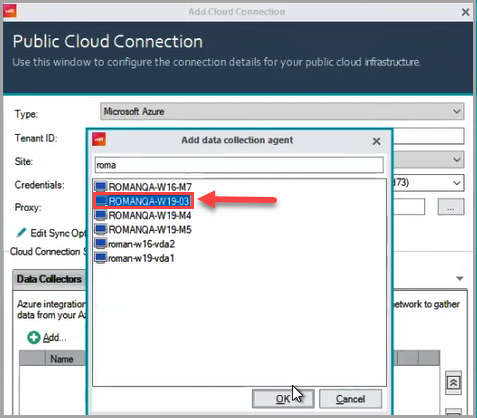
Click OK in the Add data collection popup and click OK in the Cloud Connection window.
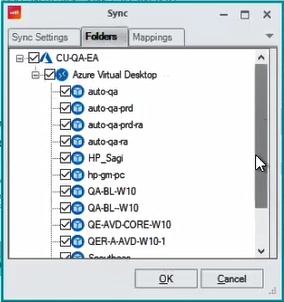
The Cloud Connection popup confirms the discovery of one Azure subscription, click OK in the Sync window and click OK in the Cloud Connection window. The new cloud connection appears under your Cloud Connections folder.
To verify that all child folders have been added, after the new cloud connection connects, right-click on it, select Connection Settings, click Edit Sync Options, and click the Folders tab. The connection is populated with the child folders:
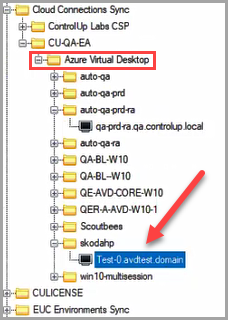
Click OK in the Sync window, click OK in the Cloud Connection window, right-click the connection from step 1 above, and select Sync Folder. The Cloud Connections Sync folder is populated with the non-domain joined AVD machine showing the DNS suffix:

Sync DNS Mappings
AVD
For AVD environments, you can set a default target DNS for all AVD session hosts, regardless of their internal Azure DNS suffix. To set a default target, create a mapping and leave the source suffix blank, before the comma separating it from the target DNS. For example:
,your.target.dns
DNS mappings allow you to standardize or alter the target DNS suffix for your synchronized machines, which is particularly useful for overriding the internal Azure DNS suffix in AVD environments.
DNS Mapping Format: <MappingMode>,<WildcardPattern>,<TargetDNS>
To set a default target DNS for all session hosts, leave the source suffix blank before the comma: ,your.target.dns
Example:
0, Test, avdtest.domain
2, scoutbees, scoutbees.com
Line 1 changes the DNS entry for all machines and folders containing "Test" to "avdtest.domain".
Line 2 changes the DNS entry for folders containing "scoutbees" to "scoutbees.com".
Configure DNS Mappings
In the Mappings tab DNS mappings text box, enter folder or machine mapping patterns as needed. Consider this example:
.png)
Line 1 changes the DNS entry for all machines and all folders matching the pattern “Test” to “avdtest.domain”.
Line 2 changes the DNS entry for all machines and all folders in the folder “scoutbees” to “scoutbees.com”.
Click OK in the Sync popup and click OK in the Cloud Connection popup.
Right-click the connection from step 1 and click Sync Folder. The folder or machine is added under your Cloud Connections Sync folder:
Sync Site Mappings
Note
If you change a site mapping in the Sync popup, it won’t be updated for machines or folders that are already synced in the folder tree. You must first remove existing machines or folders from the tree, right-click the connection from step 1 above, and click Sync Folder to add them with the updated site mapping settings.
You can map the names of folders or FQDN of machines to ControlUp Monitor sites. Add a comma as a separator, followed by the name of a ControlUp site.
Configure Site Mappings
In the Mappings tab Site mappings text box, enter folder or machine mapping patterns as needed. Consider this example:
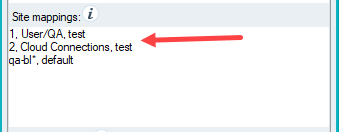
Line 1 places all machines matching the pattern “User/QA” (such as org/User/QA/Ctx-Cloud-01) to the test site.
Line 2 places all folders in the folder “Cloud Connections” to the test site.
Line 3 places all machines and all folders matching the pattern “qa-bl*” (such as qa-bl01) the default site.
Click OK in the Sync popup and click OK in the Cloud Connection popup.
Right-click the connection from step 1 and click Sync Folder. The folder or machine is added under your Cloud Connections Sync folder.
To verify that the folders or machines have been added to the site, in the Data Sources tab of the Sites and Monitors - Configuration Wizard, open the site populated with the mapped folders or machines under the Cloud Connections Sync folder.
Change Synchronization Interval via PowerShell
Important
Be aware that setting a lower synchronization interval may increase the performance overhead on the ControlUp Monitors.
The Real-Time DX Console allows setting the synchronization interval to a minimum of one hour. If you require more frequent synchronization for your AVD or EUC environments, this can be accomplished using the Set-EUCSyncConfig cmdlet.
Log in to one of your ControlUp monitors and open a PowerShell prompt.
Import the ControlUp PowerShell User module by running the following cmdlets:
$pathToUserModule = (Get-ChildItem "C:\Program Files\Smart-X\ControlUpMonitor\*ControlUp.PowerShell.User.dll" -Recurse | Sort-Object LastWriteTime -Descending | Select-Object -First 1).FullNameImport-Module $pathToUserModuleExecute
Get-EUCSyncConfigto review your current sync configuration.Identify and copy the ExtensionObjectId of the extension you like to configure.
Use the copied ObjectGuid in the following cmdlet, setting the Interval to your desired value in minutes (minimum value is 5 minutes):
Set-EUCSyncConfig -ObjectGuid "e2ca240f-6f15-4c55-9e72-55b0c262ee0d" -Interval 5Wait approximately one minute, then open the Sync Config in the console to verify the update. The Interval value should now be grayed out.
Note
After modifying the interval via PowerShell, any subsequent changes must also be made through PowerShell.
Sync Folder Mappings Troubleshooting
To troubleshoot folder mapping issues, enable debug logging for the sync operations:
Log4net Configuration
Add the following logger to your log4net configuration:
<logger name="SmartX.ControlUp.Client.FolderTreeSync">
   <level value="DEBUG"/>
   <appender-ref ref="RollingFileAppender"/>
</logger>
With debug logging enabled, the logs will show the following:
Folder Mapping Application
"Applying next folder mappings: Mode: [mode], Wildcard: "[wildcard]", Path: "[path]"" (for each configured mapping)
"Folder mapping "[mode],[wildcard],[path]" is matched with Machine "[name]" by machine name. (New projected path: "[path]")." (for ComputersOnly matches)
"Folder mapping "[mode],[wildcard],[path]" is matched with Machine "[name]" by folder path. (Old projected path: "[old]", New projected path: "[new]")." (for FoldersOnly matches)
"Folder mapping "[mode],[wildcard],[path]" is not matched with Machine "[name]" (Projected path: "[path]")." (when no match)
Common Mistakes
Using forward slashes: Always use a backslash
\in folder paths.Trailing backslashes: Remove any backslash at the end of paths.
Case sensitivity assumption: Patterns are case-insensitive.
Multiple wildcard usage: Keep patterns simple.
Not checking logs: Debug logs provide exact details of why mappings did or didn't match.
Common Validation Errors
Error: "Invalid folder mapping"
Cause: Incorrect number of parameters
Solution: Ensure each line has exactly 3 comma-separated values
Error: "Invalid sync mode"
Cause: MappingMode is not 0, 1, or 2
Solution: Use only valid mode values
Error: "Path contains invalid characters"
Cause: Using forbidden characters in the path
Solution: Remove characters such as
/,:,*,?,",<,>,|,{,}