The following article includes the manual procedure for running the script outlined in Certificate-Based Agent Authentication. This information gives you the details of what happens on each of your console and monitor machines when you run the automated script, in case you want to troubleshoot the procedure or go through all the steps manually.
First read through Certificate-Based Agent Authentication to be sure you have all the prerequisites listed and that you create the certificates as recommended.
You have to complete these manual steps for every machine or location running the ControlUp Console and the ControlUp Monitor.
Apply Private Key Certificate to the Machines Running the ControlUp Console and Monitors
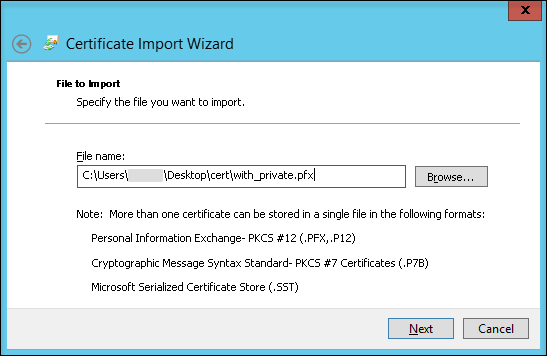
- Ensure the private key (.pfx file) you created is copied onto the machines running the ControlUp Console and Monitors, and that you have the password for the certificate stored in this file.
- Access the directory with the private key and double click the .pfx file. The Windows Certificate Import Wizard opens.
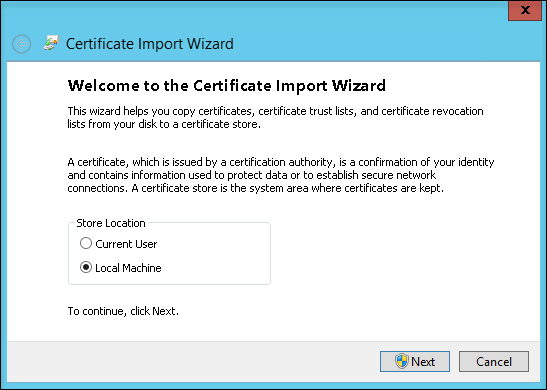
- Select Local Machine and click Next.
Note You can select the Current User option if you want to require a certificate for each user separately for this console. - Confirm that the selected .pfx file is correct and click Next.
- Enter the private key password and click Next.
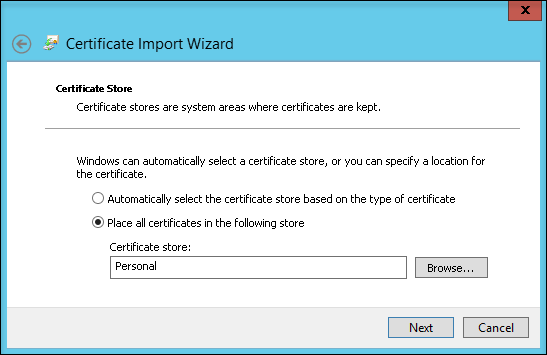
- Store the certificate. Select Place all certificates in the following store and click Browse to select the Personal directory to store it there. Click Next.
- In the next window, click Finish. The Certificate Import Wizard confirms that the import was successful.
Configure Registry Key on the ControlUp Console and Monitor Machines
For the console and monitors to start using a client-side certificate, a registry configuration is required. The registry can be configured either under the HKCU or HKLM registry hives for the console and under the HKLM for the monitors. Each hive refers to the appropriate certificate store.
Once you complete creating this registry key, you can export it to be used on any other ControlUp Console machines and the Monitor machines.
- On the console machine, open the Registry Editor and go to: HKLM/SOFTWARE/Smart-X/ControlUp/ClientCert
Missing keys must be created manually. - Create a DWORD value named Enabled and assign it the value of 1.
- Create a string value (REG_SZ) named Thumbprint and assign it the same value as assigned in the Thumbprint in the private key certificate.
You can find the Thumbprint in the private key certificate as follows.- Access the Microsoft Management Console (mmc).
- Choose File > Add/Remove Snap-in
- Select Certificates from the Available Snap-ins list and click Add > for it to appear in the Selected Snap-ins list.
- When prompted, select Computer account, and click Next, and then Finish.
- Click OK to close the Add or Remove Snap-ins window.
- Open the Certificates item and go to Personal > Certificates.
- Locate the .pfx certificate file you imported. Double-click the file and open the Details tab.
The Thumbprint field is shown in the list as follows: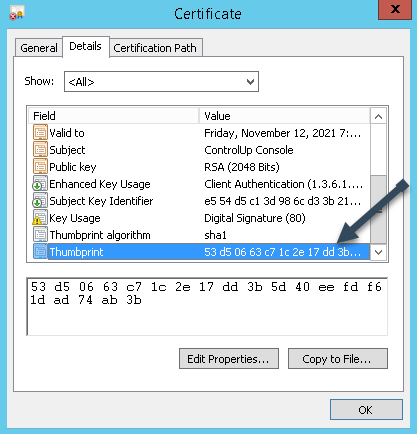
- Highlight the Thumbprint. In the details box, highlight the thumbprint sequence value and copy it into a Unicode text editor such as Notepad ++.Note
If the sequence if not maintained as Unicode, it may not work when added to the registry key.
- Copy the Thumbprint value into the registry key you created above. It should look like this:
Add Network Service to the ControlUp Monitor Machine Private Key
All the machines running ControlUp Monitors in your environment must also have this private key certificate file and the registry key you created above.
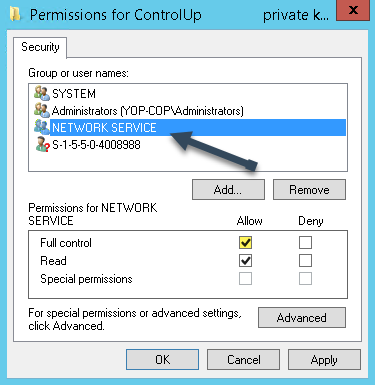
Additionally you must add the Network Service to the Security table for the certificate applied to the monitor machines. This is because the monitor runs in the context of the Network Service account.
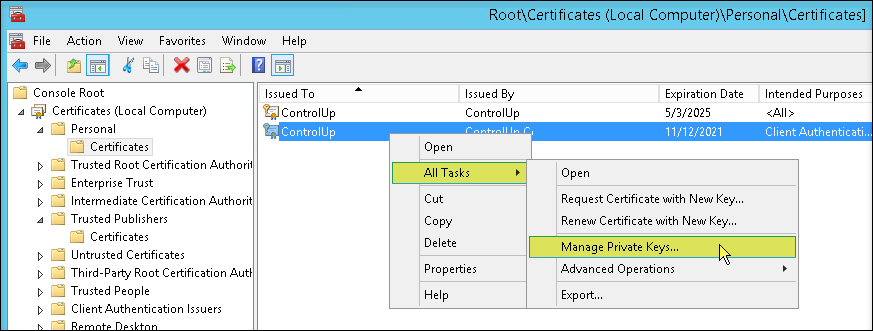
- Access the Microsoft Management Console (mmc).
- Open the Certificates item and go to Personal > Certificates.
- Right-click the private key you applied to this machine per the above procedure. Select All Tasks > Manage Private Keys...
 NoteIf you have a non-standard deployment, you may have to search for the private key file.
 - Add the Network Service to the Security table allowing Full Control (default option).
- Restart the monitor machine.
Once you have completed this stage of the procedure, restart the ControlUp Real-Time Console. When you log into the console, you should see a Certificate icon displayed at the bottom of the console window.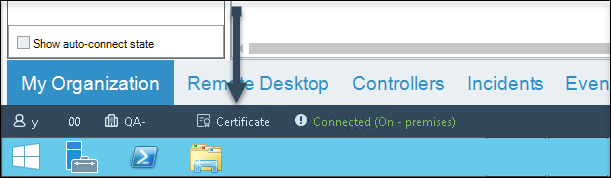 You should repeat this for every machine running the ControlUp Real-Time Console. You can export the registry configuration and import it to the other machines running the console and the monitors.
You must now configure the ControlUp Agent machines per the instructions in this article: Certificate-Based Agent Authentication.
Troubleshooting
If you receive a "CryptographicException" error, see here.