To monitor and manage ChromeOS devices, you must deploy a browser extension that acts as an Agent. Optionally, you can also set up Google Cloud connections for additional data collection and to support running power actions (reboot, factory reset, and clear user profiles) on ChromeOS devices from ControlUp.
ControlUp also supports montoring client metrics from ChromeOS devices connected to Citrix environments. Read ChromeOS Remote DX Installation to learn more.
Prerequisites
- Supports ChromeOS and ChromeOS Flex devices
- ChromeOS Enterprise Upgrade
Install and configure the browser extension
You must deploy the ControlUp DEX browser extension for ChromeOS and configure the Chrome policies described in this section.
-
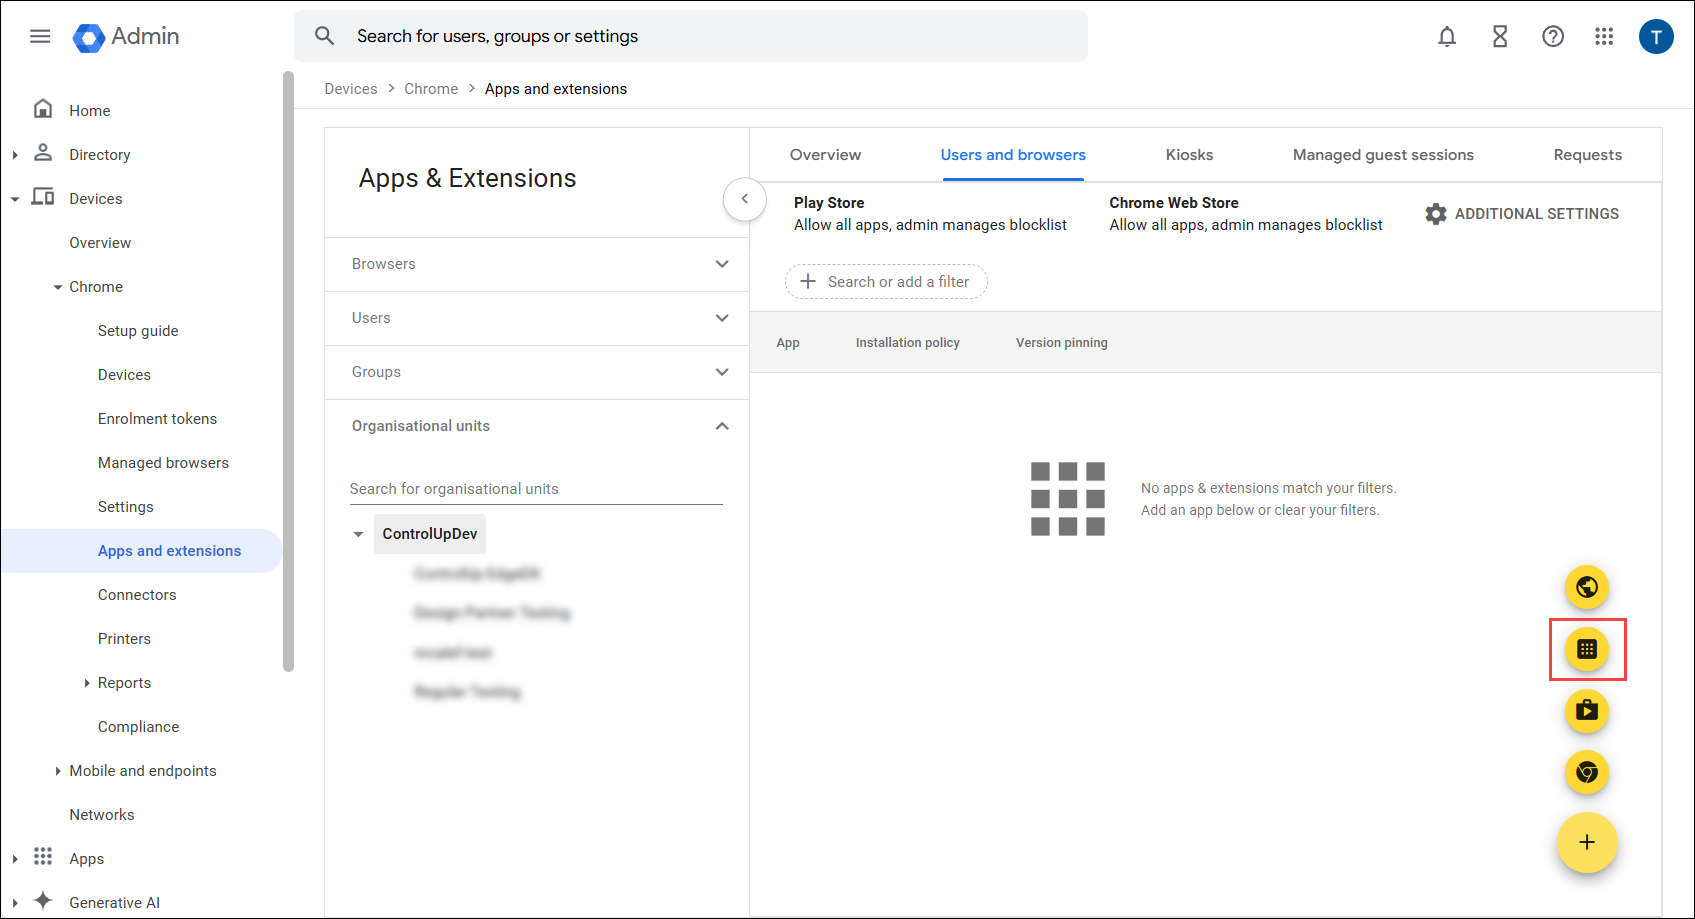
In the Chrome Admin console (admin.google.com), go to Devices > Chrome > Apps and extensions.
-
Select the organizational unit that contains the devices on which you want to deploy the extension.
-
Click the type of extension you want to add (Users and browsers, Kiosks, or Managed guest sessions), and select to add an extension by ID.
-
Add the following extension ID from the Chrome Web Store:
cmllcafpnpcfnappeekbmjbellnlcoea -
Set the Installation policy of the ChromeOS DEX extension to Force-installed so that the extension is installed on all devices in the selected organizational unit.
-
Configure the extension to connect to your ControlUp tenant:
- In the ControlUp Agent Downloads page, go to ChromeOS, and copy the JSON configuration. The JSON contains your unique tenant name and device registration code.
- In the Google Admin console, open the configuration for the browser extension and paste the JSON in the Policy for extensions field.
Read Google's documentation about app/extension deployment to learn more.
Configure Chrome policies
To access Chrome policy configuration, open the Admin console and go to Devices > Chrome > Settings. Make sure you apply the policies to the correct organizational units.
Read Google's documentation about Chrome policies to learn more.
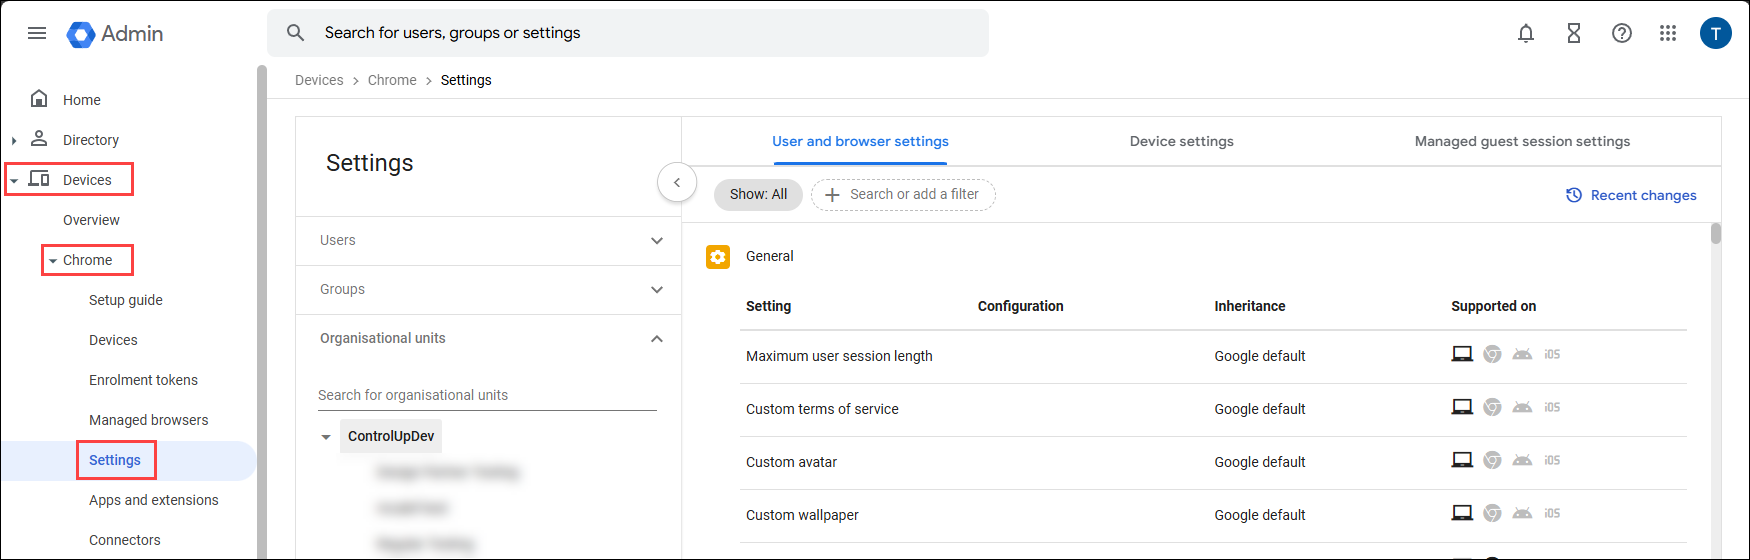
User and browser or Managed guest session settings
Depending on your ChromeOS deployment scenario, configure the following settings under either the User and browser settings or Managed guest session settings tab.
| Category | Setting | Configuration |
|---|---|---|
| Hardware | Enterprise hardware platform API | Allow managed extensions to use the enterprise hardware platform API |
Device settings
Configure the following settings under the Device settings tab.
| Category | Setting | Configuration |
|---|---|---|
| User and device reporting | Report device OS information | Enable all OS reporting |
| User and device reporting | Report device hardware information | Enable all hardware information reporting |
| User and device reporting | Report device telemetry | Enable all telemetry reporting |
| User and device reporting | Device status report upload frequency | 60 minutes |
Set up Google Cloud connections
Optionally, you can connect to Google Cloud with OAuth to get additional data such as hardware model, serial number, CPU model, disk info, and the active user. This connection is also required to perform power actions on ChromeOS devices from ControlUp (reboot, factory reset, and clear user profiles). You can also subscribe to Google Pub/Sub to get real-time data about drops in Wi-Fi signal.
We recommend you set up both connections to get the most data. These connections might also be required for upcoming features and additional data collection.
Step 1 - Create a service account
In the Google Admin console (admin.google.com), create a service account with the role Super Admin. You'll need to authenticate with this account during a later step.
You must also configure the following Chrome security settings so that you need to authenticate with the service account only once:
- In the Google Admin console, go to Security > Access and data control > Google Cloud session control.
- Based on your preference, perform one of the following steps:
- Select Never require authentication.
- Select Require reauthentication, and then select Exempt trusted apps. If you choose this method, then you must perform the steps in this Google article to designate the ControlUp DEX Platform extension as a trusted app.
Step 2 - Configure Pub/Sub in the Google Cloud console
You can skip this step if you don't want to configure Pub/Sub, but you won't get real-time data when devices experience a drop in Wi-Fi signal.
- Go to the Google Cloud console (console.cloud.google.com) and create a new project for the ControlUp connector (you can also use an existing project, depending on your preference).
- Go to IAM & Admin > Organizational policies.
- Search for the policy Domain restricted sharing and make sure it is set to Allow all. Read Google's documentation about organization policies to learn more.
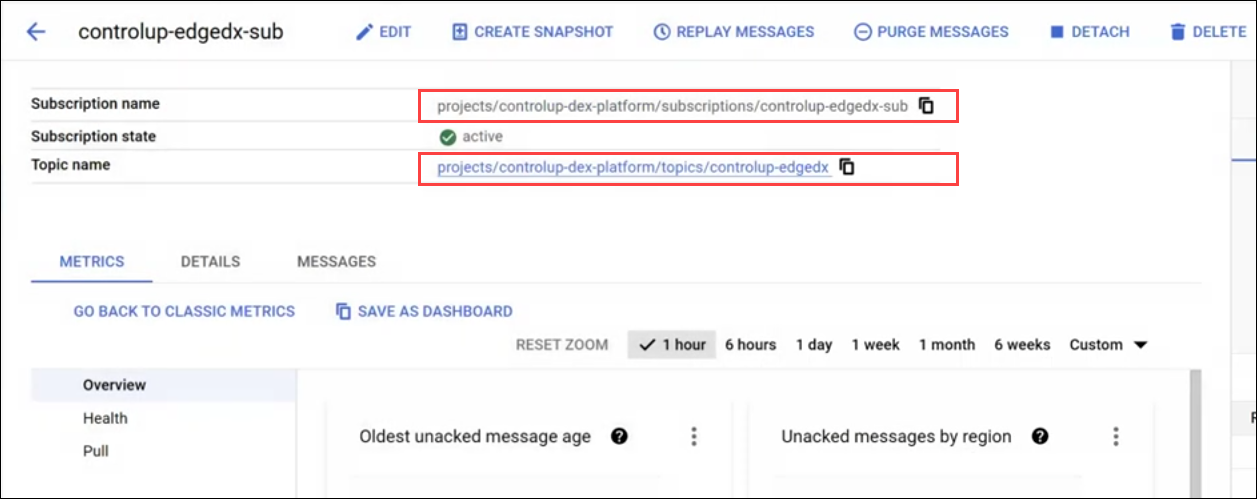
- Go to the Pub/Sub Topics page and click Create topic.
- Leave the default topic settings enabled and click Create.
- Set access controls for the topic:
- In the Permissions tab, click Add principal.
- Add the principal
cloud-pub-sub-publisher@chrome-reporting.iam.gserviceaccount.com. - Assign the role Pub/Sub Publisher.
- Click Save.
- Set access controls for the subscription:
- Click on the subscription that was automatically created when you created the topic.
- In the Permissions tab, click Add principal.
- Add the principal of the service account you created for the connection.
- Assign the roles Pub/Sub Viewer and Pub/Sub Subscriber.
- Click Save.
Take note of the Topic name and Subscription name. You'll need these in the next step.
By default, subscriptions expire after 31 days of inactivity. You might want to edit the subcription and increase the expiration period, or set it to never expire, to ensure that the ControlUp connection remains active. Learn more.
Step 3 - Add connection details in ControlUp
-
In ControlUp, go to Devices > Configuration > Settings > Connectors > Google.
-
If you chose to configure Pub/Sub in the steps described above, paste the Topic name and Subscription name.
-
Click Configure using OAuth2 and sign in using the service account.