Version 8.8 Feature
The following article describes a featute available only in ControlUp Real-Time DX version 8.8 or 8.8 MR.
Version 9.1
From version 9.1, we recommend that you enable Independent Sites mode instead of multi-tenancy mode.
The ControlUp Real-Time DX Console supports multi-tenancy environments where tenants manage their own infrastructure within their own domains. This isolation between the MSP and tenants ensures that tenants can maintain control over their own data and applications without concerns about interference or unauthorized access from other tenants.
Read the following article to learn about the concept of a single-tenant deployment type. In this setup, all tenants connect to the same ControlUp organization, and segregation of ControlUp Monitors and data sources is ensured by monitor sites.
ControlUp On-Premises
To set up tenant domains in ControlUp On-Premises (COP), see COP: Create MSP Tenant Domain.
Prerequisites
ControlUp version 8.8 or 8.8 MR.
A general prerequisite for the monitor cluster is that monitors in the Default Site (Management Network) need to be able to resolve the FQDN of all tenant monitors and must have bidirectional connectivity over TCP port 40706. See below below for more information.
In a Nutshell
There is a network separation between tenant domains a.local and b.local, meaning they don't have visibility or connectivity to each other.
The only component that leaves the tenant network and connects to the management network is the ControlUp Monitors, see below.
Outbound Internet connectivity from the console and monitors still apply in multi-tenancy mode.
Each tenant is organized as a monitor site. This means that the MSP needs to create a site for each tenant.
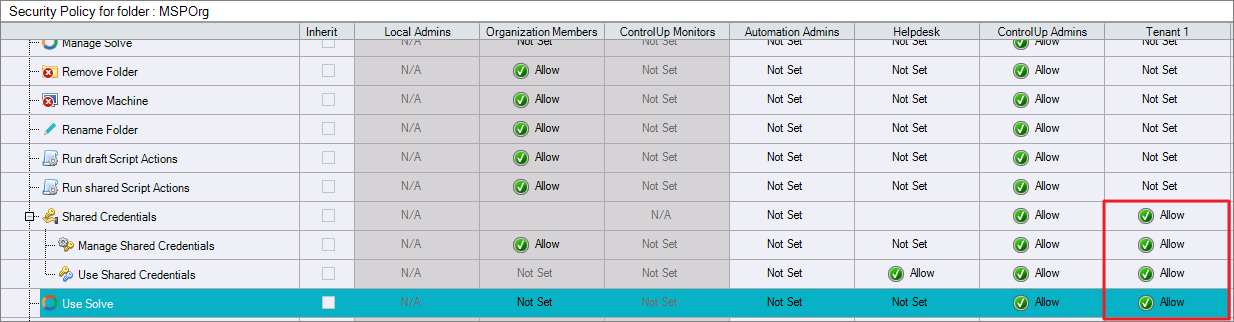
The service provider must ensure that the Security Policy is configured accordingly. Tenant permissions for viewing data are managed via the View Folder permission in the Security Policy. We recommend configuring each tenant under a separate folder in the organizational tree.
If you configure the Security Policy accordingly (see Step 6), VDI in DEX will only display tenant data relevant to each specific tenant.
Architecture Overview
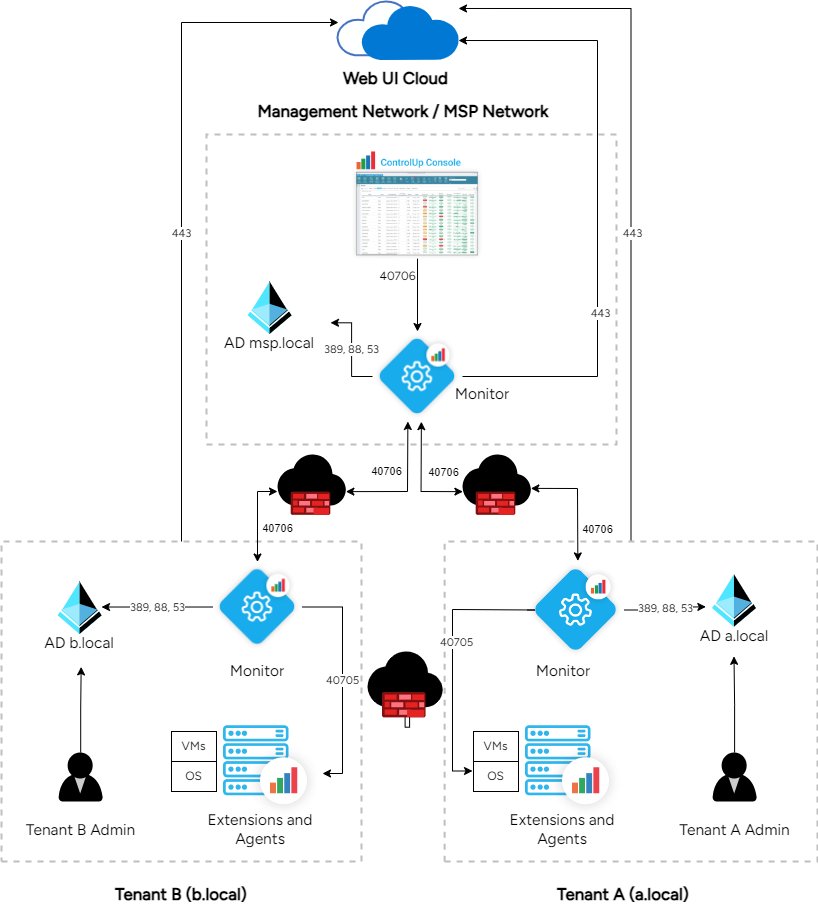
Required Inbound / Outbound Rules
Source | Destination | Protocol / Port |
|---|---|---|
ControlUp Console | ControlUp Monitor | TCP 40706 (RPC, WMI) |
ControlUp Console / Monitors | ControlUp Agent | TCP 40705 |
ControlUp Console / Monitors | ControlUp Cloud Server | TCP 443 |
ControlUp Console / Monitors | Primary Domain Controllers, other Domain Controllers | TCP 389, 88, 53 |
ControlUp Console / Monitors | Extensions (Omnissa Horizon, CVAD etc.) | Various |
ControlUp Monitor | DEX | TCP 443 |
ControlUp Monitor (Management Network) | ControlUp Monitors (Tenant) | TCP 40706 (RPC, WMI) |
ControlUp Monitors (Tenant) | ControlUp Monitors (Management Network) | TCP 40706 (RPC, WMI) |
How to Set Up a Multi-Tenancy Environment
Step 1: Configure Advanced Authentication
Open the Real-Time DX Console in the management network.
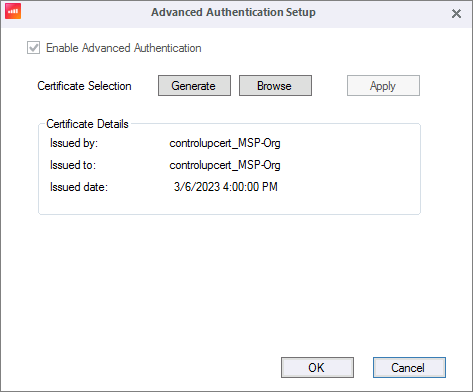
Right-click the ControlUp organization > Properties > Advanced Authentication.
Ensure that the organization uses Advanced Authentication if the Enable Advanced Authentication checkbox is grayed out. If the box is unchecked, you need to set up Advanced Authentication.
For version 8.8 only: Configure MSP Mode
Important
These steps are required only for version 8.8. If you use version 9.0 and higher, skip steps 4 and 5.
Remove Monitors: After enabling Advanced Authentication, remove all monitors in your ControlUp environment. This step is essential because switching to multi-tenancy mode is not possible with monitors installed.
Enable Multi-Tenancy Mode: Once all monitors have been removed, navigate to Monitoring Status > Monitors Settings > Advanced Settings, and select Enable Multi-Tenancy mode.

For versions 9.0, and higher these steps are unnecessary because the Enable Multi-Tenancy mode checkbox is deprecated. Monitors in versions 9.0 and higher no longer require connectivity to a local domain controller for authentication. In version 8.8, monitors used the domain identity for authentication. In version 9.0, each monitor uses a Monitor Access Key for authentication.
Step 2: Export the Certificate
On a machine in the management network, open the Certificate Manager (certlm.msc).
Under Personal > Certificates, right-click controlupcert_[NameOfMSPOrg] and click All Tasks > Export.
Follow the instructions on the screen and export the certificate to a file.
Copy this file to any tenant machine that runs the console.
Step 3: Import the Certificate on All Tenant Console Machines
Before linking your tenant to the multi-tenancy organization, you must import the certificate into the Certificate Store on all tenant console machines.
On the tenant machine, open the Certificate Manager by running certlm.msc.
Right-click on Personal, navigate to All Tasks, and select Import. Follow the prompts to import the certificate.
During the import process, select the Mark this key as exportable checkbox.
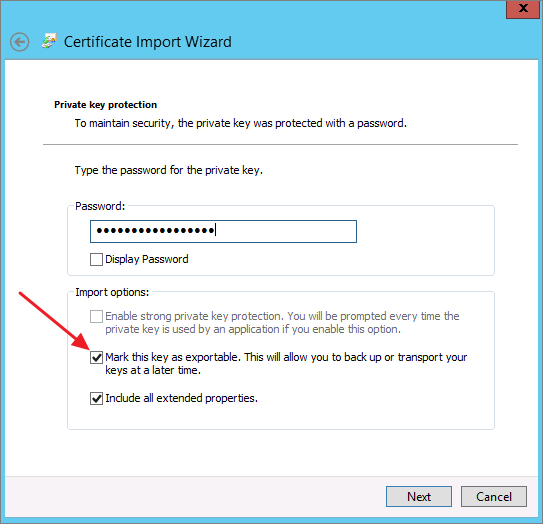
Verify that the certificate has been successfully imported.

Step 4: Connect the Tenant with the Management Organization
Open the console on the machine where you imported the certificate.
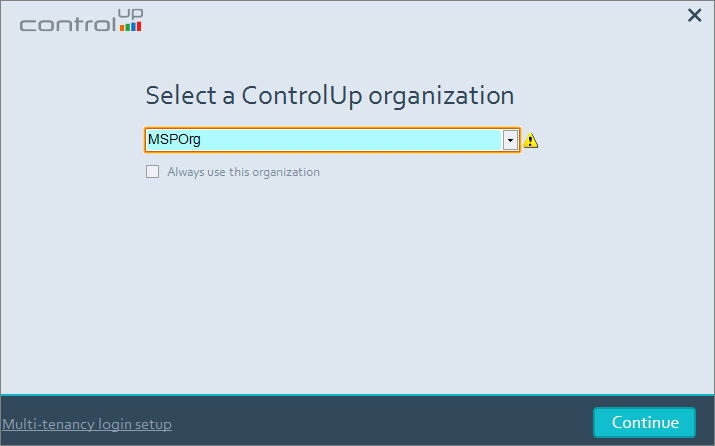
In the Select a ControlUp organization window, click Multi-tenancy login setup.

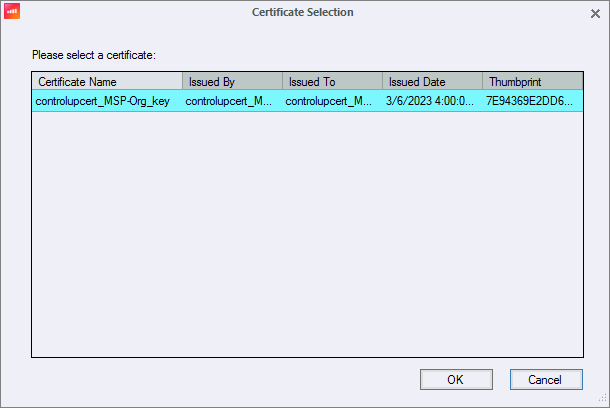
Select the certificate and click OK.
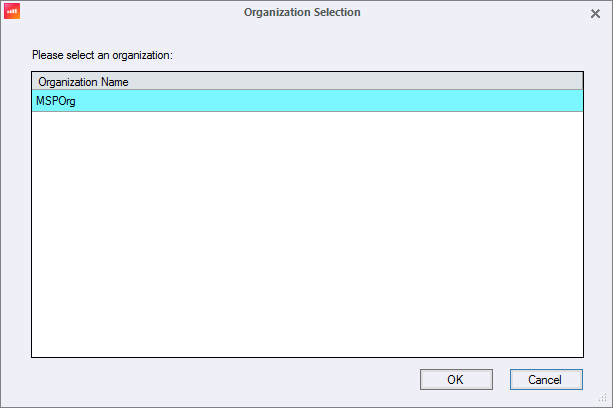
Select the management organization that this tenant belongs to and click OK.
The tenant will be linked to the Tenant in our backend, which may take about a minute. Once the tenant is linked, select the management organization and click OK again.
Enter the OTP code that you receive via email.
Step 5: Create a New Role for Each Tenant
Open the console on a management machine.
Under Security Policy, create a new role for each tenant.
Add a user or user group to the new role.
On the management machine, set the following permissions to Allow:
View Folder
Shared Credentials
Use Web Application/Solve
Step 6: Add Tenant Credentials on Tenant Machine
On a tenant machine, go to Settings > Credentials Store > Add Credentials Set.
Add the tenant user so that the multi-tenancy and tenant credentials are visible.
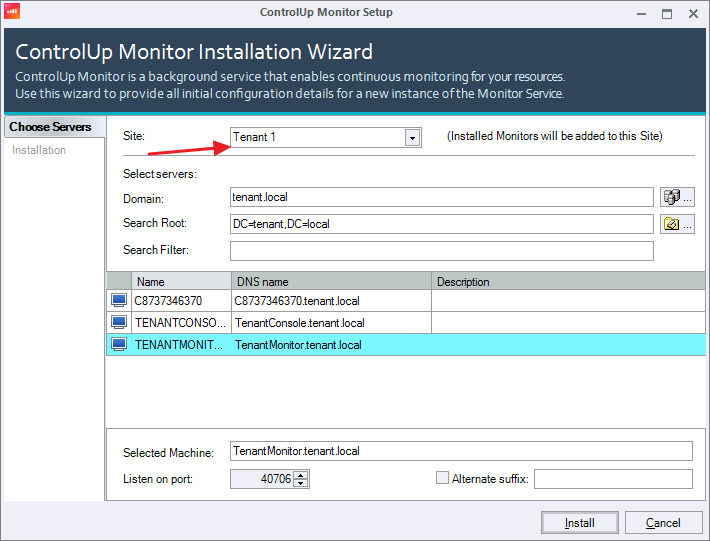
Step 7: Create a Site for Each Tenant
Create a new site for each tenant.
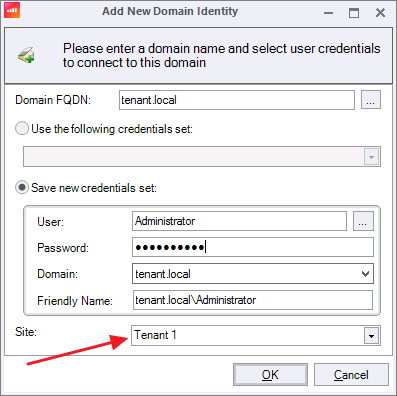
On the tenant machine, add the user account for the tenant and click OK.
Once the user that was assigned the new role is added as a row, click the Shared checkbox to make this a Shared Credential.
Step 8: Add Monitors to Sites
Each tenant (site) operates their own monitors that monitor data sources, which can include extensions or managed machines. These monitors usually reside within the specific tenant's network. Adding monitors to a site provides data segregation, ensuring that each tenant's data is isolated and managed independently.
To add monitors to a site:
On the tenant machine, click Settings > Monitors > Monitors Settings.
Under Domain Identity, click Import Console Credentials.
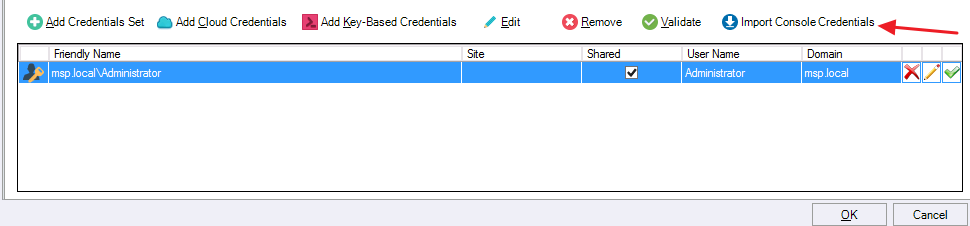
Once the credentials are imported, the Import Credentials popup shows that the import was successful. Click OK in the popup.
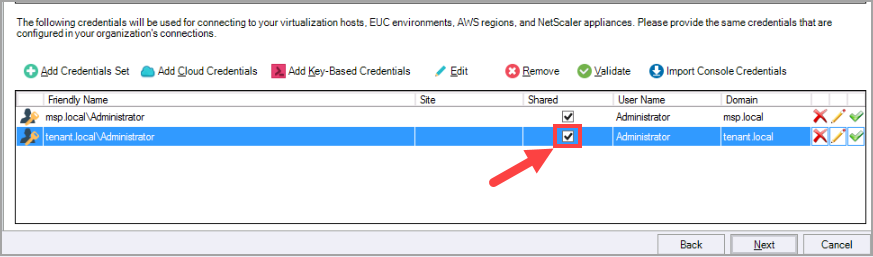
Click the credential row's Shared checkbox to make this credential a Shared Credential.

Once added, click Import AD Connection.

You can now view both management and tenant domains. Click OK.

At the top of Monitors Settings, select the tenant site and click Add Monitors to Site.

Verify the correct site appears in the Site dropdown. Select the machine on which you want to install the monitors and click Install.-
Post-Installation Tips
Assign the MSP admin the Roles Manager role
Users that are assigned the Roles Manager role are allowed to add or remove email addresses. Ensure that only the MSP admin is assigned Roles Manager, and not the tenant admin. Assigning the tenant admin with this privilege could lead to the unauthorized addition or removal of machines in the management site.
The Roles Manager has the following permissions:
Force encryption on the agent settings screen
Edit/Reset role members
Add/remove roles
Remove the View Folder Permission for Organization Members
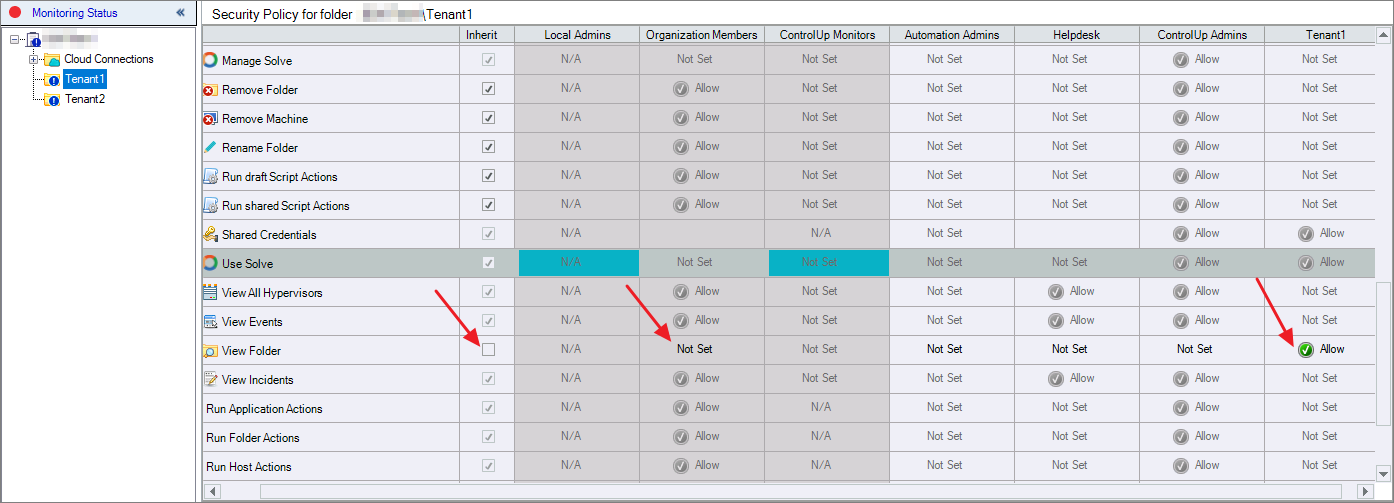
After completing the previous steps, you are now ready to add the tenant's resources to ControlUp. It is recommended to create a dedicated folder for each tenant within the organization folder and assign all managed machines to their respective folders.
For each tenant folder:
Uncheck the Inherit checkbox.
Set the View Folder permission to Allow for the tenant that should see its own folder.
Remove the View Folder permission for the Organization Members role.
Troubleshooting
Monitors unable to connect to the backend
If monitors throw an error such as Failed to authenticate using advanced authentication, check the following:
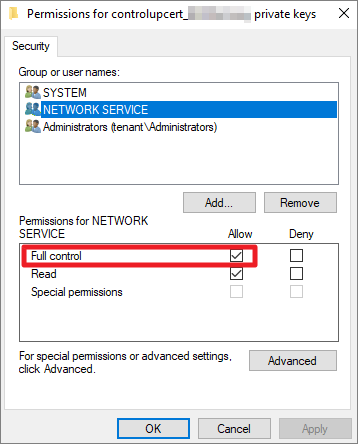
In the registry on your monitor machine, ensure that the value AdvancedModeCertificate located in S-1-5-20\Software\Smart-X\ControlUp\MonitorSvc contains the thumbprint of the certificate.
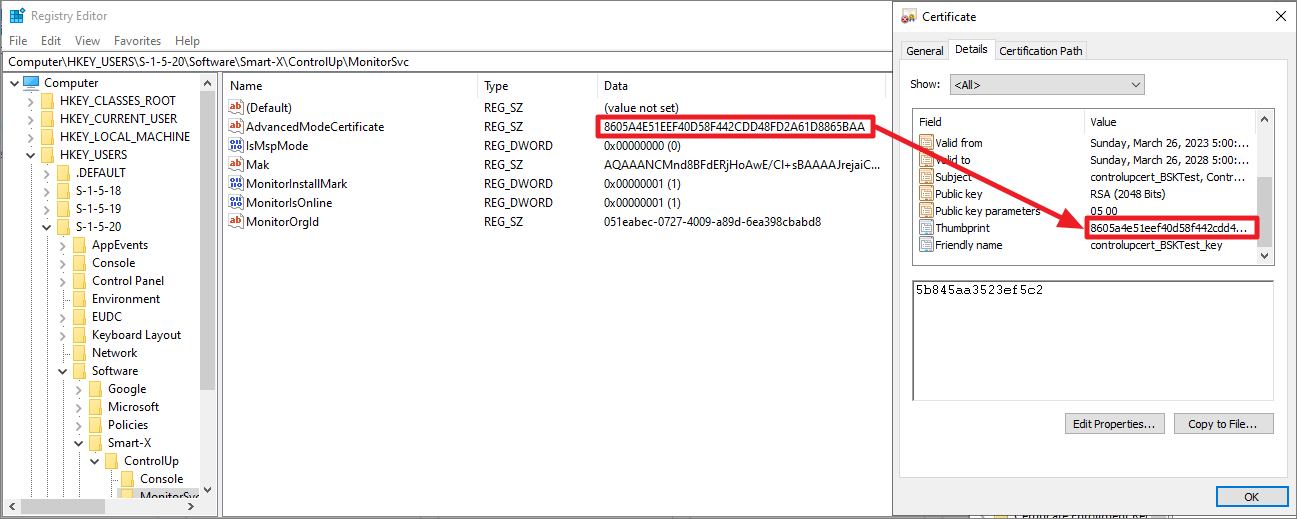
Additionally, ensure that the NETWORK SERVICE account has Full control permissions for the private key associated with the certificate. This is required because the ControlUp Monitors run with the NETWORK SERVICE account and need to be able to read the certificate. You can find more information here.