Custom Hive version
To use this Scout, make sure your Hives are updated. The latest Hive version is always recommended.
The Web Transactions Scout simulates a user's interaction with a SaaS application (or any website). While performing the predefined interactions, the Scout checks if the website is working as expected and can detect errors such as slow loading times.
A test is made up of steps that define what the Scout does on the web page. You can choose from many different types of steps, and use element locators to control where the step is performed.
For example:
Load the web page
Step 1: Wait until the username and password fields appear
Step 2: Enter the username
Step 3: Enter the password
Step 4: Click Sign In
Step 5: Perform some action on the web page
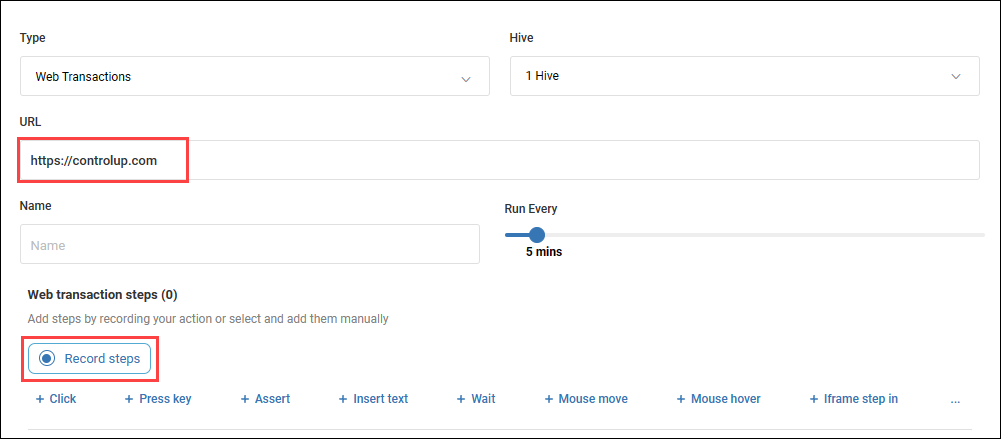
Create a Web Transactions scout
Go to Create Scout > Applications and select Web Transactions as the Scout type.
In the Hives field, select one or more locations from which you want to initiate the test.
Enter the URL of the website to begin the web transaction. The Scout loads this website at the beginning of each test. After the page is loaded, the Scout performs the steps that you define.
Enter a Name for the Scout.
Using the Run Every slider, choose how often you want the Scout to perform the test. You can choose any interval from 5 to 60 minutes, in increments of 5 minutes (5, 10, 15, 20 and so on).
Define the workflow to perform on the website. You can either:
Click Record Steps and use our browser extension to interactively record a workflow. This is the recommended method. Click here to learn how to record your steps.
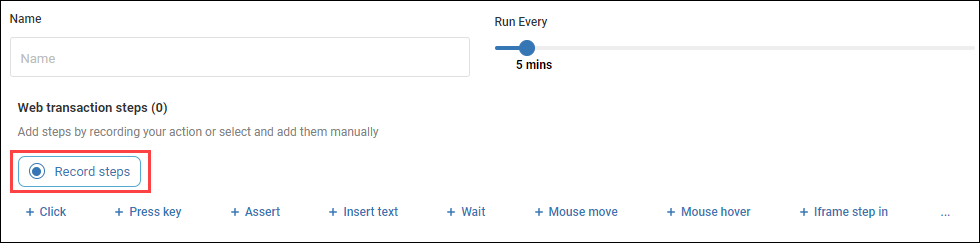
Manually add steps and configure the parameters for each step type. Click here to learn how to get element locators. Read Step Types above to learn how to configure each step.
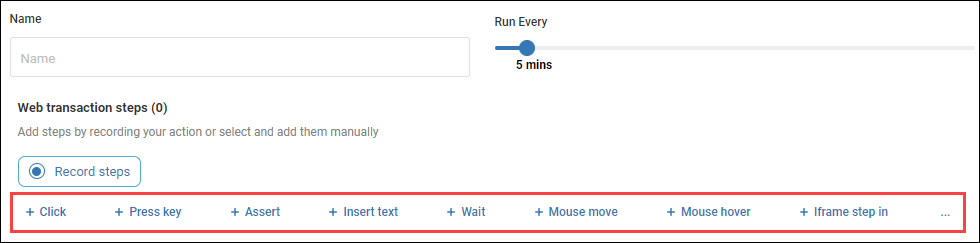
Clicking the vertical 3-dot menu to the right of the Iframe step in opens a list of additional steps.
Note
The maximum number of steps is 50. You can rearrange the order of steps, delete steps, and insert steps using these buttons: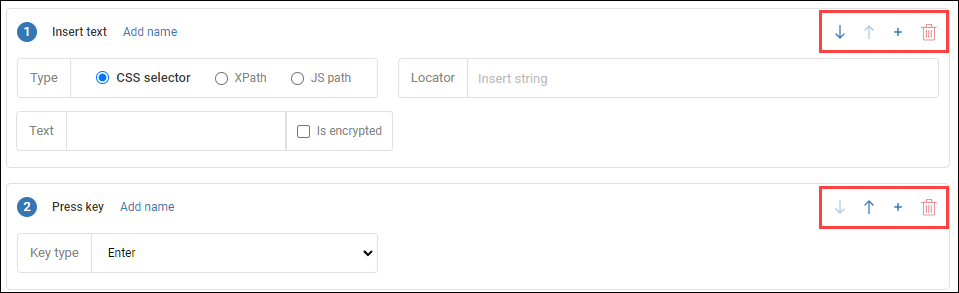
Optionally, add Tags to your Scout. Tags are key-value pairs which can be used to organize your Scouts. To learn more about tags, visit Centralized Tags Management.
Click Show additional parameters to configure the following:
SSL Verify. Sets whether to check for a trusted SSL certificate on the website. If you select Yes and the certificate isn't trusted, then the test fails.
Success Codes. Sets which HTTP status codes the Scout considers a successful response. If the status code of the website is not one of the selected options, then the test fails.
Screen size. Sets the resolution used when testing the website.
Overall transaction timeout. Sets the timeout duration for the entire test, including the initial page load and all steps. if this duration is reached before all steps are completed, then the test fails.
Click Test to test the current Scout configuration. You should test the Scout frequently when you are adding steps to make sure that the step logic and element locators are working correctly.
Click Save and optionally configure an alert policy before saving the Scout. Learn more about alert policies.
Note:
Web Transaction scouts support any authentication flow that takes place on a web browser (standard web authentication), unlike the specific API integrations in EUC scouts.
Step types
This table describes the types of steps you can use to perform different actions on a website.
Step Name | Description | Parameters you need to set |
|---|---|---|
Click | Clicks on an element on the webpage. The Scout waits until the element is Visible and enabled on the page before clicking on it. |
|
Press key | Sends a key press to the website. |
|
Assert | Checks whether the text in an element matches the conditions you specify. The Scout waits until the element is visible on the page before checking the text. If the text matches your conditions, then the test continues to the following step. If the text doesn't match, then the test fails. |
|
Insert text | Inserts text in an element. The Scout waits until the element is visible on the page before entering text. |
|
Wait | Waits until an element meets a specific condition before proceeding to the next step. If the selected element does not meet the condition before the timeout duration, then the test fails. |
|
Mouse move | Moves the mouse cursor on the page. This might be needed to "wake-up" an element and make it visible on the screen. | Nothing to configure. |
Mouse hover | Hovers the mouse cursor over an element. The Scout waits until the element Exists on the page before hovering over it. You can use this if you need to hover over a menu to see more options. |
|
Iframe step in | Enters an Iframe on the web page. The Scout waits until the Iframe is available to be entered before performing the step. You might need to perform this step to be able to interact with elements within the iframe. |
|
Iframe step out | Exits out of the currently selected iframe on the web page. | Nothing to configure |
Switch Tab | This feature is supported only from Custom Hive version 1223. It is applicable only when the Scout opens a new tab during a transaction. Subsequent steps execute on the selected tab. If the scout executes the 'Switch Tab' step when there is only one tab in the browser, the Scout stays on the current tab and continues the test . | The feature is listed as a selectable step in the Web Transactions Scout step menu.
|
MFA (Multi-Factor Authentication) | MFA allows you to test websites and apps that require an additional security layer. To use one of the MFA types, select it from the drop-down list. There are some restrictions on the use of MFA:
| These are the required configuration inputs for each MFA type:
For more information on the MFA types, see below. |
MFA types
SMS
A phone number is assigned to your service account. On this number, the account receives an SMS with a passcode from your MFA provider. The Scout enters this code when accessing the website/app.
To configure SMS MFA:
Contact ControlUp Support to set up a phone number for a service account.
Set the MFA type to SMS.
Select the phone number that has been assigned to the user credentials that you entered in one of the previous steps in the Scout.
Select the Locator type and string. This identifies the location where the user enters the SMS code during authentication. To get the locator, see
Manually configure steps using element locators below.
Voice Call
A phone number is assigned to your service account, to receive a voice call.
To configure voice call MFA:
Contact ControlUp Support to set up a phone number for a service account.
Set the MFA type to Voice Call.
Select the phone number that has been assigned to the user credentials that you entered in one of the previous steps in the Scout.
Enter the Locator type and string. This identifies the website element shown on the web page when the voice call authentication succeeds.
.PNG)
TOTP Code
To use the TOTP Code MFA type, your service account's MFA needs to be assigned to a TOTP provider which allows access to its TOTP seed. Using the seed, the Scout generates a one-time passcode and enters it during the authentication process.
To configure TOTP Code MFA:
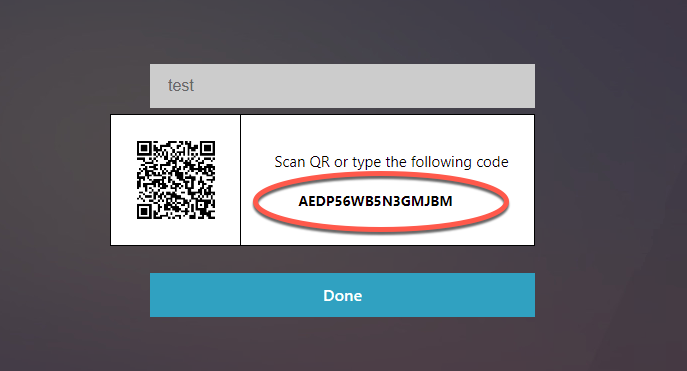
Extract the TOTP seed from your MFA provider by scanning the barcode. The TOTP seed might look like this:
For help with receiving your TOTP seed, or to setup a custom MFA provider and assign it to your service account, contact ControlUp Support.
Enter the TOTP seed that is associated with the service account from your MFA provider (as shown in step 1).
Enter the Locator type and string. This identifies the location where the TOTP passcode is to be inserted.
.PNG)
Static PIN
You can configure your website/app service account to use a static passcode that never changes. Set the MFA type of the Scout to Static PIN and enter the passcode. The Scout always uses this code when accessing the website/app.
To configure static PIN MFA:
Set the MFA type to Static PIN.
Enter the static passcode that you configured for the service account.
Enter the Locator type and string. This identifies the location where the Static PIN is to be inserted.
.PNG)
Record your steps interactively
Video tutorial
Click here to watch a video on how to use the web transaction browser extension to record steps interactively via sideloading.
Sideloading means installing software or applications on a device from a source other than the manufacturer’s approved official app store.
The Transaction Recorder Browser extension allows you to:
Capture your actions on a website
Eliminate the need for manually copying element locators
Eliminate the need to configure each step
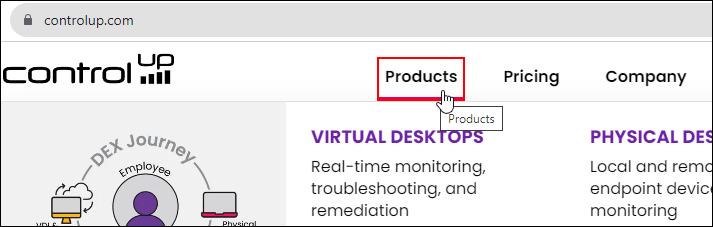
Instead of configuring each step manually, you can use our transaction recorder to record your steps on a website interactively. The transaction recorder automatically adds your steps to the Scout configuration page.
The transaction recorder can record Click, Insert text, iframe step in/out, and Press key steps. If you need to add other steps, you can edit the Scout configuration after you record your steps.
Note the following requirements before you use the transaction recorder:
Supported only on Google Chrome.
Before starting the recording on a website, make sure your cache is cleared and that you disable any form of auto-completion for usernames, passwords, etc.
Don't use an incognito window.
To record your steps:
Click here to download the browser extension from the Google Chrome web store.
In the Scout configuration page, enter a URL and click Record Steps.
 A new browser tab opens the URL you entered.
Perform a workflow on the website, and the transaction recorder automatically records each step that you perform.
When you are finished performing the steps, click Submit. The steps are automatically added to the Scout configuration page.
Manually configure steps using element locators
Video tutorial
Click here to watch a video on how to use the browser extension to get element locators.
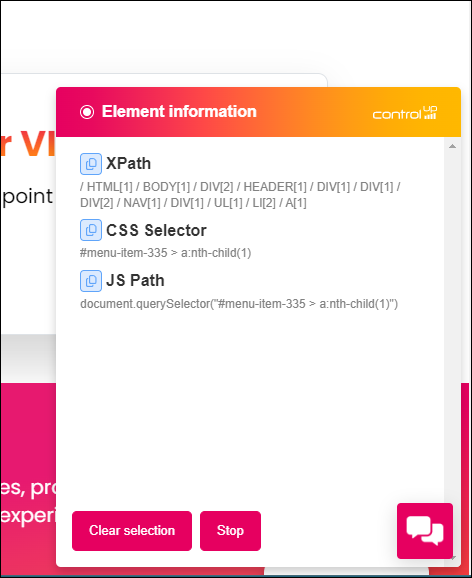
If you manually configure steps (instead of using the transaction recorder), you need to specify where to perform the interaction using one of the following types of element locators:
CSS selector
XPath
JS path
We recommend that you use CSS selectors. Web developers often add automation IDs to elements so that they can be easily located using a CSS selector. If you're having trouble testing an internal site, you can ask your web developer to add unique automation IDs.
Some websites dynamically change the names of element classes each time the page loads (for example, div.treeButton__MYZeT might change to div.treeButton__B4yZ4 when the page refreshes). In these cases, XPath might be the better option to locate the element.
JS path should be used when the name of the element is not dynamically changing and it is located under the shadow root. In these cases, CSS selectors won't include the path to the element, but JS path will.
To get element locators:
Click here to download our browser extension from the Google Chrome web store. The extension is supported only on Google Chrome.
Go to a website and Start the browser extension. We recommend that you use an incognito window to ensure that the website is not cached on your browser.
.png)
Click on the element on the website that you want to get the locator for. As you hover your cursor around the website, a red box highlights the elements on the page.
After clicking on the element, copy the locator for the element. You can paste the element locator into the Scout configuration page.
How to sign in to SaaS applications
Most SaaS web applications start with a login screen. This Scout can enter a username and password, but does not support multi-factor authentication (MFA). If the application you want to test uses MFA, then there are a few ways to get around this requirement:
Bypass MFA in your application. In the application you want to test, configure a service account that doesn't require MFA.
Bypass MFA in your identity provider. In your identity provider, configure a service account that doesn't require MFA. When the Scout attempts to sign in to the application, it is redirected to your identity provider for authentication. The Scout enters the username and password and is returned to the application after authentication.
Service account security tip
If you make a service account to bypass an MFA requirement, make sure that you give the service account the minimum required permissions to complete the test.
You might want to bypass MFA only if the sign in attempt comes from a specific IP address. If you are using a Custom Hive, then the IP address comes from the machine where the Custom Hive is installed. To see the IP addresses of Cloud Hives, visit Cloud Locations Used by Synthetic Monitoring.
Test results
When you view a test result, you can see details about the initial page load and all steps performed. You can also see a screenshot taken during each step. Click on a screenshot to enlarge it.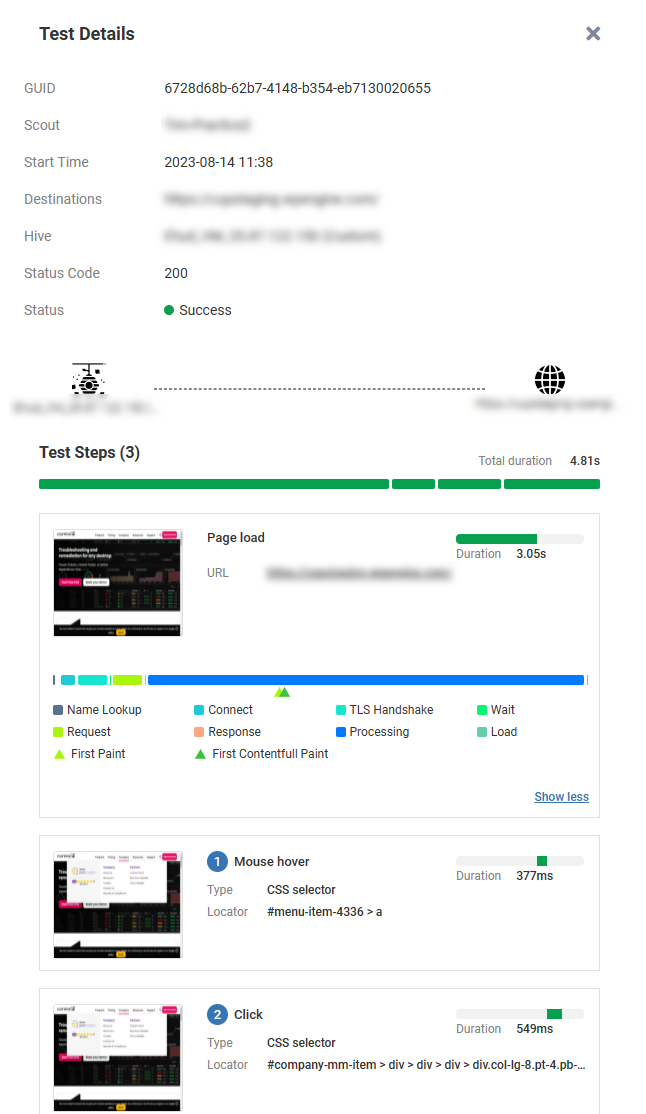
Metrics
The metrics in the table below are collected for each test result. You can create an alert policy based on some of these metrics so that you are notified when something goes wrong.
Metric name | Description |
|---|---|
Status | The overall result of an individual test (success/failure). |
Total duration | The time it took to load the page and perform all steps. |
Steps duration | The time it took to perform the steps on the website. This doesn't include the time it took to initially load the page. |
Failure reason | A description of why the test failed. The fail reason generally includes the step number that caused a problem and a description of the problem. |
Page load - connect | The duration of the connection phase of the initial page load. |
Page load - contentful paint | The First Contentful Paint time for the initial page load. At this time, the first content (image or text) from the DOM is visible on the page. |
Page load - DOM interactive | The time until the DOM has been parsed for the initial page load. Generally, at this time the user can begin interacting with the website. |
Page load - domain lookup | The DNS lookup time for the initial page load |
Page load - duration | The total duration of the initial page load. |
Page load - first paint | The time until the first pixels are visible on the screen for the initial page load, including background colors. |
Tips and troubleshooting
Most step types do not have a timeout. For example, a Click step will click on an element when it appears, even if it takes 30 seconds for the element to appear. If you want the test to fail based on the time it takes for an element to for an element to appear, add a Wait step and set the timeout duration.