SAML SSO for Insights
- Print
- DarkLight
- PDF
SAML SSO for Insights
- Print
- DarkLight
- PDF
Article Summary
Share feedback
Thanks for sharing your feedback!
Setting Up and Managing Single Sign-On
What is SSO and why does it matter?
Single Sign-On (SSO) enables users to reduce the number of logins they must perform from a single machine. When SSO is in use, an Identity Provider (IdP) – a central login-management system – works in conjunction with various Service Providers (SPs) to control user access to the SPs’ applications. Users log into the IdP rather than into individual SPs or applications. Then, when they access any of the applications of the managed SPs, the IdP logs them in automatically.
SSO & ControlUp
ControlUp Insights has incorporated SSO support, enabling users to access Insights without logging into it directly, once they have logged into a supported IdP. At present, only the SAML 2.0 protocol is supported.
Note
Currently, only logins to websites are supported. Because ControlUp’s Console is not web-based, the Console does not support SSO at this time. In addition, if the SSO option is activated for Insights, links in the Console that would normally open Insights are disabled.
In order to set up SAML 2.0 SSO for Insights, settings in both the IdP and Insights must be configured, as explained below. Part of the setup process entails copying values from your IdP to Insights’ settings, and vice versa. It is recommended to begin with the IdP settings.
Once the SAML 2.0 SSO is enabled, users (other than the user with the “Owner” role, as explained below) can no longer log into Insights from the URL they previously used ( https://insights.controlup.com/ ). Instead, they must use the URL that appears in the Insights SAML 2.0 SSO settings, under Service Provider Login URL .
Note
Any user configuration done in Insights prior to SAML integration is not saved for SAML logins (such as: Bookmarks, Home page, Top Insights customization, Time Zone). Every configuration done when logging into Insights using SAML will be saved for future sessions. It is recommended that upon logging into Insights with SAML for the first time, the user will reconfigure Insights to suit its needs.
Note
Although some IdP’s, like Ping also support Single Logout (SLO), Insights does not currently support this option. Thus, users remain logged into Insights until they either manually log out, or are logged out by Insights automatically due to inactivity (after 15 minutes). Similarly, when they are logged out of Insights, they are not automatically logged out of other Ping SPs.
Configuring Single Sign-On for Insights on Ping
Before you can set up SSO for Insights on Ping, you must have a PingFederate server set up and running in your organization. The instructions below explain how to add ControlUp Insights to an existing PingFederate server. For information about setting up and working with PingFederate, refer to the Ping Identity website (https://www.pingidentity.com ).
To add ControlUp Insights to a PingFederate server:
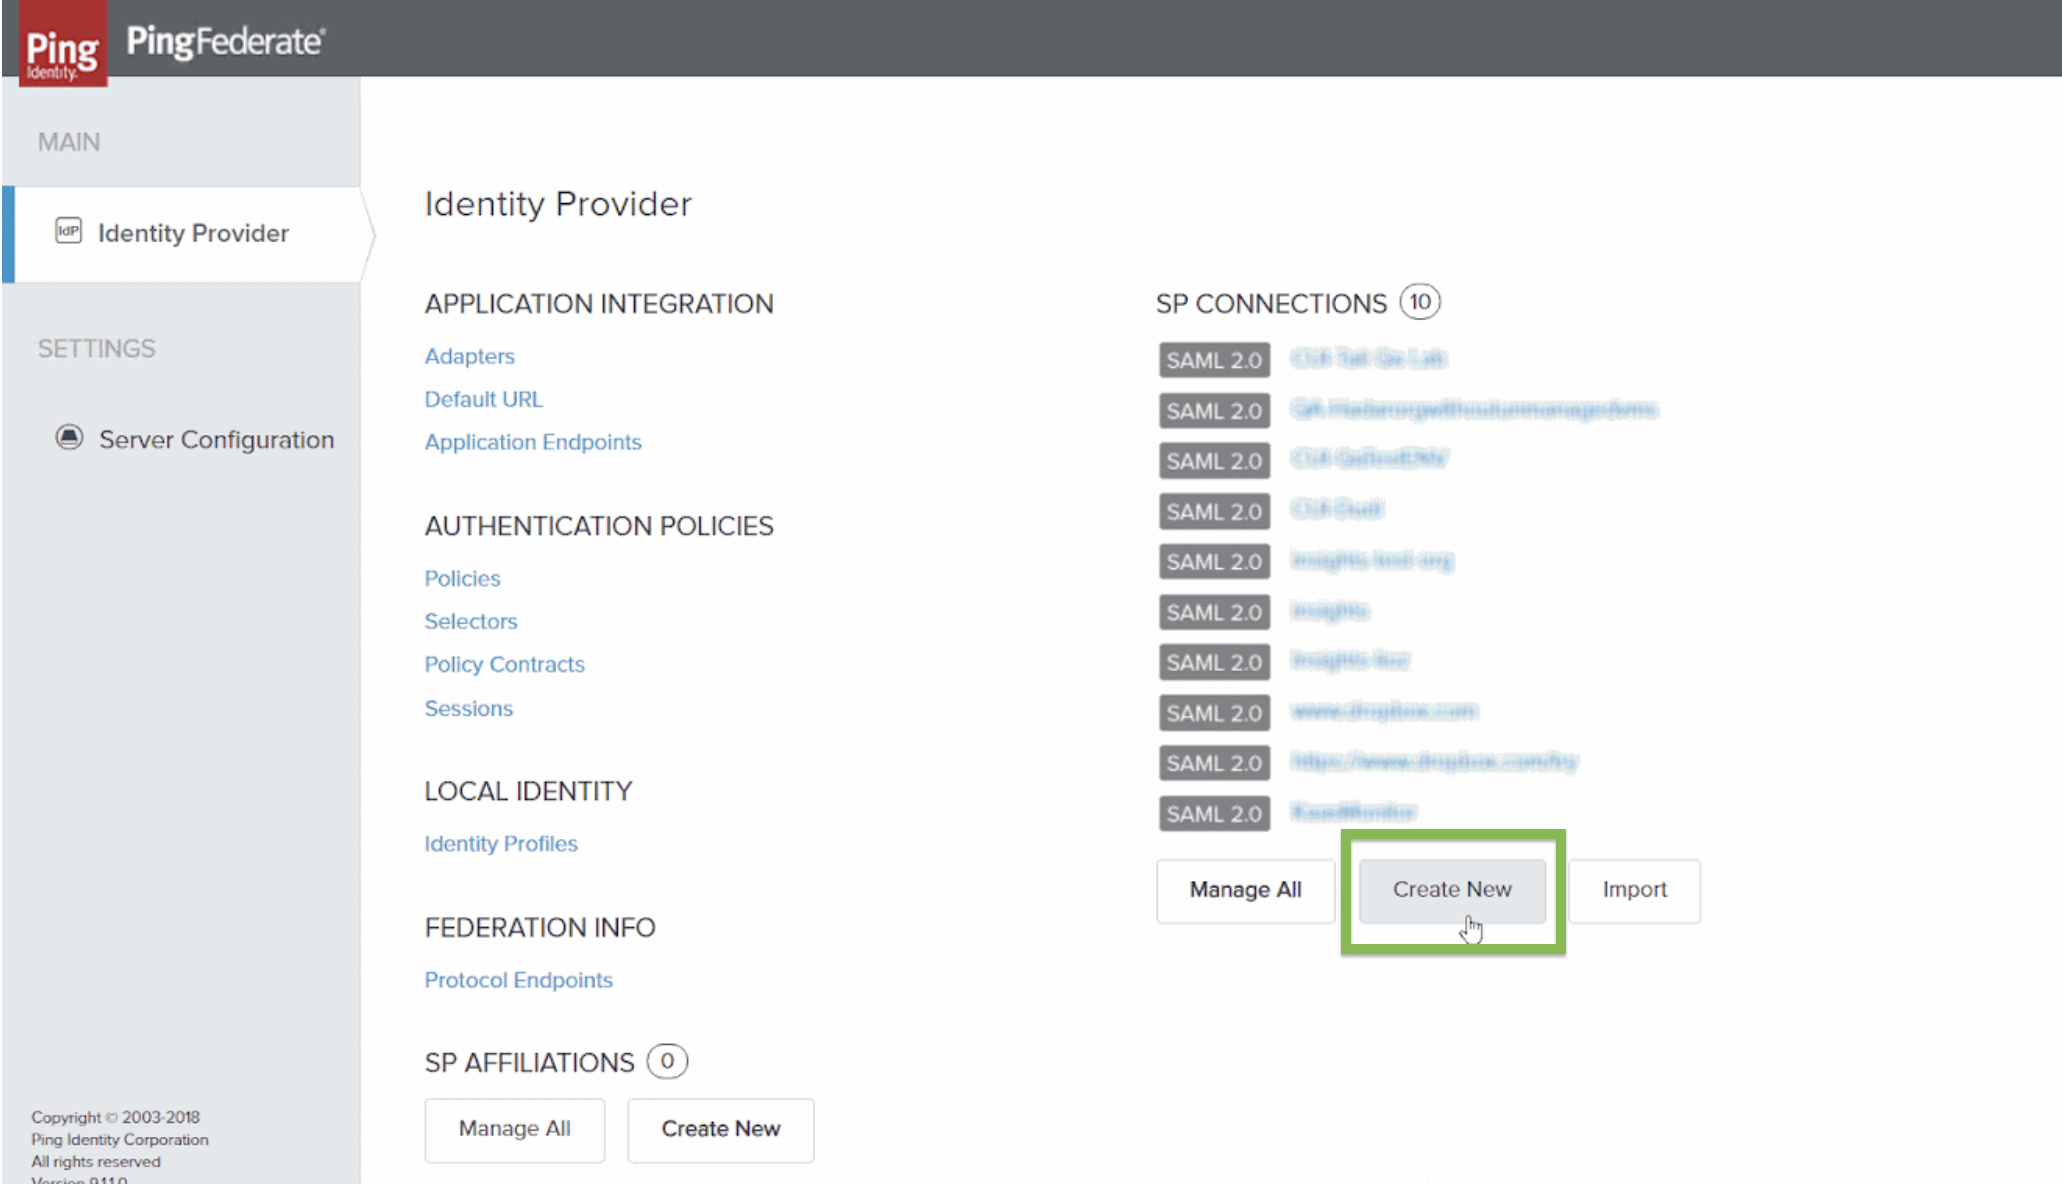
In the PingFederateIdentity Provider screen, select Create New . The Connection Template tab opens.
Identity Provider screenSelect Next repeatedly until the General Info tab opens.
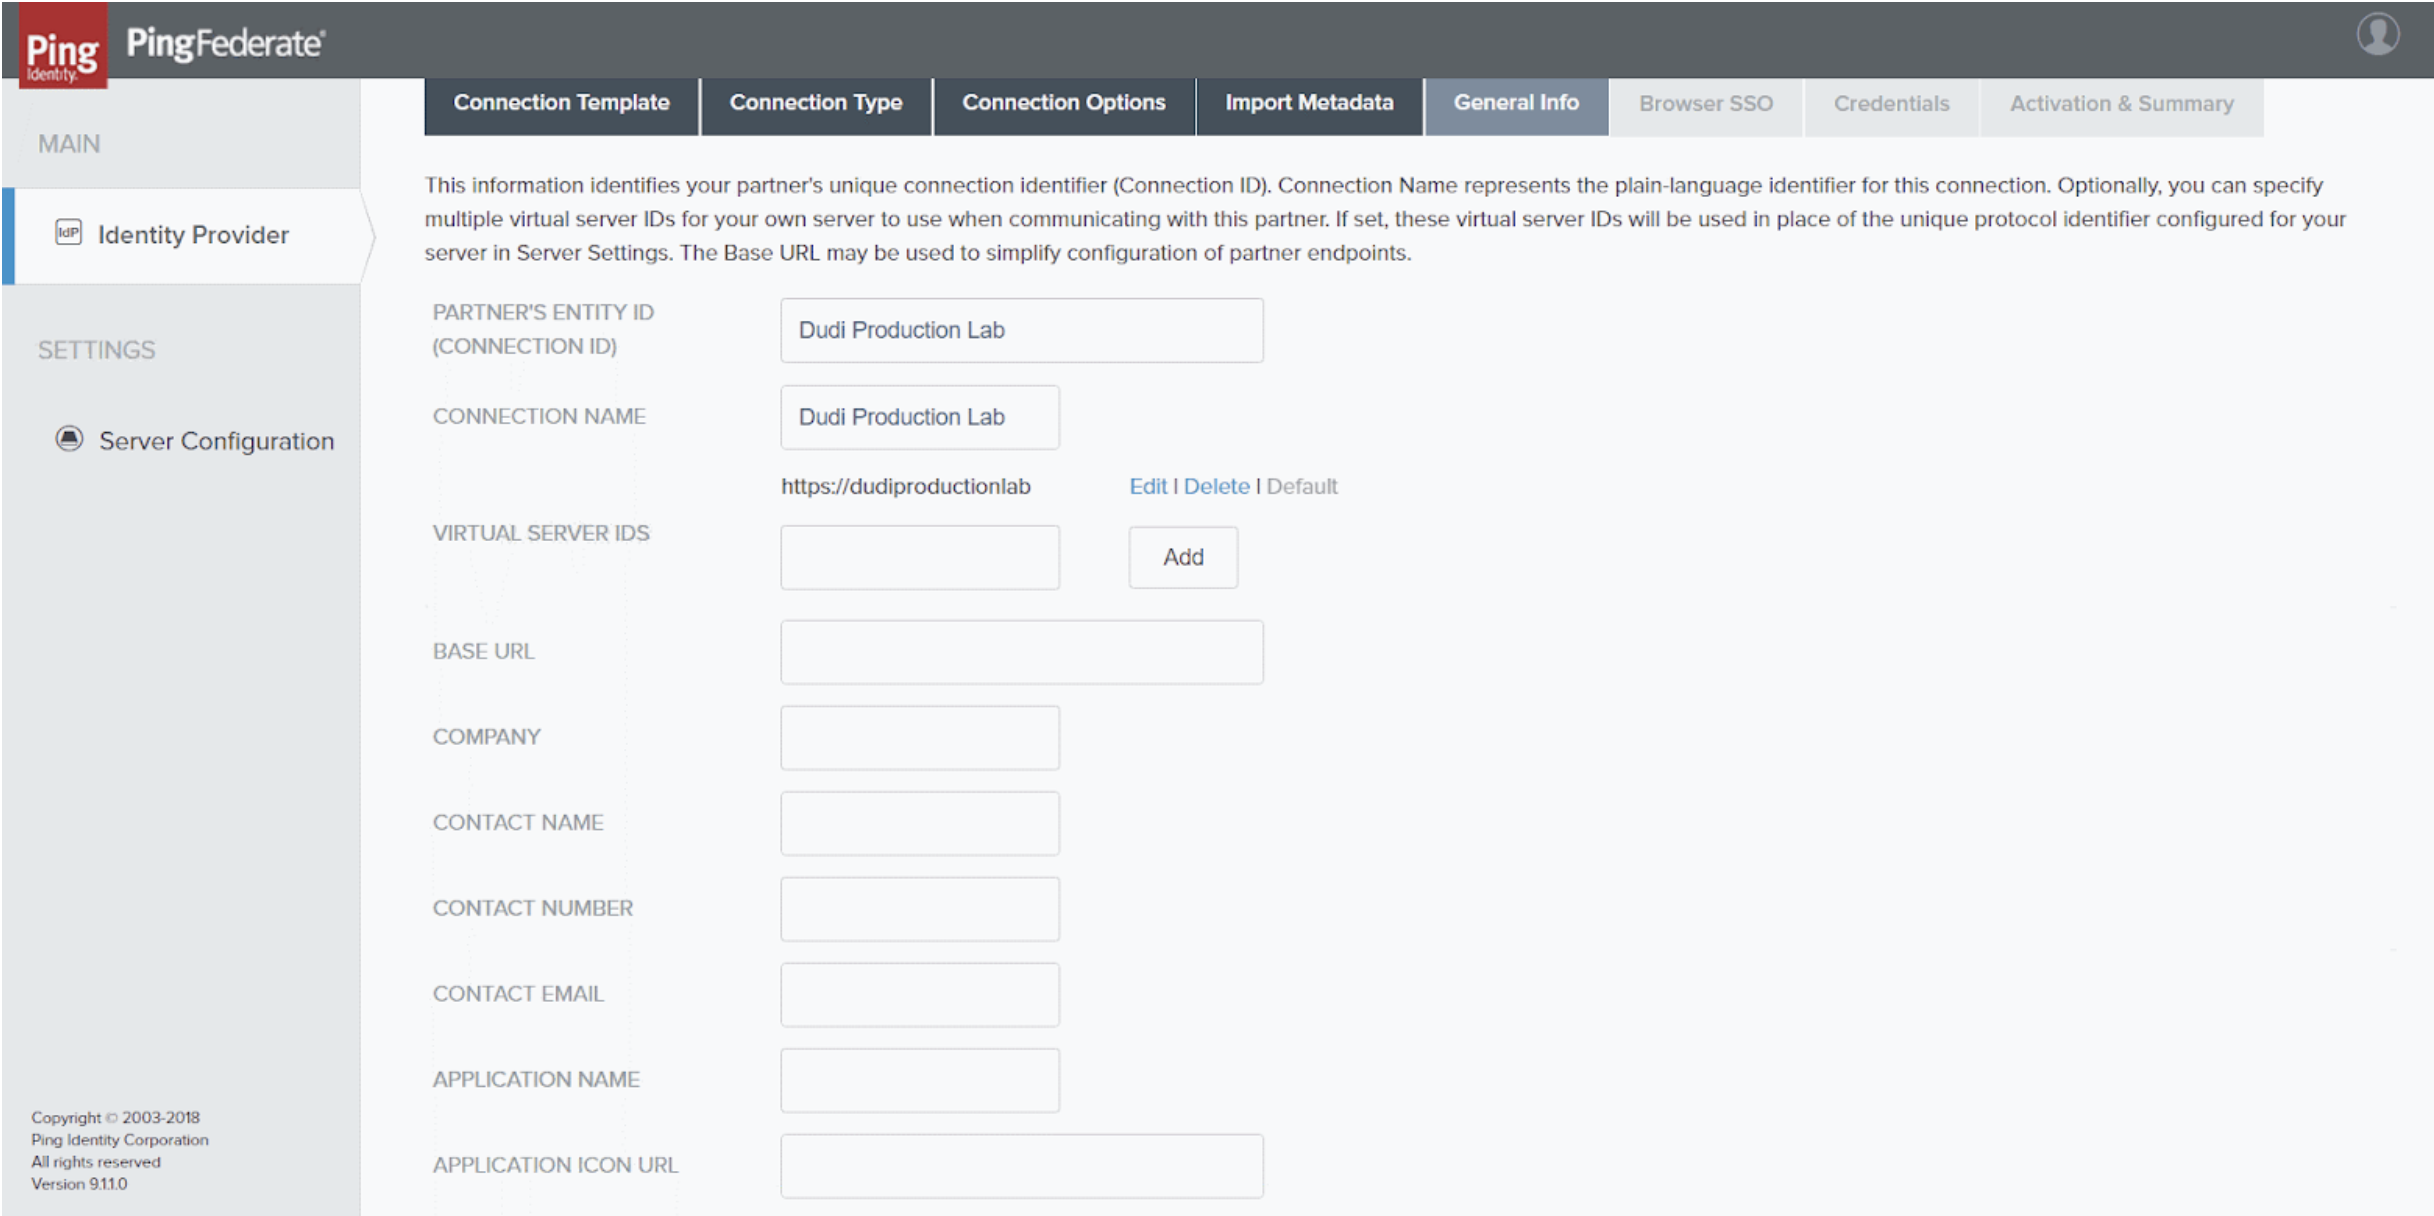
General Info tabFill in the fields as follows:


Field | Description | Example |
Partner's Entity ID | Unique identifier of the connection Enter a meaningful name for the new connection. | Dudi Production Lab |
Connection Name | Name of the connection It is recommended to enter the same name as in the preceding field. | Dudi Production Lab |
Virtual Server IDs | Enter a name, and then select Add. It is recommended to enter the same name as in the preceding field, in the following format: Note This value must be copied into the Insights SAML settings, under Virtual Server IDs. | https://dudiproductionlab |
- Select Next . TheBrowser SSO tab opens.

Browser SSO tab
- Select Configure Browser SSO . The Browser SSO screen opens with the SAML Profiles tab displayed.

SP Connection | Browser SSO > SAML Profiles tab
- Select bothIdP-Initiated SSO andSP-Initiated SSO.
Note
Insights does not support SLO (Single Log Out); selecting it here will have no effect.
- Select Next The Assertion Creation tab opens.

SP Connection | Browser SSO > Assertion Creation tab
- Select Configure Assertion Creation . TheAssertion Creation screen opens with the Identity Mapping tab displayed.
- Select Next The Authentication Source Mapping tab opens.

SP Connection | Browser SSO | Assertion Creation > Authentication Source Mapping tab
- Select Map New Adapter Instance . TheIdP Adapter Mapping screen opens, with the Adapter Instance tab displayed.

SP Connection | Browser SSO | Assertion Creation | IdP Adapter Mapping > Adapter Instance tab
- Under Adapter Instance , select the IdP adapter instance to use for user authentication.
- Select Next repeatedly until the Attribute Contract Fulfillment tab opens.

SP Connection | Browser SSO | Assertion Creation | IdP Adapter Mapping > Attribute Contract Fulfillment tab
- Under Source and Value , select the required values for your environment.
Note
For additional information, refer to the PingFederate documentation.
- Select Next . The Issuance Criteria tab opens.

SP Connection | Browser SSO | Assertion Creation | IdP Adapter Mapping > Issuance Criteria tab
- Optional: Configure the fields as appropriate for each condition you want to create; select Add for each condition.
Note
For additional information, refer to the PingFederate documentation.
- Select Next or Done repeatedly until the initial screen (Identity Provider) appears with the SP connection you created listed in it.

Identity Provider screen with the new SP connection listed
- Select the newly created SP connection. The Browser SSO screen opens with the SAML Profiles tab displayed.
- Select Next repeatedly until the Protocol Settings tab opens.

SP Connection | Browser SSO > Protocol Settings tab
- Select Configure Protocol Settings. The Assertion Consumer Service URL tab opens.

SP Connection | Browser SSO | Protocol Settings > Assertion Consumer Service URL tab
- Fill in the fields as follows:
Field | Description |
Index | Enter an index to identify the assertion URL. |
Binding | Select POST. Note For security reasons, the only supported binding type is POST. |
Endpoint URL | The Insights assertion URL; the URL to which the IdP should respond to queries from Insights. Note When you set up SAML SSO in Insights, this value is generated by Insights, and appears in the Insights SAML settings in the Assertion URL field. You must then copy it, return to this screen, and paste it into this field. You may find it easiest to simply stop configuring the Ping settings at this point, and follow the instructions below for configuring Insights. You can then copy this value from there, return to this location to enter it here, and continue with the Ping configuration. |
- Select Add. The Insights assertion URL is added to the list, and selected as the default.
- Select Next. The Allowable SAML Bindings tab opens.

SP Connection | Browser SSO | Protocol Settings > Allowable SAML Bindings tab
- Select POST.
Note
For security reasons, the only supported binding type is POST.
- Click Next. The Signature Policy tab opens.

SP Connection | Browser SSO | Protocol Settings > Signature Policy tab
- Check both options shown in the screenshot above.
- Select Next. The Encryption Policy tab opens.

SP Connection | Browser SSO | Protocol Settings > Encryption Policy tab
- Select None.
- Select Next or Done repeatedly until the Browser SSO tab appears.

SP Connection > Browser SSO tab
- Select Next. Credentials tab opens.

SP Connection > Credentials tab
- Select Configure Credentials. The Digital Signature Settings tab opens.

SP Connection | Credentials > Digital Signature Settings tab
- Under Signing Certificate, select the IDP certificate.
Note
The certificate string must be copied into the Insights SAML settings, under X.509 Certificate.
- Select Next. The Signature Verification Settings tab opens.

SP Connection | Credentials > Signature Verification Settings tab
- Click Manage Signature Verification Settings. The Trust Model tab opens.

SP Connection | Credentials | Signature Verification > Trust Model tab
- Select “Unanchored”.
- Click Next. Signature Verification Certificate tab opens.

SP Connection | Credentials | Signature Verification > Signature Verification Certificate tab
- Load the SP certificate (request from ControlUp support) and select it.
- Select Next or Done repeatedly until the initial screen (Identity Provider ) appears.
Setting Up Single Sign-On in Insights
In order to set up SAML 2.0 SSO for your organization’s Insights site, you must log into Insights with a user account that has the Owner role (the user who created the organization).
To set up SAML 2.0 SSO in Insights:
- Install and set up the PingFederate server in accordance with Ping Identity’s instructions, and configure it for Insights as explained above.
- Log into Insights with a user account that has the Owner role.
- In the Insights screen, in the upper-right corner, select your user name. A dropdown menu opens.

Select your user name to open the dropdown menu
Dropdown menu open
Note
If the user account with which you are logged into Insights does not have the Owner role, the Single Sign-On (SAML) option does not appear in this menu.
- In the menu, select Settings , and then select Single Sign-On (SAML) . The Single Sign-On (SAML) Settings dialog box opens.

Single Sign-On dialog box
- At the upper-left of the dialog box, select theEnable SAML (SSO) Authentication The required fields become available.
- Copy the following values from the Ping configuration and enter them into the fields of the same names in theSingle Sign-On (SAML) Settings dialog box:
Value in Ping | Field In Insights SSO Settings | Description |
X.509 Certificate | X.509 Certificate | The signing key of the SAML IdP, including the keywords -----BEGIN CERTIFICATE----- and -----END CERTIFICATE----- |
Assertion URL | SSO Application Endpoint | The URL for logging into the IdP |
Virtual Server IDs | Virtual Server IDs | The virtual server IDs configured in the IdP’s connection identifier |
The Save button becomes active.

Required fields filled in
- Copy the value that appears under Assertion URL to the Endpoint URL setting in the Ping configuration. (This is the URL to which the IdP should respond to queries from Insights.)
- Select Save. SAML 2.0 SSO is implemented throughout the organization. Users in your organization should access Insights through the URL that appears under Service Provider Login URL.
Note
Links in the ControlUp Console that would normally open Insights will no longer work from this point on. Beginning with Console version 7.3, after the user’s next login, these links will appear in the Console as disabled.
Configure Insights to support Azure AD SAML
Prerequisites:
- Must have an Azure Enterprise account
- Azure AD must be configured
- Must have the necessary permissions to create the application
- We assert the UPN and must match what Azure presents. See note at the bottom.
Preparation on Azure AD
- Create an enterprise application.

Azure AD - App Creation Screenshot
- After entering a name of your choosing in the “Create your own application” menu, select the third radio button option (#2 in the screenshot above): “Integrate any other app…”
Click Create.
Review the app you’ve just created.

Azure AD - All Applications Menu
Assignment Option
| Assign Users and Groups | In the properties Management tab, set ‘User Assignment required?’ to NO. |
 |  |
Side-by-side with comments - (Azure console and Insights settings)
See the annotated screenshot below to understand what information comes from the Insights Settings UI, and which comes from the Azure AD settings (note arrow direction).
Side-by-Side Comparison of Azure Console and Insights Settings Page
IMPORTANT NOTES
1. Replace whitespaces for the Sign on URL with "%20". This is required when your ControlUp organization contains whitespaces.
2. Additionally, note that we assert the UPN and must match what Azure presents.
We require the NameID attribute with the UPN value of the user. For example:
<NameID Format="urn:oasis:names:tc:SAML:1.1:nameid-format:emailAddress">The user Marcel created</NameID>
Finally, the Identifier (Entity ID) in the basic SAML config is not listed on the Insights side. Use: urn:componentspace:ControlupInsights
Possible Errors
User not authorized in Azure to use the Enterprise app - (Error AADSTS50105)
 User not authorized in Azure to use the Enterprise app - Error Screenshot
URN not configured - (Error AADSTS700016)

URN not configured - Error Screenshot
Managing Single Sign-On Settings
Once SAML 2.0 SSO is enabled in your organization, modifications to the SAML 2.0 SSO settings, and disabling of the feature, can only be performed by the ControlUp user with the Owner role. In order to do so, the Owner must access Insights from its original URL (https://insights.controlup.com/), using the username and password under which the SAML 2.0 SSO settings were last configured.
Note
If you need to change the SAML 2.0 SSO settings, but you cannot log into the original Owner user account for some reason, contact ControlUp support.
To modify the SAML 2.0 SSO Settings in Insights:
- Log into Insights at its original URL, and open the Single Sign-On (SAML) Settings dialog box as explained above.
- Modify the values as required.
- Click Save.
To disable SAML 2.0 SSO in Insights:
- Log into Insights at its original URL, and open the Single Sign-On (SAML) Settings dialog box as explained above.
- Clear the Enable SAML (SSO) Authentication.
- Click Save.
Was this article helpful?