Insights On-Premises Linux-Based Installation
- Print
- DarkLight
- PDF
Insights On-Premises Linux-Based Installation
- Print
- DarkLight
- PDF
Article Summary
Share feedback
Thanks for sharing your feedback!
The following article walks you through the installation of the Linux-based deployment of Insights On-Premises. This installation type provides an alternative to the OVA-based deployment for which you need a dedicated vCenter machine. The advantages of the Linux-based deployment is that you can choose any supported Linux distribution and run the installation from the CLI.
Installation Files
Our support team provides you with the latest on-premises installation files. Contact us at support@controlup.com and our support engineers will gladly assist you with installation.
Prerequisites
Verify that your Linux machine meets the general IOP prerequisites.
Supported Operating Systems
- Photon OS 4.0 or later
- Ubuntu 20.04 or later
Installed Software on the Linux machine
- Docker 20.10.14 or later
Installation
Throughout the following section, we will walk you through the installation of both standalone and clustered IOP servers. Before you install the IOP server, you must decide which mode to install. While we recommend a standalone installation for small environments with fewer than 5000 sessions, you should set up a clustered IOP infrastructure for environments with more than 5000 sessions. Follow the installation instructions according to your preferred deployment mode.
Standalone Machine
- Download the iop_8.x_images_stable.tgz and iopcmd-8.x.[xxx.xx].tgz to your Windows machine.
- Transfer both files to the /opt directory of your Linux machine. In our example, we use WinSCP to transfer both files.
[root@localhost opt]# ll -ltr total 1003584 -rw-r--r--. 1 root root 12245632 Feb 7 05:55 iopcmd-8.x.x.xx.tgz -rw-r--r--. 1 root root 1015420863 Feb 7 06:36 iop_x.x_images_stable.tgz - In the /opt directory, extract the iopcmd-8.x.[xxx.xx].tgz. A new directory iopcmd is created.
sudo tar zxvf iopcmd-8.x.xxx.xx.tgz - Move the iop_8.x_images_stable.tgz file from the /opt directory to the /opt/iopcmd folder.
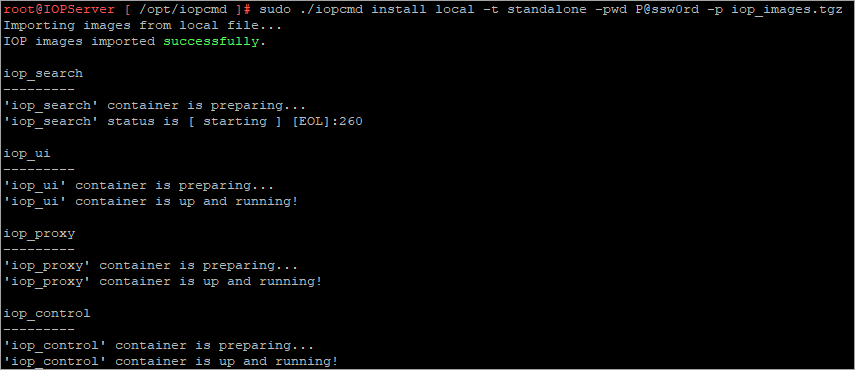
sudo mv iop_8.x_images_stable.tgz /opt/iopcmd/iop_images.tgz - Run the script to install the standalone server. Use the -t standalone parameter and provide a strong password, for example P@ssw0rd.
The password must be at least 8 alphanumeric characters in length and contain at least one of the following special characters: ~ @ % ^ - _ =
When the script finishs, following output should appear:sudo ./iopcmd install local -t standalone -pwd P@ssw0rd -p iop_images.tgz

IOP Cluster
The following section guides you through the installation of an IOP cluster which consists of one master node and at least two data nodes. Install the master node first, and then each data node sequentially. In our example, the master node has the IP address 10.20.63.14, while the data nodes have 10.20.63.15 and 10.20.63.16.
1. Install the Master Node
To install the master node:
Download the iop_8.x_images_stable.tgz and iopcmd-8.x.[xxx.xx].tgz to your Windows machine.
Transfer both files to the /opt directory of your master node. In our example, we use WinSCP to transfer both files.
[root@localhost opt]# ll -ltr
total 1003584
-rw-r--r--. 1 root root   12245632 Feb  7 05:55 iopcmd-8.x.xxx.xx.tgz
-rw-r--r--. 1 root root 1015420863 Feb  7 06:36 iop_8.x_images_stable.tgz
From the /opt directory, extract the iopcmd-8.x.[xxx.xx].tgz. A new directory iopcmd is created.
sudo tar zxvf iopcmd-8.x.xxx.xx.tgzMove the iop_8.x_images_stable.tgz file from the /opt directory to the /opt/iopcmd folder.
sudo mv iop_8.x_images_stable.tgz /opt/iopcmd/iop_images.tgzRun the following command to install the master node. In our example, we use the password P@ssw0rd and type master after the -t parameter.
sudo ./iopcmd install local -t master -pwd P@ssw0rd -p iop_images.tgz
Once the script is complete, you see the following success response message:
Importing images from local file...
IOP images imported successfully.

iop_ui
---------
'iop_ui' container is preparing...
'iop_ui' container is up and running!

iop_proxy
---------
'iop_proxy' container is preparing...
'iop_proxy' container is up and running!

iop_control
---------
'iop_control' container is preparing...
'iop_control' container is up and running!
Run the sudo docker ps command to verify that all IOP containers are running:
[root@localhost iopcmd]$ sudo docker ps
CONTAINER ID   IMAGE               COMMAND                  CREATED          STATUS                    PORTS                                                                                                                                              NAMES
118a2a25e211   iop_control:local   "hypercorn '-w 1' -b…"   8 minutes ago    Up 8 minutes (healthy)    0.0.0.0:8777->8777/tcp, :::8777->8777/tcp                                                                                                          iop_control
493c305b918a   iop_proxy:local     "/docker-entrypoint.…"   8 minutes ago    Up 8 minutes (healthy)    0.0.0.0:80->80/tcp, :::80->80/tcp, 0.0.0.0:443->443/tcp, :::443->443/tcp                                                                           iop_proxy
ce81be77e92a   iop_ui:local        "docker-entrypoint.s…"   8 minutes ago    Up 8 minutes              0.0.0.0:3000->3000/tcp, :::3000->3000/tcp                                                                                                          iop_ui
73c32dd1e734   iop_base:local      "./start.sh start-se…"   10 minutes ago   Up 10 minutes (healthy)   8065/tcp, 8088-8089/tcp, 8191/tcp, 9887/tcp, 0.0.0.0:8000->8000/tcp, :::8000->8000/tcp, 9997/tcp                                                   iop_search
51f63a7fce70   iop_base:local      "./start.sh start-se…"   13 minutes ago   Up 13 minutes (healthy)   8000/tcp, 8065/tcp, 0.0.0.0:8080->8080/tcp, :::8080->8080/tcp, 8088/tcp, 8191/tcp, 9887/tcp, 9997/tcp, 0.0.0.0:8089->8089/tcp, :::8089->8089/tcp   iop_master
The next step is to install your first data node and connect it to the master node that you just installed.
2. Install the Data Nodes
The installation of data nodes isn't very different from the installation of the master node. The only exception is that you have to provide the hostname or IP address of the master node in the installation script as well as define the type data in the -t parameter.
To install your first data node:
Repeat steps 1 through 4 from the master node installation. Make sure to place the files onto your data node.
Run the installation script with the -t data switch and provide the IP address of the master node
sudo ./iopcmd install local -t data -m 10.20.63.14 -pwd P@ssw0rd -p iop_images.tgz
The IOP images imported successfully response indicates a successful importation of the images.
[root@localhost iopcmd]$ sudo ./iopcmd install local -t data -m 10.20.63.14 -pwd P@ssw0rd -p iop_images.tgz
Importing images from local file...
IOP images imported successfully.
Use the same installation instructions for the other data nodes.
Was this article helpful?