The following article outlines the configuration needed to monitor and manage Azure virtual machines joined to Microsoft Entra ID (previously known as Azure Virtual Desktop) from your ControlUp environment. As a general prerequisite for managing and monitoring machines, all ControlUp Real-Time Consoles and Monitors in your environment need to be able to resolve the DNS hostname of your managed machines.
This article makes the following assumptions:
- Agent and monitor are connected via a network.
- You have the permission to add A records for the fully-qualified domain name of the managed machine.
- You have permission to deploy the agent MSI file on the Azure VM.
Step 1 - Deploy ControlUp Agent Manually
Download the MSI from our website and install the ControlUp Agent on each Azure VM you want to monitor with ControlUp. Install the agent by following the instructions here.
Step 2 - Create A Records in DNS Zone or Add VM hostname to Hosts File
Once the agent is installed, create A records of your managed machines in your DNS service.
Instead of using DNS, you can also map the hostnames of your Azure VMs to the specific IP addresses in the hosts file on your console and monitor machines. The file is located in C:\Windows\System32\drivers\etc. Make sure the hosts file is synchronized across all consoles and monitors in order to avoid connectivity issues.
Step 3 - Enable Port 40705
- For version 9.0, by default, the agents act as the clients by communicating through port 443, and the monitors act as the servers by listening to port 40705 for outbound connections from the agents. Inbound port 40705 is still required for data collector machines and machines you want to manage via the console. For details, see Agent Outbound Communication.
- For versions lower than 9.0, configure your security controls to enable inbound port 40705 for agent communication. Security controls such as network security groups (NSGs) or any other can be used.
Step 4 - Add Azure VMs to the Real-Time DX
To add the Azure VM to Real-Time DX, you have to use the Add-CUComputer cmdlet on one of your monitor machines.
Import the relevant module with PowerShell:
$pathtomodule = (Get-ChildItem "C:\Program Files\Smart-X\ControlUpMonitor\*ControlUp.PowerShell.User.dll" -Recurse | Sort-Object LastWriteTime -Descending)[0]
Import-Module $pathtomodule
After importing the module, you can import the Azure VM with the Add-CUComputer cmdlet. Ensure you provide the correct hostname in the -Name parameter and the domain name in the -Domain parameter. The domain parameter should match the DNS zone where the A record was created, for example if the machine AgentMachine has an A record in the zone testdomain.local then add the machine in PowerShell with this command (Replace with a folder to match your requirement):
Add-CUComputer -Name "AgentMachine" -Domain "testdomain.local" -FolderPath "\azuremachines"
After running the command, the Azure VM is added to the console as well as a data source for the monitor.

Troubleshooting
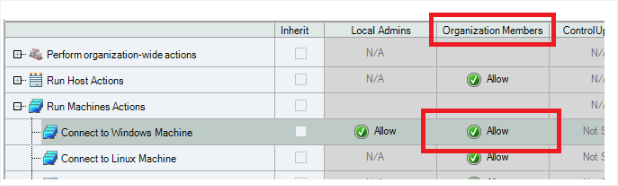
If the monitor does not have the necessary permissions to connect to the Azure VM, you will see an "Access Denied" error in the monitor details.

Make sure that the Connect to Windows Machine permission is set to Allow for the Organization Members role.