Before ControlUp version 9.0, the ControlUp Agents automatically acted as servers by listening on TCP port 40705 for inbound connections. Both the ControlUp Real-Time DX Console and Monitors acted as clients by connecting to the agents. This method required you to allowlist incoming TCP connections for all the machines in your organization with agents installed.
From version 9.0 and higher, the Agent Outbound Communication feature reversed the connection direction. Now, you can configure the agents to act as the clients by communicating through port 443. With this method, the monitors act as the servers by listening to port 443 for outbound connections from the agents. With both methods, the console pulls data from the agents.
The following diagram shows the connection changes: 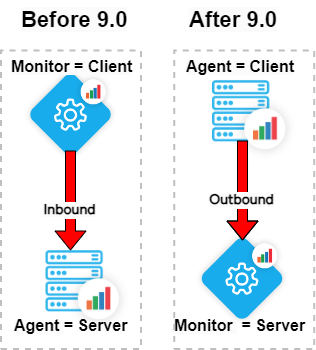
ControlUp Monitors and Data Collectors
Outbound communication is supported only for connections from the ControlUp Agents to the Monitors. It isn't supported for connections from the agents to the consoles.
Inbound port 40705 is still required for data collector machines and machines you want to manage via the console.
9.1 and higher
From version 9.1 and higher, if you've enabled agent outbound communication, access to port 40705 is no longer required on the data collector.
Prerequisites
.NET Framework 4.8 must be installed on the agent, console, and monitor machines.
Enable outbound port 443 (TLS 1.2) on all agent and monitor machines. Make sure to use port 443 on the monitor machines only for ControlUp.
Agents must be able to resolve the DNS names of monitors.
Provide all agents with the Registration Key:
If you use the console, it is automatically added to the registry.
If you install/upgrade agents with the MSI, you must manually provide the Registration Key. If you don’t provide it, the agents will use inbound communication.
Important!
The ControlUp Monitor service must listen to port 443.
To verify which service is listening to 443, you can run the following PowerShell script:
$connections = Get-NetTCPConnection -LocalPort 443 -State Listen -ErrorAction SilentlyContinue

if ($connections) {
    foreach ($connection in $connections) {
        try {
            $process = Get-Process -Id $connection.OwningProcess
            Write-Output "Port 443 is being used by $($process.Name) (Process ID: $($process.Id))"
        }
        catch {
            Write-Output "Process using port 443 could not be found."
        }
    }
} else {
    Write-Output "No processes are listening on port 443."
}
Required URLs
Component | US + Rest of the World (non-EU) URLs |
|---|---|
Agent | https://cu-agents-cpa.controlup.com/broker-discovery |
https://cu-agents-cpa.controlup.com/outbound-security | |
https://cu-agents-cpa-us.controlup.com/broker-discovery | |
https://cu-agents-cpa-us.controlup.com/outbound-security | |
Monitor | https://cu-services-cpa.controlup.com/outbound-security |
https://cu-services-cpa.controlup.com/broker-discovery | |
https://cu-services-cpa-us.controlup.com/outbound-security | |
https://cu-services-cpa-us.controlup.com/broker-discovery |
Component | EU URLs |
|---|---|
Agent | https://cu-agents-cpa.controlup.com/broker-discovery |
https://cu-agents-cpa.controlup.com/outbound-security | |
https://cu-agents-cpa-eu.controlup.com/broker-discovery | |
https://cu-agents-cpa-eu.controlup.com/outbound-security | |
Monitor | https://cu-services-cpa.controlup.com/outbound-security |
https://cu-services-cpa.controlup.com/broker-discovery | |
https://cu-services-cpa-eu.controlup.com/outbound-security | |
https://cu-services-cpa-eu.controlup.com/broker-discovery |
Benefits
Agent outbound communication can benefit your environment by reducing barriers for the following:
MSPs with multi-tenant deployments
Streamline deployment of ControlUp Agents
Set Agent Outbound Globally
To enable agent outbound communication globally via the console:
1. Click Settings > Agent and select the Enable Outbound Agent Communication checkbox:
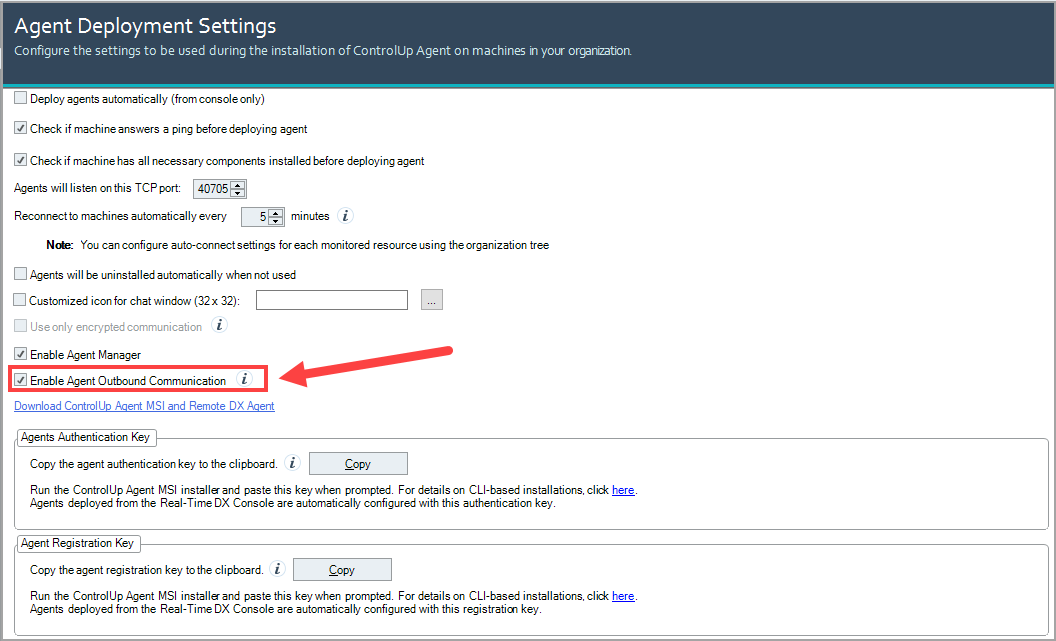
Restart your ControlUp Monitors to implement the change.
Set Agent Outbound per Agent
We’ve also added more flexibility to enable outbound communication per agent via the console. To learn more, see Setting Agent Outbound Per Agent.
Broker Discovery Service
ControlUp Agents must know which monitors to connect to in your environment. From 9.0 and higher, the broker is a monitor role that distributes agents to the available monitors with the least load. The Broker Discovery service discovers the broker monitors in your monitor site configuration, and sends a list of monitors to the agents in outbound connection mode to connect to.
Online Brokering Flow
The online agents communicate with the service in the following order:
The agent asks the Broker Discovery service which broker monitor in your environment to communicate with.
The agent sends a request to the broker to allocate a connection to a monitor in the site. The broker selects the monitor with the least load from the specific site and reserves the connection on that monitor.
When the service is online, it discovers brokers via our ControlUp Hybrid Cloud Services. When the service is offline, it discovers brokers listed in the registry settings of the agent machines.
Offline Broker Registry Configuration
If your agents can’t connect to the internet, or you don’t want to allowlist the required URLs, the agents must store a list in the registry of all required monitors they need to connect to. Each broker monitor is aware of all other brokers in your environment, allowing the agent to retrieve the monitor’s address to connect. After this connection is established, the agent can stream data to the monitor.
As best practice, we recommend you create a separate site for offline monitors.
You can manually set the Broker Discovery service to discover brokers when the service is offline. Use the following registry keys to configure offline brokering on the agent machines:
If you installed the agent from the console or with the MSI, use
HKEY_LOCAL_MACHINE\SOFTWARE\Smart-X\ControlUp\Agent\CommunicationIf you configured the agent using group policy, use
HKEY_LOCAL_MACHINE\SOFTWARE\Policies\Smart-X\ControlUp\Agent\Communication
In either key, you can configure the following values for all the monitors your offline agents will connect to:
Values | Type | Description |
|---|---|---|
Monitors | REG_MULTI_SZ | Used in combination with the |
DisableOnlineBrokeringFlow | DWORD | To automatically use offline brokering, set to |
DisableProxyToOnlineServices | DWORD | If the proxy shouldn’t be used to connect cloud services, set to |
DisableProxyToMonitor | DWORD | If the proxy shouldn’t be used to connect to the monitor, set to |
ProxyToOnlineServices | REG_SZ | Dedicated proxy (DNS or IP) that the agent uses to connect to cloud services |
ProxyToMonitor | REG_SZ | Dedicated proxy address (DNS or IP) that the agent uses to connect to the monitor |
Outbound | DWORD | If the agent should be used for inbound communication, set to |
LastDiscoveredMonitors | REG_MULTI_SZ | Used in combination with the |
Offline Brokering Flow
The offline agents communicate with the monitors in the following order:
The agent sends a request to the first monitor (any) on the list. If the first monitor is unavailable, the agent sends a request to the next monitor on the list that is available to connect.
The available monitor sends a request to the broker to allocate a connection to a monitor in the site. The broker selects the monitor with the least load from the specific site and reserves the connection on that monitor.
Security
The Broker Discovery service authenticates monitors with JSON Web Tokens (JWT) and authenticates agents with a personal access token (PAT).
Server Certificates
The agent must validate server certificates for outbound communication issued by the monitor. Outbound communication works over TLS channels, which require SSL certificates to establish connections. The monitor automatically creates a unique certificate each time it starts the gRPC server, based on its public DNS/FQDN, with one of the following methods:
Self-signed certificates. The agent validates if the common name from the certificate corresponds to the monitor's IP address.
Third-party certificates. The monitor creates a certificate sourced from the local certificate store. If enabled, the agent validates if the certificate is endorsed by a root authority or if it's part of a recognized certificate chain.
Third-party certificate prerequisites
X.509 standard, requiring a private key.
Template can be “WebServer”.
Intended Purposes can be “Server Authentication”
Signature algorithm can be secured as needed.
Certificate location must be under Local Computer > Trusted Publishers.
Configure third-party certificates
To configure a third-party certificate for outbound communication:
On the monitor machine:
In Registry key
HKEY_USERS\S-1-5-20\SOFTWARE\Smart-X\ControlUp\MonitorSvc, create string valueOutboundServerCertificateSubjectand set the data value to the common name used in your certificate store. For example, use "server.controlup.local", if the certificate subject value has the form CN=server.controlup.com.Optionally, to enforce validation of the certificate, on the agent machine:
In Registry key
HKLM\SOFTWARE\Smart-X\ControlUp\Agent\Communication, create DWORD valueCertificateValidationLeveland set the data value1.Note that if
CertificateValidationLevelis missing or has a value of0, the agent only checks if the certificate subject matches the monitor address. IfCertificateValidationLevelhas a value of1or more, the agent performs the full certificate validation process.In Task Manager, restart the ControlUp Monitor and Agent services. Agent Outbound Communication should now work correctly.
Install Agent
You can install the agent with either the Real-Time DX Console or MSI. If you upgrade or install the agent with the Console, you must manually enable agent outbound communication.
When you install the agent from the Console, the agent is automatically configured with the Authorization Key and saved under: HKEY_LOCAL_MACHINE\SOFTWARE\Smart-X\ControlUp\Agent\Communication
After you enable outbound communication in the Console, the Registration Key is also saved under: HKEY_LOCAL_MACHINE\SOFTWARE\Smart-X\ControlUp\Agent\Communication
If you configure the agent using group policy, the Registration Key is saved under: HKEY_LOCAL_MACHINE\SOFTWARE\Policies\Smart-X\ControlUp\Agent\Communication
After the agent is registered with the outbound security service, this Registration Key is deleted from the registry and a PAT is created to store it instead.
If you install the agent with MSI, agent outbound communication is automatically enabled.
Install Agent with MSI
If you install the agent with the MSI, you must manually provide:
Authentication Key. Required to connect to the agent via the console. To copy the key from the Real-Time Console, click Settings > Agent > Agent Authentication Key, or run the Get-AgentPublicKey PowerShell cmdlet on your monitor machine.
From 9.0 and higher: Registration Key. Saved in the registry of the agent machine. Required for the agent to communicate outbound instead of inbound. To copy the key from the Real-Time Console, click Settings > Agent > Agent Registration Key, or run the Get-AgentRegistrationKey PowerShell cmdlet on your monitor machine.
For more details about agent keys, see here.
To install the agent with the MSI:
On the agent machine, extract the agent MSI package. The ControlUp Agent Setup Wizard opens:
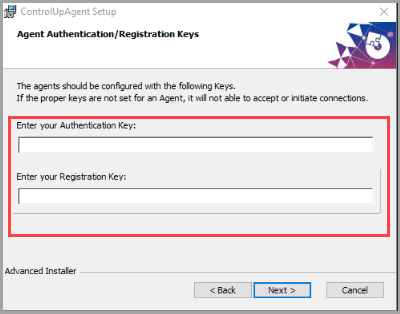
Enter your Authentication Key and Registration Key, and click Next to complete the installation.
Or run the following command prompt:
msiexec /i C:\ControlUpAgent-net48-x64-9.0.0.xxxx.msi /qb AUTHKEY=[Authentication Key] RegistrationKey=[Registration Key]
Install non-domain joined AVD Monitor
To install a non-domain joined AVD monitor on a workgroup machine, see Install-CUMonitor.
Configure Agent for Master Images
If you install the agent on a non-persistent machine that starts from a master image, you must configure the agent on the image as master.
To configure the agent in the MSI installer, select the Configure this installation as a master image checkbox and click Install:
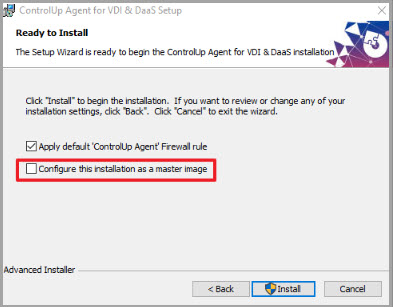
All new session hosts have the agent installed with Agent Outbound Communication enabled.
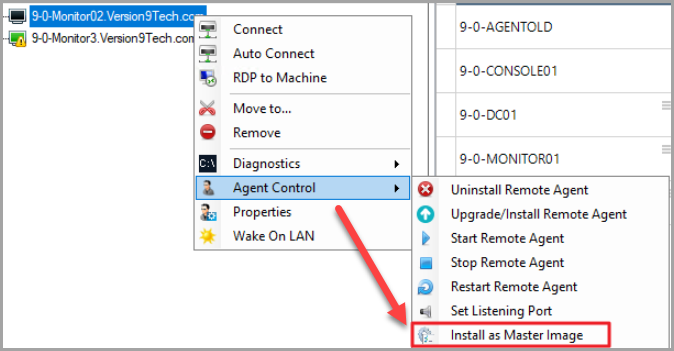
To configure the agent in the console, you must be a ControlUp Admin, or be assigned the Install Remote Agent as Master Image permission in the security policy. To install, right-click the installed agent on the non-persistent machine and click > Agent Control > Install as Master Image:
Note that you can perform this action only if there is no agent already installed on the machine.
Once the agent is installed, the FQDN of the machine is stored in a new MasterFQDN value in the agent registry:

Any new non-persistent machine that starts from the image will have the MasterFQDN of the machine.
To change the values of the Authentication Key and Registration Key, run the following command prompt:
msiexec /i C:\ADremoval\ControlUpAgent-net48-x64-9.1.0.xxxx.msi /qb AUTHKEY=[Authentication Key] RegistrationKey=[Registration Key] MASTER_IMAGE=true
Revert to Agent Inbound Communication
If you don’t want to use the new agent outbound communication, you can revert to the inbound communication.