The following Windows versions support the latest GA version of the ControlUp for Desktop Agent:
Windows 10 Version 1607+ (x64)
Windows 11 (x64)
Windows Server 2016 (x64)or higher
Windows 365 - Read Windows 365 Monitoring to learn how to monitor Windows 365 cloud PCs and connected client devices.
Prerequisites
Before you begin, read Prerequisites for ControlUp for Desktops and make sure that your environment is ready.
Download the Agent Manager
The Windows Agent Manager installs the Agent and keeps it updated according to your version control settings. By default, the Agent Manager installs the latest GA Agent version.
To download the Agent Manager, go to Devices > Configuration > Downloads > Windows Agent and click Download.
.png)
Direct Agent download
If you don’t want to use the Agent Manager, scroll to the bottom of the Downloads page to download the latest GA Agent version directly. Note that if you enable our version control feature, your Agents will automatically install the Agent manager.
.png)
Installation methods
Select an installation method below. See deployment example using using SCCM or Intune.
Run the agentmanagersetup.msi file you downloaded from the Downloads page.
Click Next to confirm that you agree to ControlUp's End User License Agreement.
Click Install to install the Agent Manager.
Copy your Tenant Name from ControlUp and paste it into the tenant name field in the setup window.
Optionally, if you want the Agent to connect to your tenant using a proxy, select Use HTTPS Proxy and enter the proxy IP address and port number.
Click Test to ensure that your device can reach your tenant with a GET request. If this test fails, make sure you meet the prerequisites.
.png)
Copy your Device Registration Code from ControlUp and paste it into the device registration code field in the setup window. Click Check to make sure that the code is correct. This check sends a POST request to your tenant. If this check fails even though the code is entered correctly, make sure you meet the prerequisites.
.png)
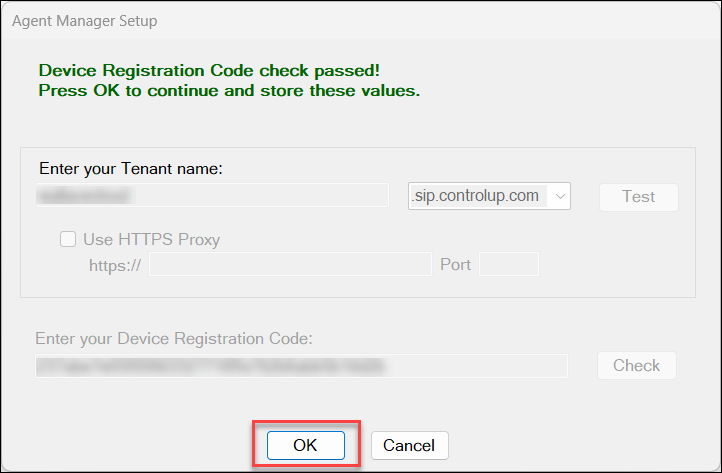
Click OK to save the tenant name and device registration code you entered.
Click Finish after the installation has been completed.
The Agent Manager and Agent are now installed on your device. Device data will appear in ControlUp shortly after the installation.
On the Downloads page, copy the msiexec command. It already includes your unique tenant name and registration code.
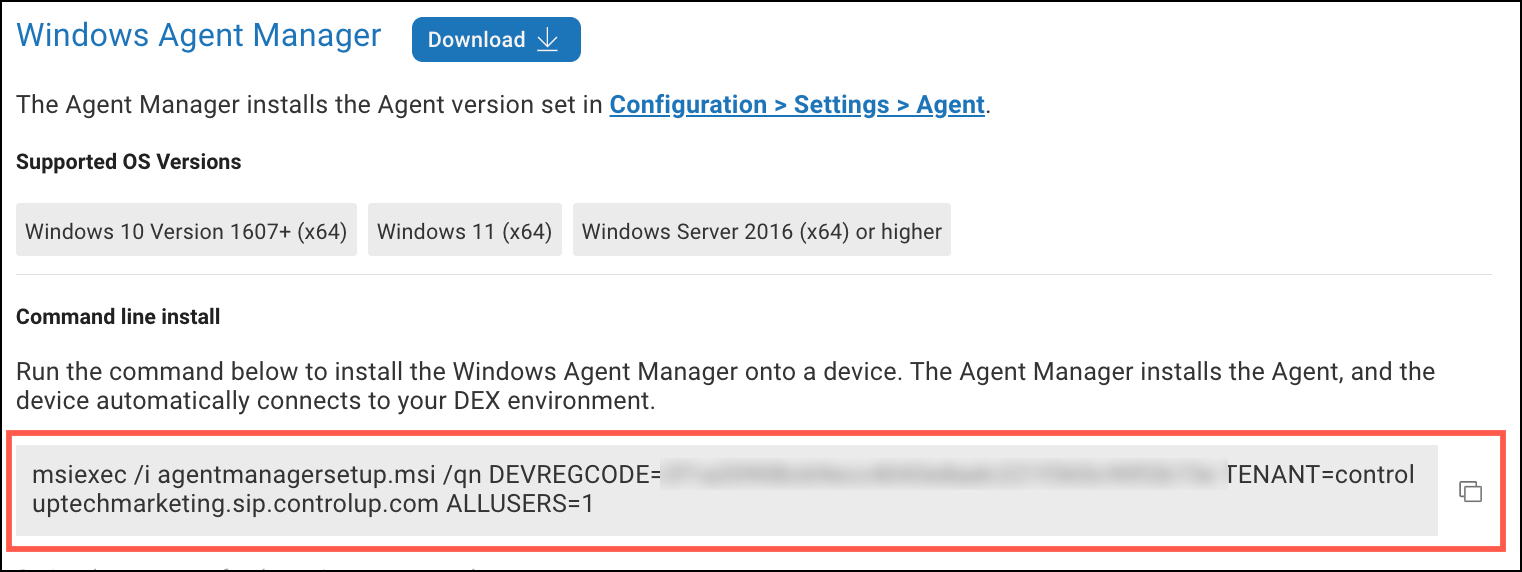
Add the following parameters to the command:
ONLYSTARTONBOOT=1: Sets the Agent to start and register the device only after the next reboot. This ensures that the Agent doesn’t immediately register on the golden image when you run the installation command.REGISTERWITHNAME=1: Sets the Agent to use the device's name as the unique ID. This ensures that when a device gets reimaged, ControlUp recognizes it as the same device, provided that the device’s name remains the same. If you don't use this parameter, you might see multiple entries for the same device. This parameter requires Agent version 2.17 or higher.
Optionally, add the following parameters to the command:
PROXYsets a web proxy IP address and port number for Agent communication. For example,PROXY=10.0.0.1:8080.PROXY_TEST_IPsets an IP address to test before using the proxy server configured in thePROXYparameter. The proxy server is used only if the test IP address is reachable. Read Proxy server configuration below for details.GROUPsets the device group. For example,GROUP=Finance. Device groups are used to organize devices and can be useful when filtering data, performing actions, configuring Agent version control, and more. Learn more about device groups.
Run the command on the golden image to install the Agent Manager and Agent. To ensure the Agent doesn’t start and register on the golden image, you must prevent the golden image from rebooting after you run the installation command. When a device first boots using the provisioned image, the Agent starts and registers the device.
The following example shows how to set the parameters in the command:
msiexec /i agentmanagersetup.msi /qn DEVREGCODE=<SampleCode> TENANT=<TenantName>.sip.controlup.com ALLUSERS=1 PROXY=10.0.0.1:8080 PROXY_TEST_IP=1.2.3.4 GROUP=Finance ONLYSTARTONBOOT=1 REGISTERWITHNAME=1On the Downloads page, copy the msiexec command. It already includes your unique tenant name and registration code.
Optionally, add the following parameters to the command:
PROXYsets a web proxy IP address and port number for Agent communication. For example,PROXY=10.0.0.1:8080.PROXY_TEST_IPsets an IP address to test before using the proxy server configured in thePROXYparameter. The proxy server is used only if the test IP address is reachable. Read Proxy server configuration below for details.GROUPsets the device group. For example,GROUP=Finance. Device groups are used to organize devices and can be useful when filtering data, performing actions, configuring Agent version control, and more. Learn more about device groups.
Run the command on a device to install the Agent Manager and Agent. Device data will appear in ControlUp shortly after the installation.
The following example shows how to set the parameters in the msiexec command:
msiexec /i agentmanagersetup.msi /qn DEVREGCODE=<SampleCode> TENANT=<TenantName>.sip.controlup.com ALLUSERS=1 PROXY=10.0.0.1:8080 PROXY_TEST_IP=1.2.3.4 GROUP=FinanceProxy server configuration
You can configure the Agent to use a proxy server to connect to your tenant. If you want the Agent to use a proxy only when the device is in a certain location (like your company's offices), you can set a proxy test IP address. Every time the Agent starts, it pings the test IP address. If the Agent receives a response, it uses the proxy. If the Agent does not receive a response, it does not use the proxy.
If you don't configure a proxy, the Agent uses the proxy in the system-level environment variable HTTPS_PROXY (if one is set). If you do configure a proxy for the Agent, it is used instead of the proxy in the environment variable. You can configure the Agent to never use a proxy, regardless of environment variables, by setting ProxyAddress to 0 in the registry.
To configure a proxy server during Agent installation, follow the instructions above. Note that the GUI method doesn’t allow you to set a proxy test IP address during installation.
To configure a proxy server for an existing Agent, you can use the Registry Editor:
To set the proxy server, go to Computer\HKEY_LOCAL_MACHINE\SOFTWARE\Avacee\SIP and add a string (REG_SZ)
ProxyAddress. Set the value ofProxyAddressto the proxy IP and port number (for example,10.0.0.1:8080). If you set this value to 0, the Agent will never use a proxy, regardless of environment variables.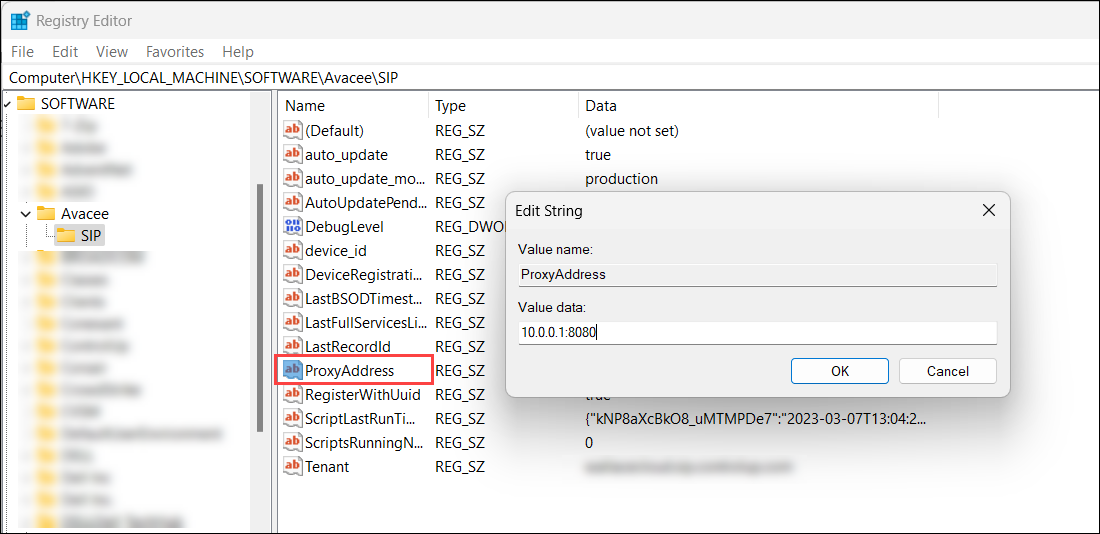
To set a test IP address, go to Computer\HKEY_LOCAL_MACHINE\SOFTWARE\Avacee\SIP and add a string (REG_SZ)
proxy_test_ip. Set the value ofproxy_test_ipto the IP address to test (for example,127.0.0.1). If you set a test IP address, the Agent uses the proxy configured inProxyAddressonly if it receives a response from a ping to the test IP address when the Agent starts.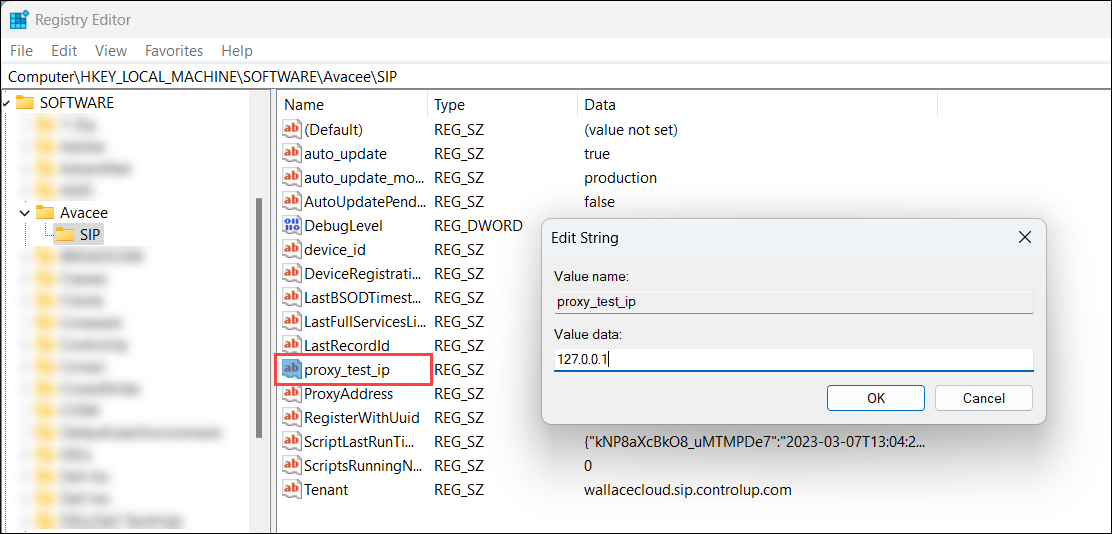
Scripted Agent uninstall
You can use the following PowerShell script to uninstall the Agent.
$Command = "c:\Windows\System32\msiexec.exe"

### to fully uninstall Agent Manager ###
$Params = "/x {2AE0BDC4-26B3-4352-81EA-F4811B5B9B60} /norestart /qn"
$ParamsArray = $Params.Split(" ")
& "$Command" $ParamsArray

### to fully uninstall SIP Agent ###
$Params = "/x {0EE8541E-2D9F-4382-820F-DE7B93F7ED53} /norestart /qn"
$ParamsArray = $Params.Split(" ")
& "$Command" $ParamsArray
You can run the the uninstallation script directly from ControlUp:
Under Configuration > Scripts click Add Script and add the PowerShell script provided above. See the Scripting Guide for more information.
Schedule when the script should run. For example, you can select the System - Once Per Day to run the script daily (the script will initially run a few minutes after you save it). If you want to run the script on only certain devices, set the script trigger to Custom Action. You can then run the action from ControlUp to uninstall the Agent from targeted devices.