The following article explains how to use the Security Policy pane in ControlUp Real-Time Hybrid Cloud. If you use ControlUp On-premises (COP), see here.
ControlUp users within the same organization can use the Security Policy pane to delegate administrative tasks by configuring a security policy. The Security Policy is a collection of settings that determine which actions can be performed by each ControlUp role.
You assign security settings per role, and can also assign them differently for each folder in the organization tree, enabling you to segment your environment into distinct areas of responsibility.
To learn more about the Security Policy, watch our video.
To access the Security Policy pane, click the Security Policy tab at the bottom of the Real-Time DX Console.
Organization Ownership and User Roles
Each ControlUp organization has a designated owner record, which initially contains the identity of the user who first created the organization, known as the Organization Owner. The Organization Owner is a Windows user or group account that has the permanent ability to change permissions. Regardless of any changes to the Security Policy, the Organization Owner can always reset the Security Policy to the default settings.
To view your current Organization Owner, in the Security Policy pane, click Manage Roles in the Home ribbon, and the Security Setting open.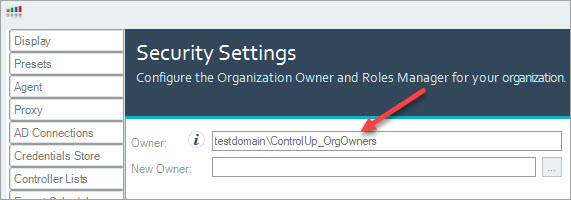
During initial configuration of the ControlUp Security Policy, it is recommended to configure a restricted Active Directory group with more than one user as an Organization Owner. This enables you to reset the Security Policy to factory settings, even if the user who originally created the organization can no longer be contacted.
ControlUp evaluates administrative permissions according to your currently logged-on Windows account. Every ControlUp organization contains a list of roles that determine the permitted actions for each role member. Every ControlUp role must include at least one Windows user or security group.
By default, the Security Policy includes the following user roles:
User Role | Description / Permissions |
|---|---|
Local Admins | Windows users with local administrative permissions on the managed machines |
Organization Members | All authenticated ControlUp users in your organization |
Automation Admins | Role has only Create Automated Actions permission |
Helpdesk | Role has preset connection, credentials, and viewing related action permissions |
ControlUp Admins | Role has preset permissions for all Management Actions |
You can't delete these default roles or modify their membership using ControlUp. However, you can grant each role some or all of the Management Actions, depending on the type of role.
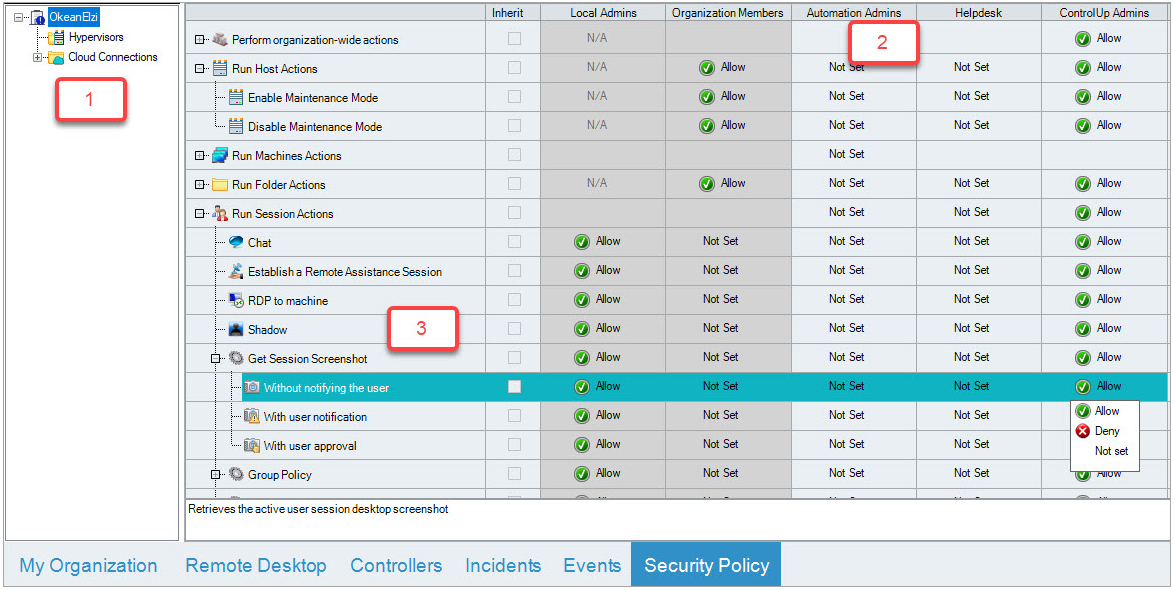
The Security Policy pane permissions grid contains a column for every role and a row for every Management Action. Each Management Action includes a number of action elements, which you can grant permissions to individually. Click + next to a Management Action to display its action elements: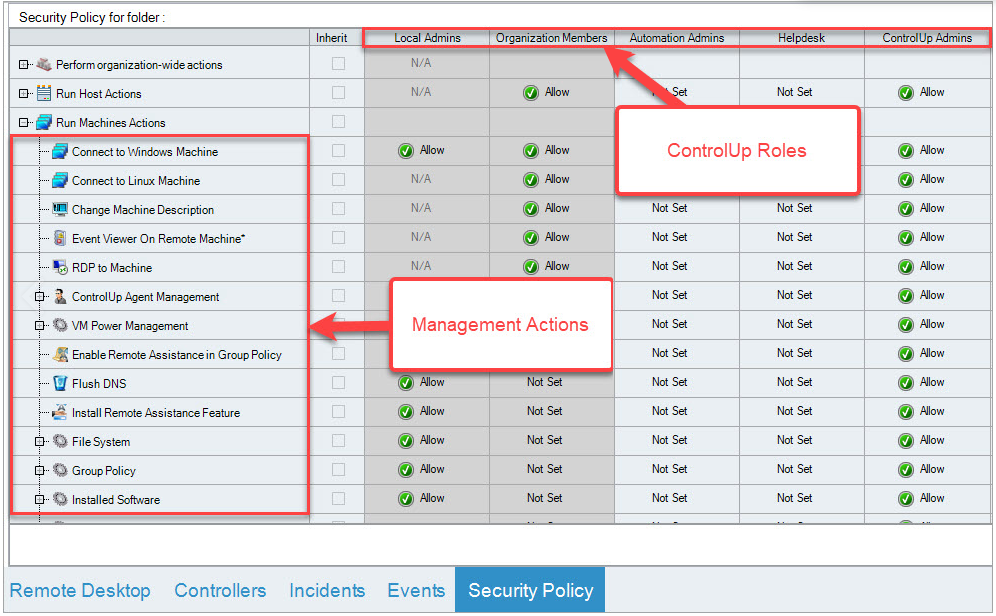
For versions 9.0.5 and higher, you can create new roles with SAML SSO groups. For details, see here.
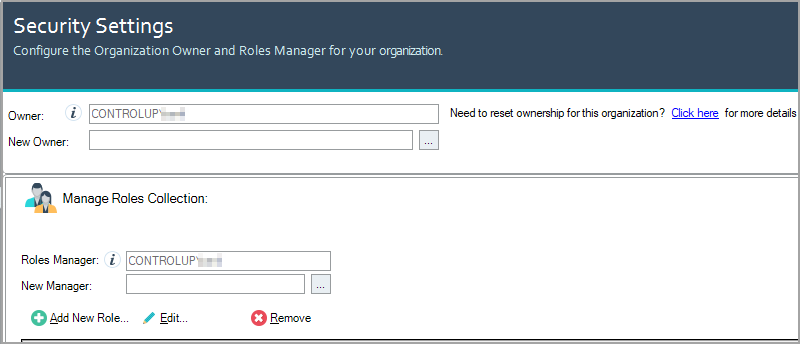
For versions 9.0 and lower, you can create new roles in the Roles Manager, which is a built-in permission initially granted to the organization’s owner. For details, see here.
Configure Custom Roles and Restrict Actions
You can create custom roles for different teams or individuals on your network using the Manage Roles Collection window. Active Directory users and groups from any domain or forest configured in ControlUp can be members of these custom groups.
Note
As a security precaution, you can’t modify the Security Policy if you have been disconnected from the Central Configuration Store for over 24 hours. Should you wish to limit your organizations maximum offline period even further, contact support@controlup.com.
To create a custom ControlUp role:
Click Manage Roles. The Security Settings popup appears:
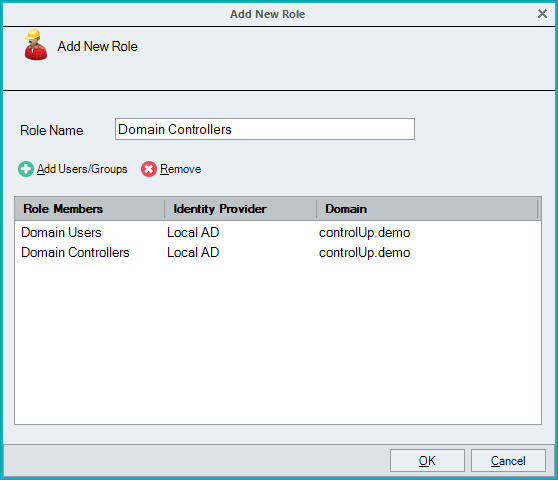
Click Add New Role. The Add New Role popup appears.

Note
You must be logged in as a Roles Manager. If not, the Add New Role button won't display.
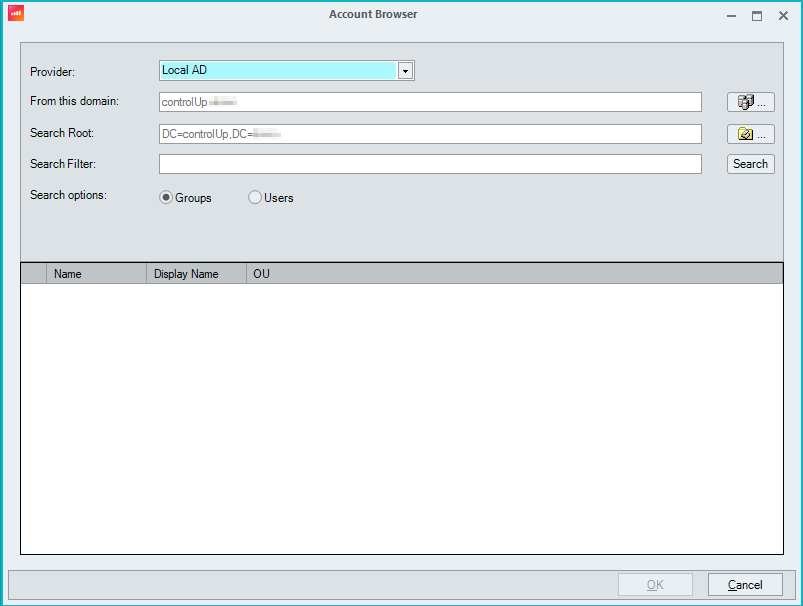
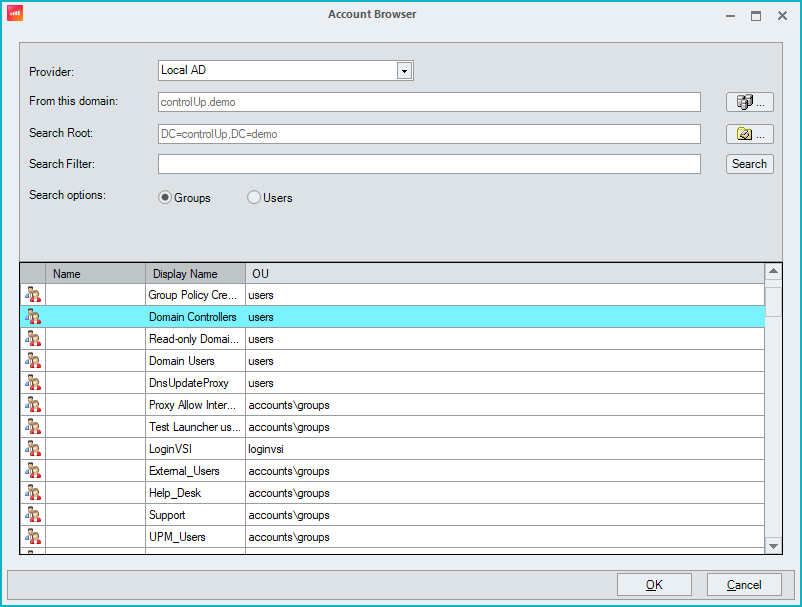
Enter a name in the Role Name text box and click Add Users/Groups. The Account Browser popup appears.
Note
If you select a group, the group scope must be either Global or Universal. Domain local group scope isn't supported.
Select the appropriate users or groups from Active Directory domains available and click OK.
You are returned to the Add New Role popup with the selected roles and groups.
Note
By default, ControlUp only displays group accounts in the search box. In order to display individual user accounts, select the Users and groups radio button.
Click OK and you return to Security Settings.
Click Apply and the new role is created and appears in the Security Policy pane.
Default Permissions
By default, Local Admins are granted permission to perform all Management Actions available in ControlUp. This means that before a user can perform a Management Action, ControlUp checks whether this user’s current Windows account is a member of the local Administrators group on the managed machine. If this validation fails, the Management Action isn't completed.
Organization Members are allowed to perform organization-wide actions, but not Management Actions. For example, they can see the folder tree, create or modify folders, add or remove machines and connect to machines to see their performance information. However, they can't perform any actions on the managed machines.
Permissions for Management Actions
The rows in the permissions grid correspond to Management Actions. For more details regarding particular permissions, see Action Permissions below.
Every ControlUp user can be either allowed or denied access to a Management Action, depending on their role membership and the location of the managed resource in the organization tree. Each cell in the permissions grid can be in one of the following states:
Allow. Users in the current role are allowed to run the action unless they are also members of another role that is configured with a Deny set.
Not Set (or blank). Users in the current role aren't allowed to run the action unless permitted by another role.
Deny. Users in the current role are never allowed to run the action.
N/A. The said action doesn't apply to the role. This can't be changed.
For example, by default, a member of the Local Admins is allowed to perform all machine actions on all machines in the organization. This permission is granted since the Local Admins role has an Allow permission on all machine actions for the root folder, and all subfolders inherit this permission.
Important
Once the changes have been made, you MUST click Apply on the Home ribbon of the Security Policy pane to submit your changes to the Central Configuration Store. Until this button is clicked, any changes to the Security Policy aren't applied.
Security Policy Inheritance
When a ControlUp organization is first created, the default Security Policy is configured on the root folder of the organization, which has the organization’s name.
Configuring Security Policy for Subfolders
By default, all of the subfolders under the root folder in your organization tree inherit their Security Policy from the root folder. A checked Inherit checkbox near each permission in the grid signifies this. If you require the Security Policy of a subfolder to be different from its parent folder, you must uncheck this checkbox for the selected permission row.
After you uncheck the Inherit checkbox, a blue exclamation point icon appears on the subfolder, indicating that part of its Security Policy is no longer inherited from its parent folder:
In the above example, the Enable Maintenance Mode Management Action for the "Hypervisors” folder isn't inherited from its parent folder, hence the blue exclamation point icon.
Granting Permissions
To grant user permissions for Management Actions, you require the following details:
Folder name. The name of a folder in the organization tree, which contains resources you need to grant permission. Select the root folder if you need to grant permissions on machines in the entire organization, otherwise select a subfolder (e.g. Workstations).
Note
You can also grant permissions on individual machines by selecting them in the organization tree. However, for manageability reasons, it is recommended that you grant permissions on folders only.
Role name. The name of a built-in or custom role to which the user belongs. For example Help Desk Users.
Action name. The name of the Management Action which you would like to permit (e.g. Refresh Machine Policy). You can also grant permissions on an entire action group (e.g. Run machine Actions).
After you provide the details above, click on the required folder name in the organization tree on the left and locate the row in the table with the required action name in the row name.
If the Inherit checkbox for that row is selected, deselect it. If not, click on the cell with the required Role name in the column header and select Allow from the drop-down list.
Click Apply on the Home ribbon to save the changes. Members of the Helpdesk role now have the ability to run the Refresh Group Policy action on machines located in the Workstation folder.
Note
As with standard Windows permissions, Deny permissions always override Allow permissions. This means that any Allow permission applies only if the affected user is not a member of any other role which has a Deny permission entry in the same row.
Denying Permissions
ControlUp’s Security Policy includes two approaches of preventing users from running management actions:
Implicit Deny. Not granting permissions in the first place, or setting the permission to Not Set.
Explicit Deny. Setting the permission to Deny.
The difference between these two methods is that Explicit Deny overrides any other permission, and the affected users will always be denied access to the action, even if they are members in additional roles that allow access to the same action. Implicit Deny (or Not Set) means that users aren't allowed to run the Management Action, unless permitted to another role they are also a member of.
Note
Its best practice to use the Explicit Deny approach only if you need to configure an exception for an existing rule. For example, to enable all Local Admins to restart workstations, except for Helpdesk users, an Explicit Deny is recommended.
However, to ban Local Admins from restarting machines, it is recommenced to use an implicit Deny (Not Set) permission.
Resetting Inheritance
There are several methods of restoring the default Security Policy in ControlUp, depending on your needs:
If there’s a single permission entry currently set on a folder and you need to reset this permission to inherit its parent folder settings, select the Inherit checkbox next to that permission and click Apply on the Home ribbon.
If you have a folder with a complete Security Policy that you would like to extend to all its subfolders, select this folder and click Reset Inheritance on the Home ribbon, and then click Apply. You will need an Allow setting in the Change Permissions row for the selected folder to perform this action.
If your entire Security Policy is misconfigured and you would like to reset it to factory defaults, click Reset Defaults on the Home ribbon. Note that this operation will also remove any custom user roles you have created. To perform this operation, your user account must be either the Organization’s Owner or a Roles Manager with sufficient permissions to change permissions on the root folder.
Action Permissions
This section describes all the permissions configurable in ControlUp.
Perform Organization-wide Actions
These actions are performed on objects in the ControlUp’s organization tree only, without affecting managed resources, such as machines or user sessions. They can also be referred to as 'tree actions' since they are executed using the ControlUp Real-Time DX Console and include the ability to add or remove machines, create and arrange folders, and change permissions.
Management Action | Functionality |
|---|---|
Add Folder | Add a folder in the organizational tree view to arrange similar machines |
Add Machine | Add a managed machine to the organizational tree view |
Change Folder Description | Change the description for a folder |
Change Permissions | Modify the access and management permissions for users in your environment. As a security precaution, the Organization’s Owner/s can always change the permissions |
Change Settings | Modify the following settings: Presets, Agent, AD Connections, Schedule, Monitors, Virtual Expert, and Audit Log settings. |
Configure Incident Triggers | Configure Incident Triggers |
Connect to Data Source | Collect data from an external data source, such as hypervisor, XenDesktop site, public cloud or NetScaler appliance |
Create Automated Actions | Create Automated Actions |
Download and share Script Actions | Download and share Script Actions |
Edit Stress Settings | Modify who is able to edit the Stress Settings |
Launch Controllers | Work in the Controllers pane. This permission is only configurable on the root folder. |
Manage All Cloud Connections | Create, edit and delete cloud connections in this organization |
Manage All EUC Environments | Create, edit and delete EUC Environments connections in this organization |
Manage All Hypervisors | Create, edit and delete hypervisor connections in this organization |
Manage All NetScaler Appliances | Create, edit and delete NetScaler connections in this organization |
Manage application load time settings | Configure the parameters ControlUp Agent uses when measuring application load times |
Manage application title settings | Configure the parameters ControlUp agent uses to monitor title of active windows |
Manage branch mapping settings | Configure the lookup table of client IP addresses to branch office names in the Settings window |
Manage browser URL settings | Configure the parameters ControlUp agent uses to monitor URLs of browser processes |
Manage data upload settings | Modify data upload and incident reporting settings on the Data Upload tab of the Settings window |
Manage Monitor | Perform management tasks for ControlUp Monitors |
Manage Script Actions | Manage Script Actions |
Manage Web Application | Modify Web Application settings of this organization |
Remove Folder | Remove a folder in the organizational tree view |
Remove Machine | Remove a managed machine from the organizational tree |
Rename Folder | Rename a machine folder in the organizational tree view |
Run draft Script Actions | Run Scripts Actions that are in draft mode |
Run shared Script Actions | Run shared Script Actions |
Shared Credentials | Perform all actions related to Shared Credentials (some can be granted only for non-built-in roles). |
Credentials | Assign permissions for shared credentials in your environment. If you set "Deny" or "Not Set", then a user in this role won't be able to use this permission in any script or automated action. If credentials are configured for a hypervisor. EUC environment, etc. in a specific monitor site, we recommend to set "Alow" only to users from that site. |
Manage Shared Credentials | Create, edit and delete Shared Credentials in this organization |
Use Shared Credentials | Connect to an organizational tree view connection with Shared Credentials (can be granted only for non-built-in roles) |
Use Web Application | Launch and use the web interface for this organization. |
View All Hypervisors | View all hypervisor related objects (VMs, Hosts and hypervisor connections) in this organization |
View Events | View Events pane |
View Folder | View a folder in the organizational tree view |
View Incidents | View Incidents pane |
Run Application Actions
Citrix Virtual Apps and Desktops
Management Action | Functionality |
|---|---|
Enable Published Application | Enable Published Application |
Disable Published Application | Disable Published Application |
VMware Horizon
Management Action | Functionality |
|---|---|
Enable Horizon Application Pool | Enable Omnissa Horizon (formerly VMware Horizon) Application Pool |
Disable Horizon Application Pool | Disable Omnissa Horizon Application Pool |
Run Folder Actions
Citrix Virtual Apps and Desktops
Management Action | Functionality |
|---|---|
Disable Delivery Group | Disable CVAD delivery group |
Disable Maintenance Mode | Change the state of a certain CVAD delivery group out of Maintenance Mode |
Enable Delivery Group | Enable CVAD delivery group |
Enable Maintenance Mode | Enter a certain CVAD delivery group into Maintenance Mode |
Script Actions
View all installed Script-based Actions (SBA) in your environment. Here you can define which user role can execute a certain script.
VMware Horizon
Management Action | Functionality |
|---|---|
Disable Horizon Pool/Farm | Disable Omnissa Horizon (formerly VMware Horizon) Pool/Farm |
Disable VMware Horizon Pool/Farm provisioning | Disable Omnissa Horizon Pool/Farm provisioning |
Enable Horizon Pool/Farm | Enable Omnissa Horizon Pool/Farm |
Enable Horizon Pool/Farm provisioning | Enable Omnissa Horizon Pool/Farm provisioning |
Run Host Actions
Management Action | Functionality |
|---|---|
Disable Maintenance Mode | Change the state of a certain host out of Maintenance Mode |
Enable Maintenance Mode | Enter a certain host into Maintenance Mode |
Run Machines Actions
These actions are performed on the managed machines via the ControlUp Agent.
Management Action | Functionality |
|---|---|
Change Machine Description | Change description for machine |
Connect to Windows Machine | Connect to Windows Machine |
Enable Remote Assistance in Group Policy | Removes the unsolicited remote assistance restriction on the target machine |
Event Viewer On Remote Machine | Opens the event viewer of the remote machine. This action requires RPC access and valid administrative credentials on the target machine(s) |
Flush DNS | Flush DNS on selected machine |
Install Remote Assistance Feature | Install Remote Assistance Feature |
RDP to Machine | RDP to machine |
Azure Cloud
Perform Azure related actions.
Management Action | Functionality |
|---|---|
Reboot | Restart a certain Azure Machine |
Start | Start a certain Azure Machine |
Stop | Power-Off a certain Azure Machine |
Reapply Azure Machine State | Reapply a certain Azure Machine |
Deallocate Azure Machine | Stop and Deallocate Azure Machine |
Azure Virtual Desktop
Management Action | Functionality |
|---|---|
Disable Drain Mode | Remove Drain mode to enable new connections on the session host |
Enable Drain Mode | Place a session host into Drain Mode to prevent new connections. |
Citrix Virtual Apps and Desktops
Perform Citrix Virtual Apps and Desktops related actions.
Management Action | Functionality |
|---|---|
Disable Maintenance Mode | Change the state of a certain host out of Maintenance Mode |
Enable Maintenance Mode | Enter a certain host into Maintenance Mode |
ControlUp Agent Management
These actions define how the user role can interact with the ControlUp Agent. All actions require RPC access and valid administrative credentials on the target machines.
Management Action | Functionality |
|---|---|
Disable Outbound Communication | Disable outbound communication at the selected machine |
Enable Outbound Communication | Disable outbound communication at the selected machine |
Install Remote Agent as Master Image | Installs the remote agent as an image on the selected machine |
Listening Port Remote Agent | Set listening port for the remote agent on the selected machine |
Remove Remote Agent | Remove the remote agent at the selected machine |
Restart Remote Agent | Restarts the remote agent at the selected machine |
Start Remote Agent | Starts the remote agent at the selected machine |
Stop Remote Agent | Stops the remote agent at the selected machine |
Upgrade/Install Remote Agent | Upgrades the remote agent on the selected machine |
File System
Perform all file-system related actions in this category.
Management Action | Functionality |
|---|---|
Manage File System | Opens the File System Controller Form |
Monitor File System | View, analyze and compare file system objects |
Group Policy
Perform all group policy-related actions in this category.
Management Action | Functionality |
|---|---|
Refresh Machine Policy | Refreshes the machine group policy using the command 'gpudate.exe /target:machine' |
Installed Software
View information about the software package currently installed.
Management Action | Functionality |
|---|---|
Display Installed Software | Display information about currently installed programs |
Display Installed Updates | Display information about currently installed updates |
Power Management
Perform all power management tasks in this category.
Management Action | Functionality |
|---|---|
Shutdown | Shut down the selected machine |
Reboot | Restart the selected machine |
Wake-On-LAN | Send a Wake On LAN magic packet to wake up the machine |
Processes
Execute processes on the managed machine.
Management Action | Functionality |
|---|---|
Disable Process Execution | Disables a process execution |
Enable Process Execution | Enables a process execution |
Start Process As User | Starts a new process on the target machine, with the supplied credentials, or with the remote agent credentials |
Registry
Perform all registry-related actions in this category.
Management Action | Functionality |
|---|---|
Import Registry Machine | Import a registry key from a file. Type a file name or browse for a registry file to import. |
Modify Machine Registry | Perform registry actions on machines in this container. |
Monitor Machine Registry | Analyze and compare registry settings on machines in this container. |
Services
Perform all service-related actions in this category.
Management Action | Functionality |
|---|---|
Manage Services | Opens the Services Controller Form and adds the selected machines |
Monitor Services | Analyze and compare system services settings on machines in this container |
VM Power Management
Control power management of virtual machines.
Management Action | Functionality |
|---|---|
Force Reset VM | Forcefully resets the virtual machine |
Restart Guest | Gracefully restarts the virtual machine |
Force Power off VM | Forcefully powers off the virtual machine |
Power On VM | Powers on the virtual machine on the hypervisor infrastructure |
Shutdown Guest | Gracefully shuts down the virtual machine |
VMware Horizon
Perform all Omnissa Horizon (formerly VMware Horizon) related actions in this category.
Management Action | Functionality |
|---|---|
Disable Connection Server | Disable Omnissa Horizon Connection Server |
Disable Maintenance Mode | Remove a certain Horizon machine from Maintenance Mode state. This operation takes the current machine out of maintenance mode. Applies only to managed machines which do not belong to Instant Clone Engine desktops. |
Disable RDS Server | Disable Omnissa Horizon RDS Server |
Enable Connection Server | Enable Omnissa Horizon Connection Server |
Enable Maintenance Mode | Enter a certain Horizon machine into Maintenance Mode. This operation puts the current machine into maintenance mode. Applies only to managed machines which do not belong to Instant Clone Engine desktops. |
Enable RDS Server | Enable Omnissa Horizon RDS Server |
Recover Machine | Recover a certain Horizon Instant Clone machine . This operation applies only to machines belonging to Instant Clone Engine desktops. The machine being recovered must not have any active user session, otherwise this operation fails. |
Restart Horizon Machine | Restart a certain Horizon machine. This applies only to managed machines. |
Run Processes Actions
Perform all of the actions in this category on process objects in the current container. A user granted access to these actions can execute them only on processes running on managed machines affected by the Security Policy you are currently editing. See “Security Policy for folder: …” on the top of the permissions grid.
For more information regarding these actions, see My Organization Pane.
Management Action | Functionality |
|---|---|
End Process | Terminates the selected process gracefully |
Kill Process | Terminates the selected process |
Set Process Priority | Set Process Priority |
Pskill Process | Terminates the selected process |
Set Process Affinity | Set Process Priority |
CPU Throttling
Management Action | Functionality |
|---|---|
Start CPU Throttling | Set a limit for the CPU consumption of the selected process(es) |
Stop CPU Throttling | Remove the set limit for the CPU consumption of the selected process(es) |
Run Session Actions
Actions in this group are invoked using the Sessions view and performed on the managed machines using the ControlUp Agent. Users granted access to these actions can execute them only on user sessions hosted on managed machines affected by the Security Policy that you are currently editing. See “Security Policy for folder: …” on the top of the permissions grid.
For more information regarding these actions, see My Organization Pane.
Management Action | Functionality |
|---|---|
Chat | Starts a chat |
Establish a Remote Assistance Session | Initiates a remote control session. For RDP sessions, generates an RAInvitation file and sends it back to the console |
RDP to machine | Switches to Remote Desktop view and establishes an RDP connection |
Remote Control | Initiates a remote control session |
Remote Control (Admin) | Initiates a remote control session with elevated commands |
Shadow | Starts an additional session on the target machine, that controls the selected session using the 'Shadow' tool |
Get Session Screenshot
Retrieves the active user session desktop screenshot.
Management Action | Functionality |
|---|---|
With user approval | Retrieves the active user session desktop screenshot, but asks for user approval |
With user notification | Retrieves the active user session desktop screenshot with a user notification |
Without notifiying the user | Retrieves the active user session desktop screenshot without a user notification |
Group Policy
Perform all Group Policy related actions in this category.
Management Action | Functionality |
|---|---|
Refresh Machine Policy | Refreshes the user group policy removed by the Kill Policy action |
Refresh User Policy | Refreshes the user group policy using the command 'gpupdate.exe /target:user |
Remove Group Policy | Removes explorer Group Policy on the selected session |
Installed Software
View information about software packaged currently installed.
Management Action | Functionality |
|---|---|
Display Installed Software | Display information about currently installed programs |
Display Installed Updates | Display information about currently installed updates |
Processes
Execute processes on the managed machine
Management Action | Functionality |
|---|---|
Run Process | Starts a new process in the selected session |
Registry
Perform all registry-related actions in this category.
Management Action | Functionality |
|---|---|
Import Registry User | Imports a registry key from a file. Type a file name or browse for a registry file to import. |
Modify User Registry | Performs registry actions on sessions in this container |
Monitor User Registry | Analyze and compare registry settings on session in this container |
Remote Desktop Services
Perform all Terminal Services - related actions in this category.
Management Action | Functionality |
|---|---|
Disconnect Session | Disconnect a user session without notifing the user. If the selected target is an Account, then all the account sessions on the selected folders will be Disconnected. |
Log Off Session | Logs off a user session without notifing the user. If the selected target is an Account, then all the account sessions on the selected folders will be logged off. |
Send Message | Sends a message to the selected sessions |
Send Super Message | Send a rich text message to the selected sessions, including graphics, text formatting and the ability to gain feedback from the user |
VMware Horizon
Management Action | Functionality |
|---|---|
Disconnect Session | Disconnects a certain Horizon session |
Log Off Session | Logs off a certain Horizon session |
Log Off Session Forcibly | Logs off a certain Horizon session forcibly. This operation will also log off a locked session. |
Agent-based Actions
You can perform the rest of the machine actions with the ControlUp Agent on the managed machines. A user must be granted access to agent-based actions to perform these actions on the managed machines. Agents on a managed machines use its Local System account to perform the action, unless otherwise specified.
For example, when using the Processes > Run as… action, the user can execute any process accessible by the Local System account. As a result, you can't run processes from the network unless you specify valid credentials, since the Local System can't access network locations.
For a full list of agent-based actions, see My Organization Pane.