Navigating the Scoutbees Web App
- Print
- DarkLight
- PDF
Navigating the Scoutbees Web App
- Print
- DarkLight
- PDF
Article Summary
Share feedback
Thanks for sharing your feedback!
This article covers how to effectively navigate the Scoutbees web app, and configure it so that you can see the information you need.
Home Page
The Scoutbees Home page shows all of your Scouts, with a summary of each Scout's configuration and test results.
There are two ways you can view this page:
- In a grid view, where each Scout has its own widget. This view lets you see more graphical test result information for each Scout.
- In a list view. This view is more compact, and also lets you select Scouts with checkboxes to perform an action on multiple Scouts at the same time.
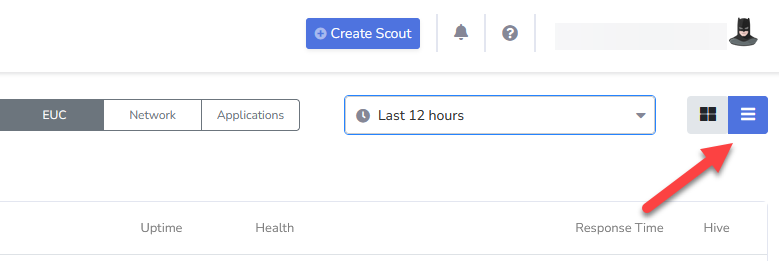
Switch between these views at the top-right of the page.
Select a Scout Type to Show
At the top of the Home page, you can select which of the three main types of Scouts you want to display - EUC, Network, or Applications. When you select a Scout type, the Test Overview graph shows test result summary with all Scouts of the selected type.
You can select All Types to show all of your Scouts.
Select a Time Period for Test Results
By default, the Home page shows test results for the last 24 hours. You can change the time period at the top of the page. Select from preset time periods, or enter a custom range.

Filter your Scouts
To add a filter the Scouts that are displayed on the Home page:
- Select Filter Scouts to see the available filter categories. In addition to the default filter categories, custom labels also appear in the list if you have added any to your Scouts. For more information on labels, see Scout Labels below.

- Select a filter category to see the available values for that category.
- Select a filter value to add the filter.
The filter is now applied to all the Scouts on the Home page, indicated by the blue box. You can add additional filters, or remove them.

Scout Details Page
From the Scoutbees Home page, select a Scout's name to open the Scout Details page.
On this page, you can see details of the Scouts configuration, and more statistics about the test results. The statistics on this page are relevant to the selected Hives and time period at the top of the page.
Perform Actions on the Scout
From the Scout Details page, you can perform the following actions on the Scout:
- Create an Alert Policy so that you are notified when issues occur. For details, visit Alert Policies. The alert policy icon indicates the ststus of the alert policy:
 indicates that an alert policy already exists.
 indicates that an alert policy exists, but it is disabled.
 indicates that no alert policy exists.
- Delete the Scout permanently.
- Edit the Scout's configuration.
- Disable the Scout temporarily. If you disable a Scout, the Scout's configuration and previous test results are saved, but the Scout does not run any new tests and collect new information. You can enable the Scout again at any time.
 indicates that an alert policy already exists.
 indicates that an alert policy exists, but it is disabled.
 indicates that no alert policy exists.
See Test Result Statistics
On the Scout Details page, you can see detailed and interactive test result statistics including:
- The number of successful and unsuccesful tests.
- The test failure rate.
- Other metrics, depending on the type of Scout you are viewing.
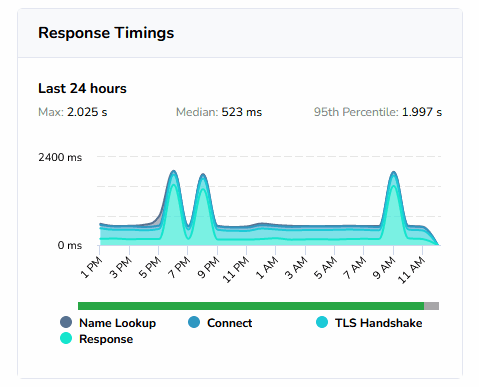
For example, the image below shows result statistics for an HTTP/S Scout.

These results are interactive. You can hover over the graphs to see more information, and click on a data point in the graph to jump straight to the relevant test results.
You can also see a list of the Hives that are running the Scout, along with results for each Hive. Choose the map view to see each Hive geographically. This lets you visually identify regions that are experiencing problems.

See Individual Test Results
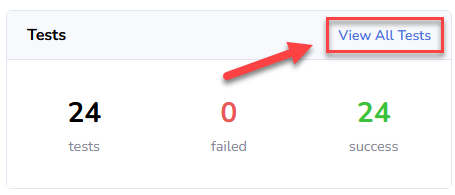
From the Scout Details page, select View All Tests to see a list of test results.
In the list of test results, you can sort and filter the columns, select which columns to display, and export the list to a CSV file.
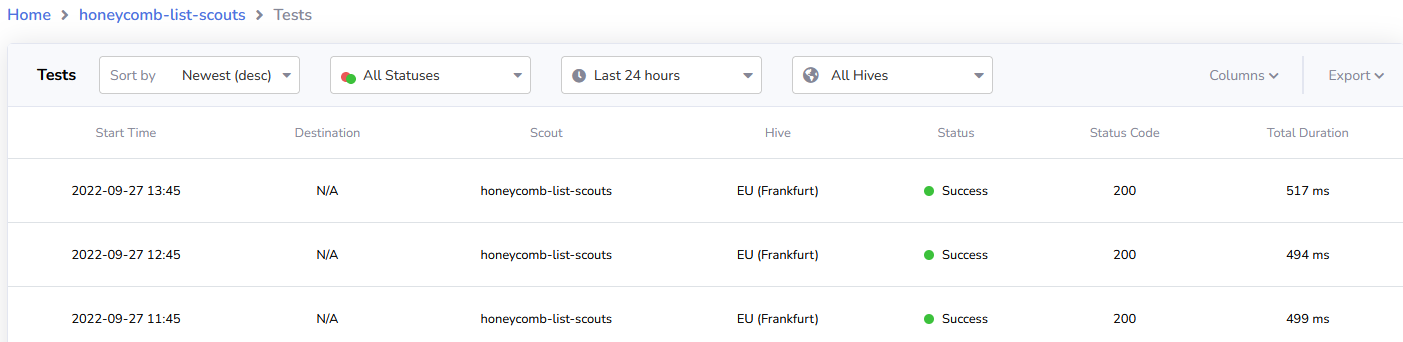
Select a test results to open the Test Details page for the test. The type of information returned in a test result depends on the Scout Type. Visit the docs for EUC, Network, and Application Scouts to see what kind of information Scoutbees can get.
Scout Labels
You can create custom Scout labels to organize your Scouts into groups. Labels are key-value pairs that you add to your Scouts. After you have added labels to your Scouts, you can use them to filter your Scouts.
For example, you could add a label key Environment, and label values such as production, QA, etc. This lets you filter your Scouts based on their environment so that you can monitor each environment separately on the Home page.
Add a Label to a Scout
To add a label to a Scout:
- Create a new Scout, or edit an existing one, to open the Scout configuration window.
- Under Labels, select Add label.
- Enter a label key in the Key field. If you have already created label keys, then you can select them from the dropdown.
- Enter label value in the Value field. If you have already created label values for the entered label key, then you can select them from the dropdown.
- Repeat steps 2-4 for as many labels as you want to add to the Scout.
- Save the Scout configuration.
After adding the label, you can now use it to filter the Scouts on the Home page. You can remove labels from a Scout in the Scout configuration window.
Was this article helpful?