ControlUp provides out-of-the-box integration with your Azure environment into the Real-Time DX Console and our VDI App, making it easy to monitor and troubleshoot your Azure resources such as virtual machines or logical disks. The following article explains the preparation steps that you need to start managing and troubleshooting your Azure environment with ControlUp. After you follow these steps, you will be up and running with our Azure integration, and gain practical understanding of how to configure the different ControlUp components.
Related topics:
To learn how to get started with Azure integration, watch our video.
Prerequisites
Set up ControlUp Data Collectors for the Azure connection. Data Collectors make the API calls to your Azure tenant. We strongly recommend that you configure a maximum of 5 subscriptions per Data Collector to prevent overloading. Depending on the number and size of your subscriptions, you might need to set up multiple Data Collectors. Learn more about Data Collector machine requirements and Azure throttling limits. To check if a specific machine is already configured as a data collector, see here.
The Data Collector machines must have access to https://management.azure.com.
An active Azure subscription. If you don't have a subscription yet, you need to create an Azure account here.
If you have an Azure Enterprise Agreement, make sure to allow Account Owners and Department Administrators to view charges in your Azure subscription.
Make sure the Microsoft Resource Health provider is registered for the Azure subscription you want to integrate with ControlUp.
Benefits of monitoring your Azure environment with ControlUp
Easier management of your Azure resources
A comprehensive view of your Azure costs
Automating actions on your Azure resources
Which resources can we monitor?
We provide metrics for different Azure resources. You can monitor the following Azure resources in the Real-Time DX Console and the VDI App:
Subscriptions
Resource groups
Virtual machines
Virtual disks
Microsoft Azure Virtual Desktop
Host Pools
Session Hosts
Workspaces
Application Groups
From version 9.1 and higher, you can break down your cloud data connections with the Real-Time DX Console.
Getting Started
To take the first steps on your journey into the ControlUp integration with Azure, you need to create a Service Principal and generate a Client IDand Secret Key, which represent a username and password. Refer to Microsoft's official documentation to learn how to create a service principal. You need to provide the following to connect ControlUp with Azure:
Tenant ID
Application ID
Secret Key
Important
Credentials should not be shared with other platforms or across ControlUp environments.
Managed Identity for Azure
From version 9.2.5 beta, ControlUp supports Managed Identity as a built-in alternative to standard Service Principal credentials, allowing you to configure Azure connections securely without providing a Client Secret. You can easily configure connections using either a system-assigned Managed Identity, which requires no additional IDs, or a user-assigned Managed Identity, which simply requires a client ID.
Your selected authorization method is strictly validated during setup, saved directly to the connection configuration, and seamlessly persists across all edit, reload, and update operations. Once configured, this authentication method is consistently utilized by the data collector runtime to ensure secure and uninterrupted data collection.
Mandatory Roles for ControlUp
Make sure you assign the following roles or custom roles to all service principals you want to use for ControlUp:
Reader
Virtual Machine Contributor. Necessary to perform actions on your Azure virtual machines.
If you are unable to use Azure's built-in roles, then create a custom role with these permissions and assign your service principal:
Microsoft.Resources/subscriptions/resourceGroups/read
Microsoft.ResourceGraph/resources/read
Microsoft.ResourceGraph/resourcesHistory/read
Microsoft.Subscription/aliases/read
Microsoft.Resources/subscriptions/read
Microsoft.Resources/subscriptions/resourceGroups/deployments/read
Microsoft.AzureActiveDirectory/b2ctenants/read
Microsoft.Compute/virtualMachines/vmSizes/read
Microsoft.Compute/locations/vmSizes/read
Microsoft.CostManagement/query/read
Microsoft.CostManagement/forecast/read
Microsoft.CostManagement/forecast/action
Microsoft.Compute/virtualMachineScaleSets/virtualMachines/read
Microsoft.Compute/virtualMachineScaleSets/read
Microsoft.ResourceHealth/AvailabilityStatuses/read
Microsoft.Compute/virtualMachines/read
Microsoft.Compute/disks/read
Microsoft.Compute/virtualMachines/instanceView/read
Microsoft.Compute/virtualMachines/providers/Microsoft.Insights/diagnosticSettings/read
Microsoft.Compute/virtualMachines/powerOff/action
Microsoft.Compute/virtualMachineScaleSets/virtualMachines/powerOff/action
Microsoft.Compute/virtualMachineScaleSets/virtualMachines/deallocate/action
Microsoft.Compute/virtualMachines/deallocate/action
Microsoft.Compute/virtualMachineScaleSets/virtualMachines/restart/action
Microsoft.Compute/virtualMachines/restart/action
Microsoft.Compute/virtualMachineScaleSets/virtualMachines/start/action
Microsoft.Compute/virtualMachines/reapply/action
Learn more about assigning roles to a service principal in the official documentation.
Create the Azure Connection in ControlUp
To add an Azure connection to ControlUp, you can use:
Add Azure Connection using PowerShell
In this section, we use the Add-CUCloudConnection cmdlet to add the Azure connection to your ControlUp organization tree.
Open PowerShell as an administrator on a monitor machine and import the ControlUp.PowerShell.User module:
PowerShell
$pathtomodule = (Get-ChildItem "C:\Program Files\Smart-X\ControlUpMonitor\*ControlUp.PowerShell.User.dll" -Recurse | Sort-Object LastWriteTime -Descending)[0]
Import-Module $pathtomodule
Add your Azure Cloud credentials and provide your Secret Key, Client ID, and Friendly Name as needed:
PowerShell
$Secret = ConvertTo-SecureString "[Secret Key]" -AsPlainText -Force -debug

Add-CUCredentials -ClientId [Client ID] -SecretKey $Secret -SiteName Default -FriendlyName [Credentials Friendly Name] -IsCloud True -ShareWithUser -debug
Create a new Azure cloud connection:
PowerShell
Add-CUCloudConnection -Type Azure -TenantId <TenantID> -SiteName <SiteName> -Credentials <Credentials> DataCollectorNames <DataCollectorHostMachine> -EnableAvd <$true> -Proxy <ProxyName>For example:
PowerShell
Add-CUCloudConnection -Type Azure -TenantId 6ec9ec76-46a9-41ee-b0d3-076bcd11f67e -SiteName Default -Credentials avdShared6 -DataCollectorNames EmployeeD-US-LT -EnableAvd 1 -Proxy $proxysTo verify if your Azure connection wassuccessfully added, run the Get-CUCloudConnection cmdlet to retrieve a list of all cloud connections. Note the ID of your Azure subscription.
Add Azure Connection using the Console
After you have your Tenant ID, Application ID, and Client Secret, you can add the Azure connection to ControlUp.
To add a new Azure Cloud Connection:
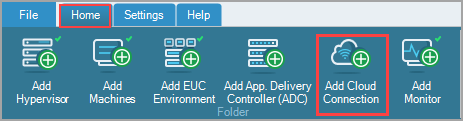
From the Real-Time DX Console, click Add Cloud Connection.
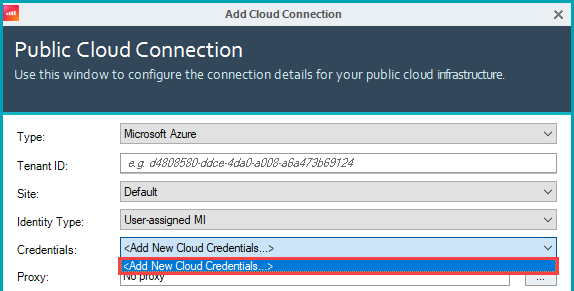
In the Type field, select one of the following:
Microsoft Azure to add an Azure Commercial Cloud.
Microsoft Azure (Government) to add an Azure Government Cloud.
Under Tenant ID, enter the ID of your Azure Tenant.

Optionally, select the Site to assign the connection to.
Under Identity Type, select one of the following:
Service Principal
User-assigned MI (Managed Identity, from version 9.2.5 beta only)
System-assigned MI (Managed Identity, from version 9.2.5 beta only)
If you selected Service Principal or User-assigned MI, under Credentials, click the drop-down list and select <Add New Cloud Credentials...>
Enter the Access Key (Application ID) / Client ID, Secret Key (Client Secret), and a Friendly Name that helps identify the shared credential. For tracking purposes, we recommend using the credential name as the Friendly Name. Click OK to confirm your input.

After you add the credentials, you can see the Friendly Name with the Access Key (in parentheses) in the Credentials field.
Large environments
For large environments, we recommend adding more than one Service Principal to the Credentials List. Find more information here.

Note: The credentials must be shared credentials. See Configuring Shared Credentials for more information about shared credentials.
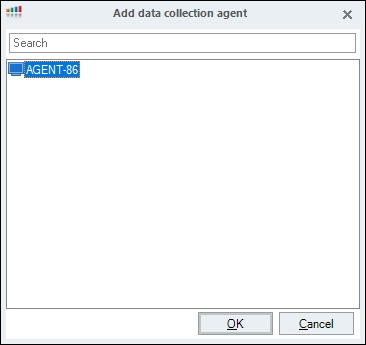
Click +Add to add a Data Collector for the cloud connection.
In the Add data collection agent wizard, select a machine that you want to use as the Data Collector. Click OK to confirm the selection.
The machine name appears and you can verify the Azure credentials by clicking Test Connection or the green checkbox that appears next to the Data Collector.
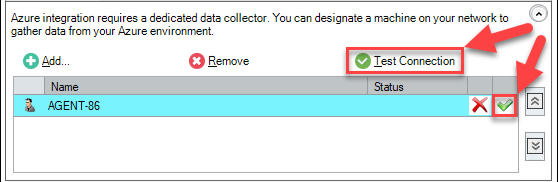
If the Data Collector establishes a successful connection to your Azure account, a green confirmation icon appears in the Status column.

If the Data Collector fails to connect to your Azure account, a red icon is shown. Hover over the red icon to see the reason for the error. To continue, you need to fix the error.
Optionally, add another machine to use as a backup Data Collector in case the primary Data Collector is down. Note that the first machine in the list is used as the primary Data Collector.
Click OK.
Add Subscriptions to Azure Connection
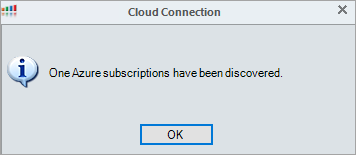
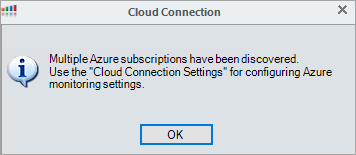
ControlUp checks how many subscriptions are associated with your Azure Tenant. The following popups are displayed based on the number of subscriptions:
1 subscription found:
2 or more subscriptions found:
The Subscriptions List tab shows all subscriptions in your Azure tenant.
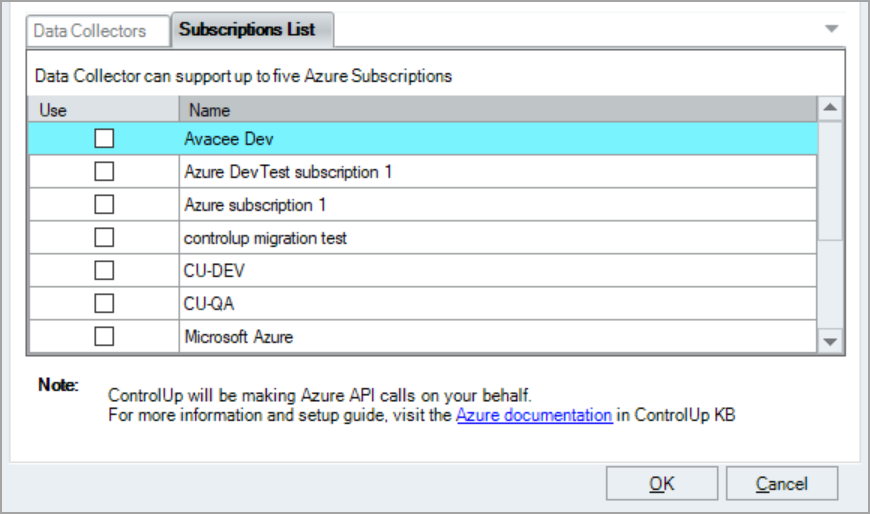
Select the checkbox next to the subscriptions you want to add. The Data Collector you added earlier is used to connect to the subscriptions you select. Follow these recommendations when adding subscriptions:
Add a maximum of 5 subscriptions for each Data Collector. If you have large subscriptions (more than 100 virtual machines), you should distribute them across different Data Collectors to prevent overloading a single Data Collector.
Add subscriptions one at a time and confirm that the data connection remains stable to all subscriptions, especially when adding large subscriptions. To do this, you'll have to follow this procedure again to add a new Cloud Connection and select a different subscription.
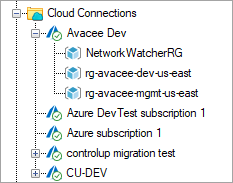
Click OK to add the Cloud Connection with the subscriptions you selected. ControlUp automatically connects to the selected subscriptions and they are added to your organization tree:
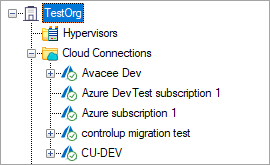
You can view Resource Groups under a subscription by clicking the + button next to the subscription:
Azure Integration in VDI App
In our VDI App, subscriptions and resource groups are displayed in the navigation hierarchy in the Discovery panel.
For more information about how to use Azure in the VDI App, see here.
Configuration Options
In the previous chapter, you added your Azure subscription to ControlUp. For now, this is enough to start monitoring your Azure resources with ControlUp. However, there are more configuration options that we want to explain in this section. Let's look at each configuration option to help you understand what additional options you have to configure ControlUp. Articles with more information are linked in the corresponding section.
Changing the Data Collection Intervals
ControlUp provides great granularity for aggregating data from your Azure environment. This enables you to refresh data in the Real-Time DX Console and the VDI App more frequently, and to benefit from a better real-time experience. You can define time intervals in seconds for which data is aggregated. Refer to the Azure Integration: Data Collection Intervals article to learn more about data collection intervals.
Displaying Azure Cost Types in ControlUp
You can make use of the different Azure cost types in the Real-Time DX Console and VDI App to streamline your Azure cost management. To learn more about how to configure cost types, refer to the Azure Integration: Collecting Cost Metrics.