At ControlUp we prioritize your security. Our feature, Advanced Authentication implements certificate-based authentication, a security mechanism that allows connections only from those Real-Time DX Consoles or ControlUp Monitors that have a certificate configured. You can either generate your own self-signed certificate or one of your corporate (third-party) certificates to authenticate Monitors and Consoles to the ControlUp backend.
If your organization requires certificate-based authentication, contact our support team before you configure Advanced Authentication.
Update Certificate
Note that the Real-Time DX Console's Update certificate action doesn’t apply to workgroup monitors, see the workaround below.
How Advanced Authentication Works
Advanced Authentication is a security measure used to securely identify and authenticate ControlUp components that access the ControlUp backend, Real-Time consoles, and ControlUp Monitors. The ControlUp organization owner, who is the user that created the organization, is responsible for configuring a certificate within the console. This can be done by generating a self-signed certificate or using a third-party certificate
The certificate that is set up for your organization is unique to it and saved in the local Certificate Store on the console machine where the organization owner has created it. Once you have set up a certificate for your ControlUp organization, the console automatically distributes the private certificate to all the monitors in the ControlUp environment, and sends a public certificate to the ControlUp backend in the cloud.
It's important to understand that if the configured certificate is missing on a console machine, it isn't possible to connect to your ControlUp organization from that particular machine. In this case, you have to manually apply the new certificate to this machine to allow the Console to connect to your ControlUp environment. This is explained below in the Distribute the New Certificate to Consoles and Assign Read Permissions to Console Users sections.
Prerequisites
ControlUp On-premises (COP) versions do not include this feature.
A ControlUp organization owner who has local admin rights on the console machine where you enable Advanced Authentication.
An existing, valid certificate. This is needed only if you want to use a third-party certificate
You must add the following registry settings to the console machine to enable Advanced Authentication:
Registry Key:
HKLM\SOFTWARE\Smart-X\ControlUp\ConsoleValue:
MCData Type:
REG_DWORDValue Data:
00000001
Certificate Information
Version: X.509v3, requiring a private key.
Serial number: a random number allowed in a 64-bit signed integer
CN=controlupcert
O=ControlUp
Expiry Date: 5 years after the creation date of the certificate
Template can be “WebServer”.
Intended Purposes can be “Server Authentication”
Certificate location must be under Local Computer > Trusted Publishers.
Signature algorithm can be secured as needed.
The hash of the data is generated by the SHA256 algorithm and signed with the RSA algorithm.
Create a Self-Signed Certificate
You can create a self-signed X.509 certificate from the Real-Time Console. In this section, we show you how to create a certificate and how it is used within ControlUp. Note that only the organization owner can create a certificate.
To create a self-signed certificate:
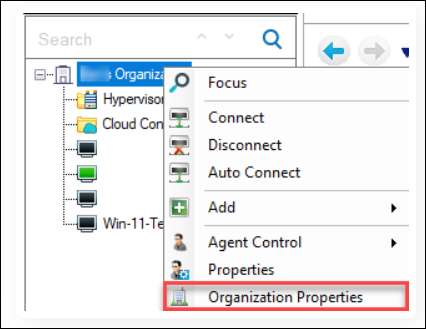
Open the Real-Time Console and right-click your organization > Organization Properties.
Click Advanced Authentication.

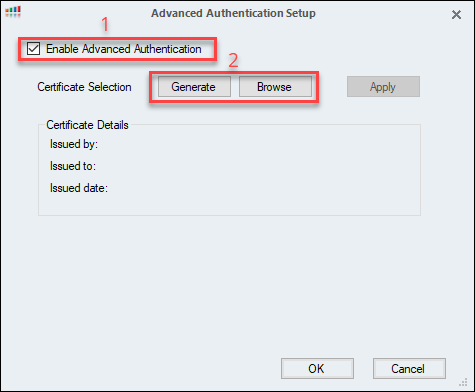
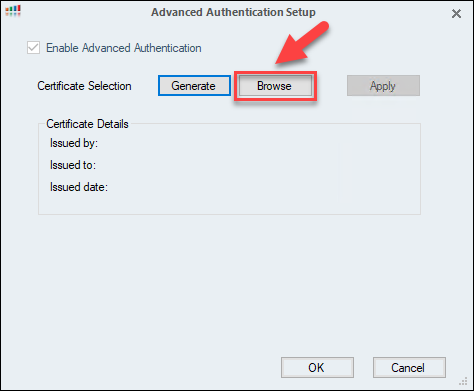
In the Advanced Authentication Setup, mark the Enable Advanced Authentication checkbox (1). This activates two buttons for selecting a certificate, Generate and Browse (2).
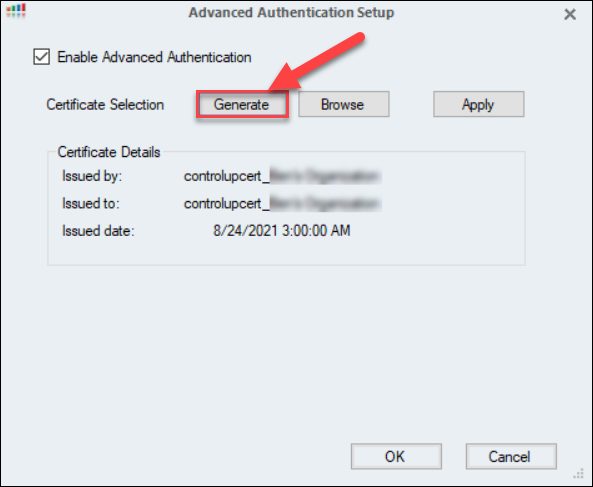
Click Generate to create a new certificate. Once the certificate is created, the Certificate Details pane is populated with the Issuer, the organization that the certificate is issued to, and the creation date of the certificate.
Click Apply to create the certificate file. Click OK to confirm the warning message.
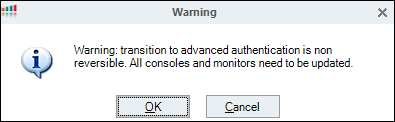
Important
A rollback to basic authentication is not possible once you confirm the warning message. Be aware of that when you activate Advanced Authentication.
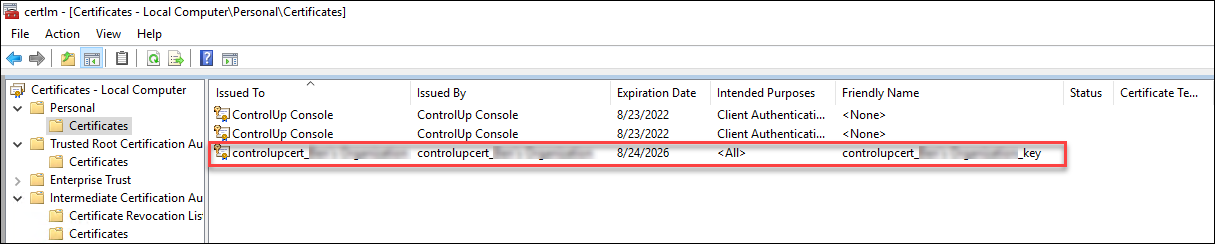
To see the new certificate, open the Certificate Manager on the Console machine. Select Run from the Start menu, and enter certlm.msc. Navigate to the Certificates folder under the Personal directory and you can see the new certificate you just created.
Note
The new private certificate is automatically distributed to domain-joined ControlUp Monitors in your organization, but not to the other machines where the ControlUp Consoles are installed. If your organization has workgroup (non-domain-joined) Monitors, see the workaround below.
Distribute the New Certificate to Consoles
In the previous section, you created and configured a self-signed certificate that is now used for the communication between your monitors and the Real-Time Console from where you generated the certificate. As already mentioned, the new certificate is distributed only to the monitors and not to the other Real-Time Consoles. You must distribute the certificate to all machines from where a Real-Time Console connects to your organization.
Note
Ensure that you exported the private key (.pfx file), either from the console or the monitor machine. For more information on exporting a PFX file, refer to this article.
There are two ways you can distribute the pfx file to other console machines. You can perform the steps manually or you can use our [PowerShell script] attached to this article. If you choose to do it manually, then you have to manually [distribute the certificate to all console machines] and set read permissions for all non-admin users on the console machine. If you want to use our PowerShell script to perform both steps automatically, refer to the Distribution and Permission Setting via PowerShell section.
Manual Distribution of the Certificate
To distribute the certificate manually:
On each console machine, open the local certificate store on the Console machine. Run mmc > Add/Remove Snap-in > Certificates > Add. In the Certificates snap-in wizard, select Computer account > Next > Local computer: (the machine this console is running on) > Finish.
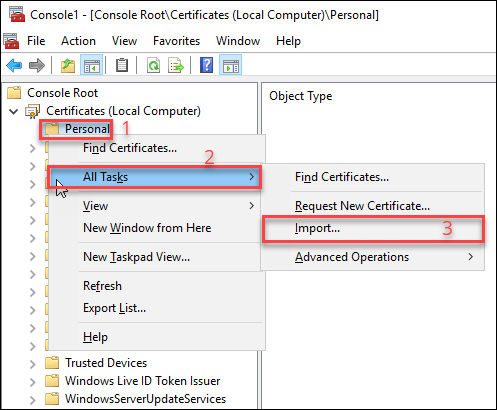
Right-click the Personal folder (1) > All Tasks (2) > Import… (3).
In the Certificate Import Wizard, make sure that Local Machine is checked. Click Next to continue with the import.

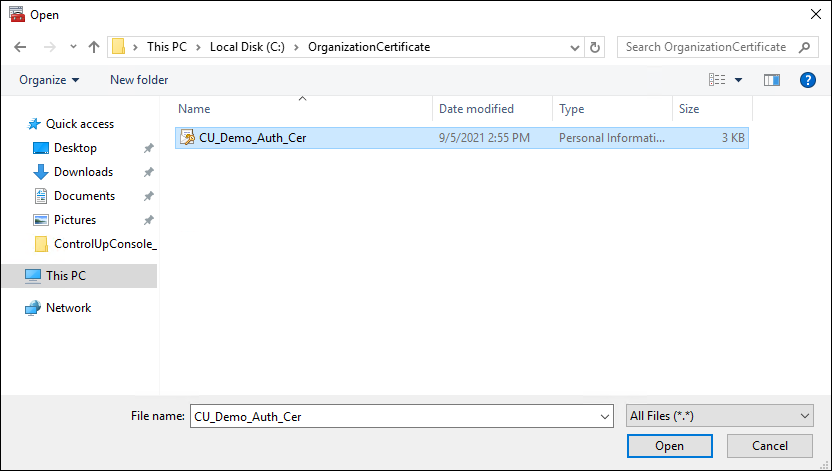
Browse the certificate file and open it.
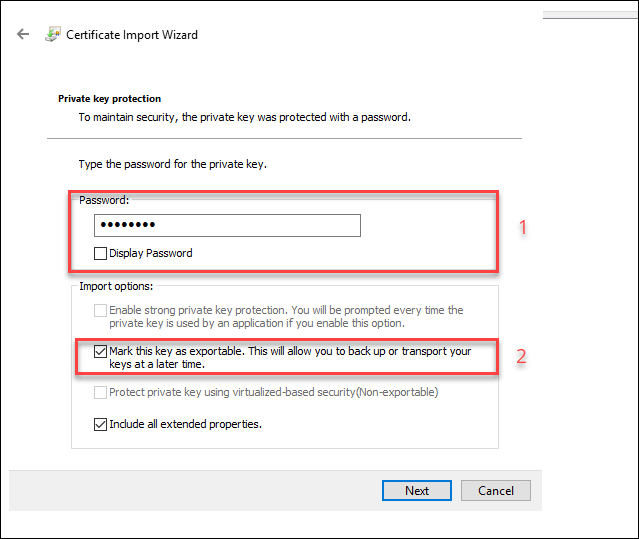
Enter the Mark this key exportable.. checkbox. (2). Click Next to continue.
Select Place all certificates in the following store and click Next.

Review the Import Summary and click Finish.
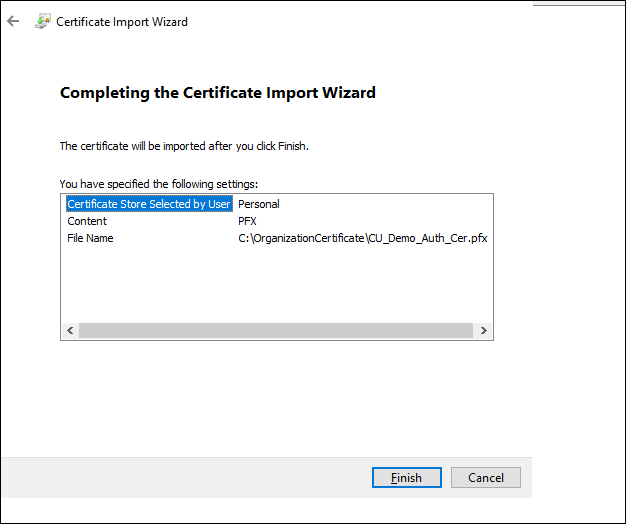
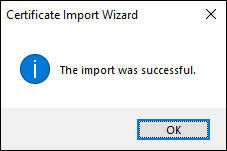
Once the import is finished, an Import was successful popup appears. Click OK.
Check the imported certificate under Personal > Certificates.

Assign the necessary read permission for all Real-Time Console users, as described in the next section.
Assign Read Permissions to Console Users
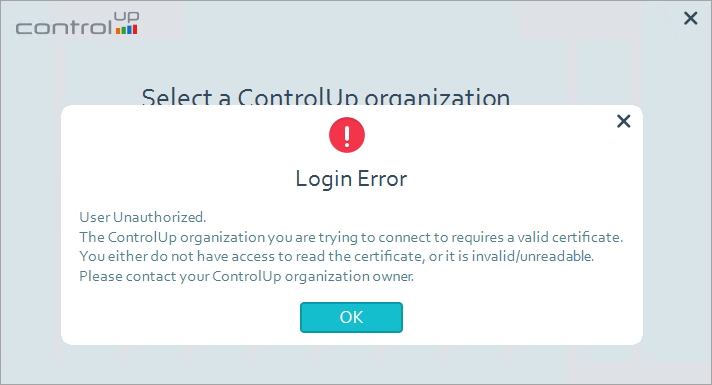
Any user that needs to use the Real-Time Console must have Read permissions to the certificate that you configured in the section above. By default, only users with administrator rights on the Console machine can access the Console without manually modifying permissions.
If a non-admin user wants to connect to the Console without read permissions, this popup appears upon login.
To set read permissions to the certificate
Open certlm.msc
Browse the certificate that was created for your organization, right-click the certificate > All Tasks > Manage Private Keys …
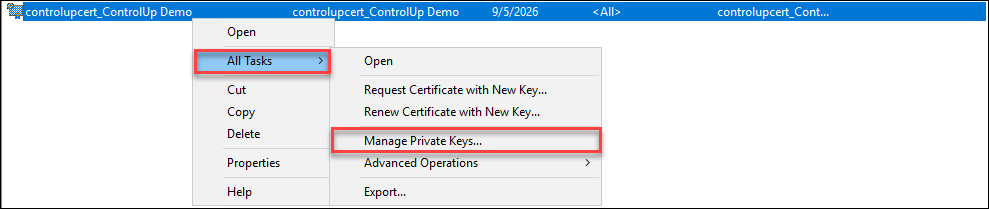
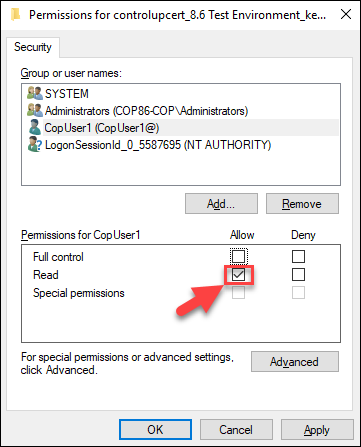
In the permissions wizard, click Add...
Enter the username for which the permission to the certificate should be applied. Click OK to confirm
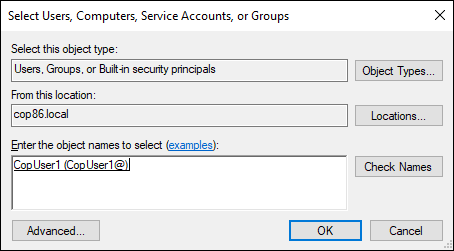
Make sure you select the correct user. Click the Allow checkbox under Read. Click Apply > OK
Open the console as the user you assigned the Read permissions and select the organization in the Select a ControlUp organization list. At this point, the selected organization should be accessible to the user. If the Select a ControlUp organization list includes one or more organizations which are missing the required certificate/ permissions for login, the following warning will appear: “Warning: one or more organizations are missing the required certificate/permissions for login.”
Distribute the Certificate and Assign Read Permissions via Powershell
If you want to distribute the certificate to console machines in your organization and to set the Read permissions for non-admin users on those machines, you can use our PowerShell script to perform both actions automatically.
To distribute the script to console machines and set read permissions via Powershell:
Download the script and place it onto the console machine where you saved the pfx file that you want to distribute.
Copy the path of the pfx file. You need the path when you execute the PowerShell script.
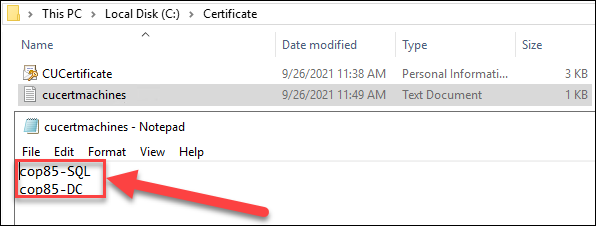
Create a text file that contains the host name of your console machine to which you want to distribute the certificate. Note that machine names must be line-separated and no space should be left at the end of each line
Execute the script with administrative privileges
& '.\Distribute_AdvancedAuthentication_Certificate.ps1' -certificatePath C:\temp\mycert.pfx -Verbose -clearTextPassword "mypassword01" -copyCertificateLocally -computersfile C:\Scripts\DistributionScript\cucertmachines.txt -allow "testdomain.local\copuser1", "testdomain.local\Domain Users"
Input parameters:
-certificatePath. File path where the PFX certificate is stored
-Verbose. Enables detailed information about the script execution to be displayed
-clearTextPassword. Password for the private key file
-copyCertificateLocally. Allows manual copying of the certificate
-computersfile. Text file that contains the list of machine names to which the PFX file will be distributed
-allow. Comma-separated list of domain users or groups to whom read permissions will be granted
Review the detailed output of the script execution. The following screenshot confirms that the script was successful (0 errors out of X computers)

To access a console machine where you have distributed your certificate, log in and launch the console. Any user, whether local admin or non-admin, who has been granted read permissions as specified in the -allow parameter can now connect to your ControlUp organization.
Use a Third-Party Certificate
Instead of creating a self-signed certificate, you can also use your own corporate certificate.
To import your own certificate:
Follow steps 1-4 from the Create a Self-Signed Certificate section.
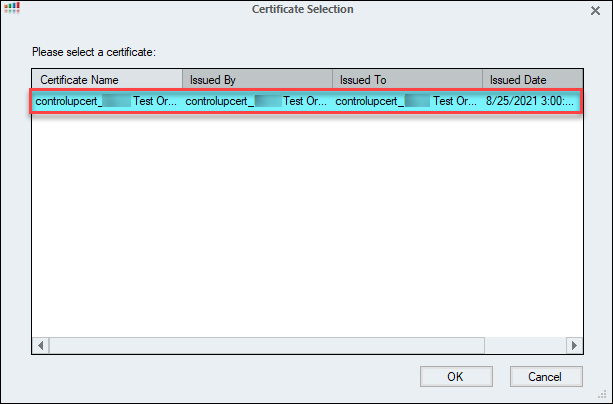
In the Advanced Authentication Setup, click Browse.
In the Certificate Selection wizard, open the certificate you want to import. The certificates displayed here are taken from the Certificate Store on the local machine. Click OK to confirm the selection.
Click Apply and confirm the warning. Once the import is finished, the certificate is exported to the organization settings.
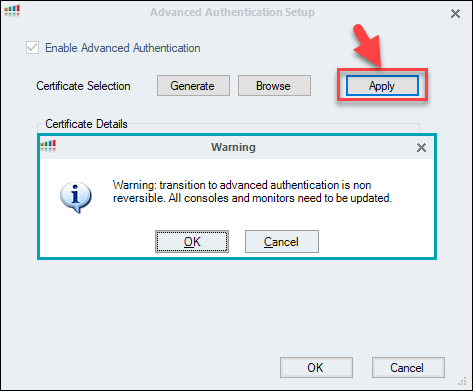
Important
Once you confirm the warning message, it is not possible to perform a rollback. Keep this in mind when enabling Advanced Authentication
All monitors in your ControlUp organization are now being restarted and the new certificate is applied to all monitors
Check that all previously running monitors are online and not generating any errors
Import the new certificate to all machines from which users need to run the console. Follow the steps in the Distribute the New Certificate to Consoles section.
Make sure that the certificate is configured with Read permissions for all non-admin users on the console machines. Follow the instructions in the Assign Read Permissions to Console Users section.
Enable Advanced Authentication for Workgroup Monitor
If you have a workgroup (non-domain-joined) ControlUp Monitor installed before enabling Advanced Authentication, use the following workaround to authenticate the monitor:
Step 1: Export Certificate from Console Machine
To open the local machine certificate store, open an elevated command prompt and run
certlm.msc.Navigate to Personal > Certificates.
Right-click the “controlupcert” certificate and click All Tasks > Export...
In the wizard, select Yes, export the private key and keep the .pfx file format selected.
Select the Include all certificates in the certification path if possible and Export all extended properties checkboxes.
Set a password, choose a save location (e.g., controlupcert.pfx) and complete the wizard.
Step 2: Install Certificate on Workgroup Monitor
Copy the exported .pfx file to the workgroup monitor machine.
Open an elevated command prompt and navigate to the monitor installation directory.
Run the following command:
cd "C:\Program Files\Smart-X\ControlUpMonitor\Version 9.2.XXX"
cuMonitor.exe /installCert /path="<full_path_to_controlupcert.pfx>" /password="<your_password>" /deleteFile
Step 3: Verify Installation
Open certlm.msc on the ControlUp Monitor machine and confirm controlupcert is in Personal > Certificates.
Right-click the certificate, select All Tasks > Manage Private Keys, and confirm NETWORK SERVICE has Full Control.
Verify that the registry settings
HKEY_USERS\S-1-5-20\SOFTWARE\Smart-X\ControlUp\MonitorSvc\AdvancedModeCertificateholds the correct certificate thumbprint.
The Monitor service will restart automatically and show as green in the Real-Time DX Console after successful authentication.
Troubleshooting
If you receive a "CryptographicException" error, see here.