ControlUp components such as the ControlUp Monitor (cuMonitor.exe), ControlUp Agent (cuAgent.exe) or the Real-Time DX Console usually come with lower overhead. In some cases, CPU consumption of a component can be higher than expected. The following topics are covered in two sections:
- You can disable the creation of a memory dump of the cuAgent process and specify a path under which the cuAgent memory dump should be saved.
- It shows you how to use JetBrains dotTrace to generate a snapshot of the cuAgent.exe process, which in our use case consistently consumes 5% of CPU.

Automatic Snapshot File when cuAgent Crashes
You can set a path on your Agent machine to which a full memory dump of the cuAgent process is written. As the size of the full memory dump can reach many hundreds of megabytes, it is helpful to avoid saving the full memory dump on the C:/ partition.
On the Agent machine:
-
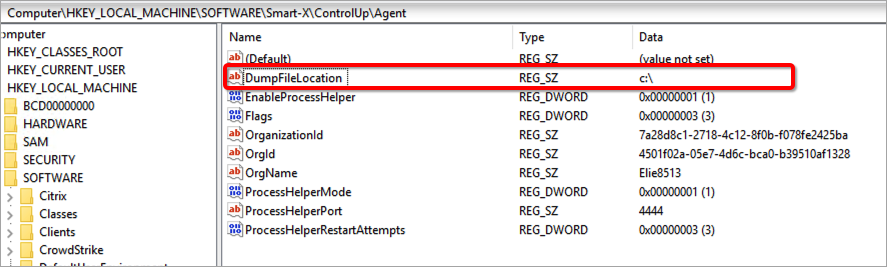
Create two new registry keys under
SOFTWARE\Smart-X\ControlUp\AgentDisableDumpCreation
Data Type:REG_SZ
Value Data:- False: Dump file will be created as ControlupAgentEmergencyShutdown[dd_MM_yy_HH_mm_ss].dmp If registry key AgentDumpFileLocation is empty, the default path is C:\Windows\Temp. This is the default setting if the registry key is missing.
- True: No dump file will be created
DumpFileLocation
Data Type:REG_SZ
Value Data:- Any file system path on the Agent machine to which the dump is written. In our example, we want to dump file to be written in C:\
- Any file system path on the Agent machine to which the dump is written. In our example, we want to dump file to be written in C:\
-
Restart the cuAgent service.
-
The next time, the cuAgent crashes due to an unhandled exception, the memory dump will be written to the path you defined under
DumpFileLocation.
Using dotTrace to Generate a Snapshot File
dotTrace is a .NET performance profiler that you can use to diagnose CPU performance issues with a ControlUp component. In this example, we show you how to generate a snapshot file for the cuAgent.exe process.
JetBrains offers a 30-day trial that you need to activate. Make sure you create the trace file before the trial expires.
To generate a trace file
- Download and install dotTrace on the machine where you wish to investigate the ControlUp process.
- Run dotTrace as an Administrator. Under Profiling, select the cuAgent.exe process and choose Timeline as Profiling Type. Click Start to run the trace.
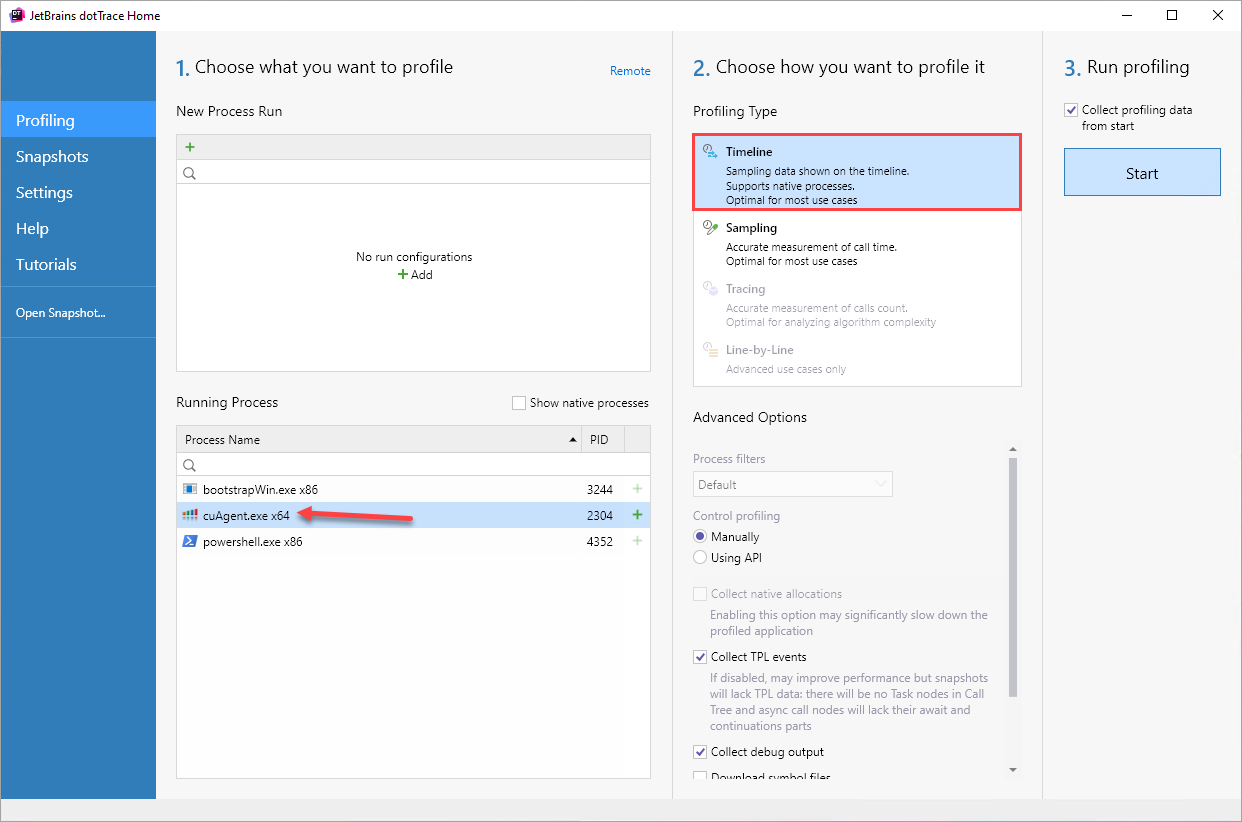
- A status bar is displayed indicating the profiling session is currently running.

- Click Get Snapshot and Wait to create a snapshot of the cuAgent.exe process. If you check the Open snapshot immediately checkbox, the Timeline View opens.

- Click File > Export snapshot and save the profiling snapshot file.
- Upload the dtt file to our Sharefile portal via this link.