Click the Data Upload tab to access the Data Upload Settings page, where you can configure settings that define how ControlUp for VDI uploads data to the cloud servers.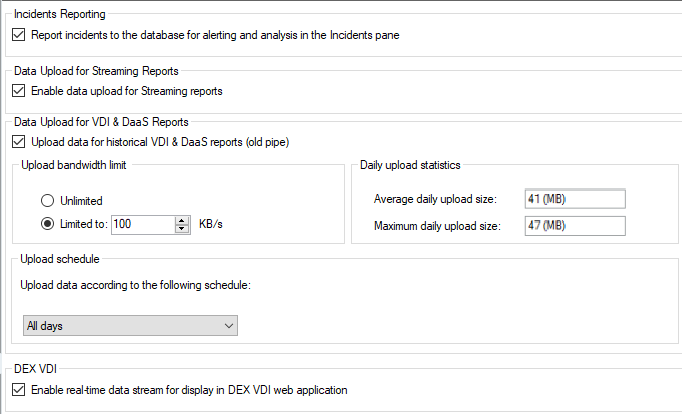
Incident Reporting
In Incident Reporting, select the Incidents Reporting checkbox to enable incident triggers defined in your ControlUp organization to record entries in the cloud database. When this setting is enabled, ControlUp records an incident entry in the cloud incidents database every time a condition is detected that matches one of the triggers defined in your organization. This allows past incidents to be investigated in the Incidents pane, and for alerts to be received by email.
The Incidents Reporting checkbox is selected by default. When this option is disabled, incidents are not reported to the cloud, and all alerting and historical analysis of incidents are disabled.
Data Upload for Streaming Reports
In Data Upload for Streaming Reports, select the Enable data upload for Streaming reports checkbox to enable the ControlUp Monitor instances in your organization to upload activity data to display new data pipeline reports in the VDI App UI.
The Enable data upload for Streaming reports checkbox is selected by default. When this option is disabled, no data will be uploaded to the VDI App or shown in the new reports.
Data Upload for VDI & DaaS Reports
In Data Upload for VDI & DaaS Reports, select the Upload data for historical VDI & DaaS Reports (old pipe) checkbox to enable the ControlUp Monitor instances in your organization to upload activity data to display legacy reports in the VDI App UI.
The Upload data for historical VDI & DaaS Reports(old pipe) checkbox is selected by default. When this option is disabled, no data will be uploaded to the VDI App or shown in the legacy reports.
Upload Bandwidth Limit
In Upload Bandwidth Limit, you can set a bandwidth limit for the activity data upload process, or select the Unlimited option. By default, the Unlimited option is enabled.
Daily Upload Statistics
In Daily Upload Statistics, the average and maximum volumes of data uploaded daily to the Insights portal are displayed.
Upload Schedule
In Upload Schedule, you can select an existing schedule from the menu for the data upload process. The menu also includes the options Add new schedule and Manage schedules for configuring new schedules and editing existing schedules.
To add a new schedule:
Click Add new schedule. A dialog box opens for creating the new schedule.
Select the time slots for the new schedule.
Click OK.
By default, the upload schedule is unrestricted, and activity data is uploaded automatically as needed.
Click Manage schedules to edit or remove an existing schedule. The Manage Schedules window associated with the Schedule tab opens. See Schedule Settings for more information about the Manage Schedules window.
Note that restricting the upload schedule and limiting the upload bandwidth might cause ControlUp to fail to display up-to-date information. In extreme cases, if schedule and bandwidth are insufficient to upload activity data in a timely manner, ControlUp might discard activity data which will cause report data to be lost permanently. It is recommended that you consult with Support before you modify these settings.
DEX VDI
In DEX VDI, select the Enable real-time data stream for display in DEX VDI web application checkbox to enable the ControlUp Monitor instances in your organization to upload real-time data to display in the VDI App UI.
The Enable real-time data stream for display in DEX VDI web application checkbox is selected by default. When this option is disabled, no data will be uploaded to the web UI.