The following article applies to ControlUp version 8.8 and lower only. From version 9.0, use the built-in synchronization feature.
Azure Virtual Desktop (AVD) is a Microsoft Azure desktop and application virtualization service that runs in the cloud, previously known as Windows Virtual Desktop (WVD). It brokers users to desktops or applications from anywhere in the world.
We created Script Actions (SBAs) that natively integrate your AVD environment into the ControlUp ecosystem. For example, you can manage all your AVD session hosts and host pools from the Real-Time Console.
You don't have to log onto the Azure portal and can manage these resources directly from the ControlUp Real-Time Console. Using ControlUp, you can perform actions like setting a maximum session limit on the host pool, getting Azure image information, or sending a message to a user through the AVD service.
To run the SBAs for AVD, you must prepare both Azure and your ControlUp environment. To begin, perform the following steps:
- Configure Azure App and the Service Principal for ControlUp Script-based Actions. You need to create a new Service Principal to enable communication between Azure and ControlUp.
- Synchronize your ControlUp organization tree with your AVD directory. (Optional) Sets up synchronization so that your ControlUp organization tree reflects your AVD directory. This is an optional advanced step that should be done before the next step but is not mandatory for the integration to work.
- Configure Your ControlUp Console to Monitor and Manage Your AVD Environment.
Once the integration is complete, you’ll be able to:
- Run the SBAs against your AVD environment from your ControlUp Real-Time Console.
- Configure the load balancing algorithm in real-time.
- Create triggers to run automation in response to metrics such as the number of users, CPU load, or almost anything else.
Part I - Configure Azure App Registration and Service Principal Object for ControlUp Script Actions
To use the AVD script, you need to create and configure a Service Principal in Azure. This allows ControlUp to run PowerShell scripts against your AVD environment as the AVD script actions use an Azure Service Principal to connect. So every time you run the scripts, you won't have to enter your Azure credentials.
Create a Service Principal Account in Microsoft Entra ID
To create a Service Principal account in Microsoft Entra ID, create a new registration and secret:
- Log onto the Azure portal and use the hamburger menu to navigate to Microsoft Entra ID > App registrations. Click New registration.
- Name your Service Principal so that it is easy to identify.
- Select Accounts in this organization's directory only and click Register.
- Take note of the Application (Client) ID and the Directory (Tenant) ID information as they are needed in the next procedure for configuring ControlUp.
- Click Certificate & secrets to create a secret and click New client secret.
- In the Description field, give a meaningful description (i.e. ControlUp secret), select from the Expires options, and click Add.
- Copy the secret value to a password manager or temporary file. This is the only time it is displayed and can be copied from the Azure portal.If you don't copy this secret value, you will have to delete this secret and create a new one to ensure you have a valid secret for authentication.
Assign the Service Principal the required permissions in Entra ID and for your Azure Subscription
To ensure the Script Actions can retrieve the assigned AVD resources for a user, the Service Principal account must be assigned a specific role in the Microsoft Entra ID.
- Log onto the Azure portal and use the hamburger menu to navigate to Microsoft Entra ID > Roles and administrators.
- Use the filter to find the Privileged role administrator.
- Click Add assignments.
- Use the Search filter to search for the ControlUp Service Principal account you just created. Select it and click Add to assign the role to this account.
In addition to Microsoft Entra ID, the Service Principal account must also be assigned a specific role for your Azure Subscription.
- Log onto the Azure portal and use the hamburger menu to navigate to Subscriptions > < your subscription name > > Access Control (IAM).
- Click Add and select Add role assignment.
- Under Role, select Contributor, and under Selected members, select the ControlUp Service Principal you just created.
- Click Save to assign this role.
Part II - Synchronize your ControlUp organization tree with your AVD directory (optional)
This process is optional and requires some advanced procedures, along with several synchronization scripts that you download from our GitHub repository. It is performed primarily on the ControlUp monitor server and is not mandatory for the integration to work. If you are currently not yet in production with your AVD environment, you can easily skip this whole step and go here.
Prerequisites
- ControlUp Monitor server
- The following PowerShell modules installed on the ControlUp Monitor machine:
- Az.Accounts
- Az.DesktopVirtualization
- Az.Resources
- ControlUp.PowerShell.User.dll - This dll is located in the ControlUp Monitor folder
C:\Program Files\Smart-X\ControlUpMonitor
- An Azure Service Principal with sufficient permissions to manage AVD (Application ID, Tenant ID & Secret Key) - created in Part I
- The following AVD synchronization scripts from our ControlUp GitHub repository in the Environment_Synchronization_Scrips folder.
- WVD_Sync.ps1
- WVDFunctions.ps1
- Build_CUTree.ps1
- Store-AzPSCredentials.ps1
Prepare the ControlUp Monitor server
To set up the synchronization, prepare the ControlUp Monitor server with the proper PowerShell modules and the AVD synchronization scripts.
- To set up the monitor server, log onto the monitor server with an account that has Administrator privileges.
- Open a PowerShell prompt with elevated privileges and run the following commands:
Install-Module Az.Accounts -Scope AllUsersInstall-Module Az.DesktopVirtualization -Scope AllUsers - Confirm you have the latest ControlUp PowerShell modules with Get-CUFolders. For details, see ControlUp Powershell Commands.
- Download and extract the Environment_Synchronization_Scripts folder from our GitHub repository onto your ControlUp Monitor server.
- To store the Service Principal credentials in an encrypted file, so it can be used by the script actions (or other PowerShell scripts that need a connection to Azure) , run this script:
Store-AzPSCredentials.ps1
- Enter the required information.
- Start the AVD_Sync.ps1 script with the folder path of the directory you want to sync into ControlUp and with the -Preview parameter to see which commands it outputs. Ensure the folder path parameter ends with \AVD. For example:
PS C:\Sync> . .\AVD_Sync.ps1 -folderPath "VDI_and_SBC\AVD"
-Delete -LogFile C:\swinst\AVD2020-07-22.log -Preview
- Once you are comfortable with the proposed changes in the output, remove the -Preview parameter to commit the changes to the organizational tree in the ControlUp console.
Optional - Set up a scheduled task to periodically perform the synchronization
You can configure a Windows task to periodically run these scripts so the organizational tree in your ControlUp console is synchronized with your AVD.
The steps here were run on a Windows Server 2019 machine running the ControlUp monitor. Keep in mind that the Az.DesktopVirtualization PowerShell module requires PowerShell version 5.1 or up and .NET Framework version 4.7.2 or higher. These are the most updated steps for these versions as of the date we are publishing this article.
- Open the Windows Task Scheduler on the ControlUp monitor server machine and select Create Task...
- In the General tab, give the task a name, such as Synchronize AVD to ControlUp.
- Under Security options:
- Check that the user account is the same as the one you used to run the Set-AzSPCredentials.ps1 script.
Or you can rerun the credential script under the account you want to use for this periodic synchronization. - Select the option to Run whether user is logged on or not.
- Check that the user account is the same as the one you used to run the Set-AzSPCredentials.ps1 script.
- In the Triggers tab, create a new trigger and set the schedule for running this task.
- In the Actions tab, create a new action with the following options and parameters:
| Action | Start a program |
| Program/script | powershell.exe |
| Add arguments (optional) | -file C:\Sync\AVD_Sync.ps1 -folderPath "VDI_and_SBC\AVD" -Delete -LogFile C:\swinst\AVDSync.log |
| Start in (optional) | C:\Sync |
- Run the scheduled task and review the log file to validate the operation.
Part III - Configure the ControlUp Console to manage Windows Virtual Desktop (AVD) resources
This section configures the integration between the ControlUp Console and your AVD environment so you can monitor and manage your AVD resources directly from ControlUp.
If you chose not to perform Part II, you can perform this configuration but you must manually name a folder in your ControlUp organization tree: \AVD.
Prerequisites
AVD is a cloud service that requires the following prerequisites to be installed alongside your ControlUp Console to activate these management actions.
- The following PowerShell modules installed on the console server and the machine running the script actions (if it's not the console):
- Az.Account
- Az.Resources
- Az.DesktopVirtualization
- AzureAD
The modules can be installed from the PowerShell Gallery using the Install-Module cmdlet. Administrator rights are required to install modules. (In Windows 10, you can install the modules in the scope of the current user which works for virtual machines if you don't have local admin permissions.)
- PowerShell session is set to use at least TLS1.2 for the communication to the PowerShell Gallery when installing the modules.
- An Azure Service Principal with sufficient permissions to manage AVD with the r equired Service Principal properties (AppId, DirId, and Secret) - created in Part I
- From version 9.0, .NET Framework 4.8 is required for the AZ PowerShell Module
- Before version 9.0, .NET Framework 4.7.2 required for the AZ PowerShell Module
Run the AVD Set Azure Service Principal Credentials script action
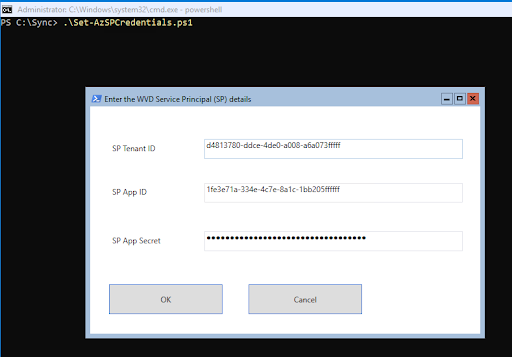
To run the different AVD script actions that are available to ControlUp, you must first run the AVD Store Azure Service Principal Credentials script. This script stores the required Service Principal information in a local encrypted file which is linked to the username and machine running the script.
For details on using script-based actions in ControlUp, you can read this article.
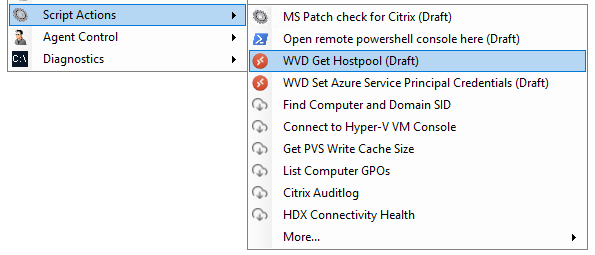
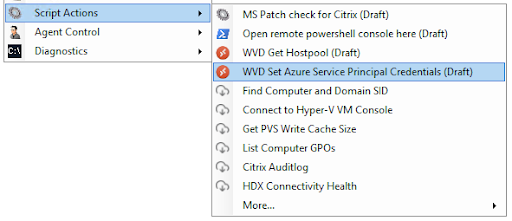
In your ControlUp Console in machine view, right-click a machine (recommended under the \AVD folder) and select Script Actions > AVD Store Azure Service Principal Credentials.
When you run this script action, you are asked for the required Azure Service Principal information in this popup window:
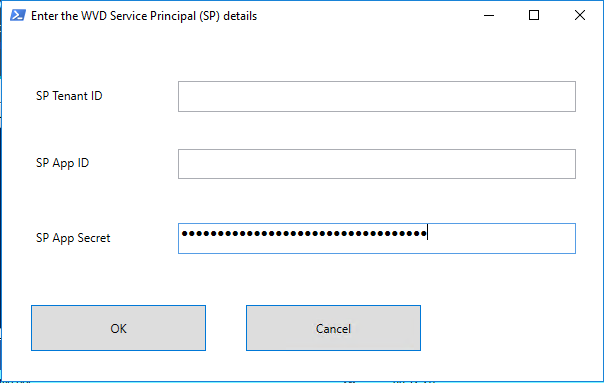
Enter the information that you previously stored for the Service Principal.
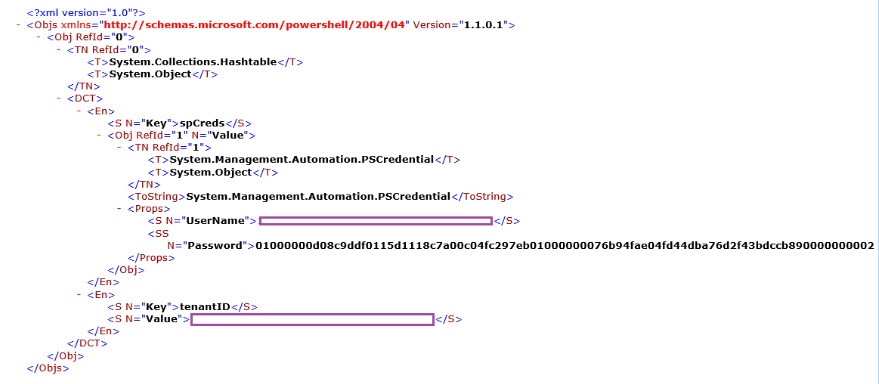
This information is stored (locally) on the machine running the script in an XML file with an encrypted app secret. To validate that the correct secret appears, access the XML and check that the UserName and Value fields are not empty:
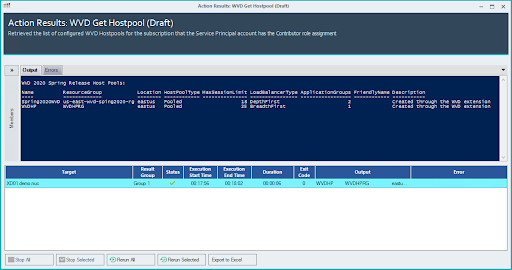
This stored Service Principal information is used by the other AVD Script Actions, such as the AVD Get Hostpool.