When accessing Solve via a direct URL, you can configure SAML to enable Single Sign-On (SSO) authentication. LDAP and SAML
We recommend not to enable both SAML and LDAP. If both are enabled, Solve uses SAML authentication.
Create Solve Users from Your IdP
If you enable the option Create Solve user automatically and add the additional attributes listed in the attribute table below, then a user account is created the first time a new user signs in to Solve using SAML. This means that a new user can access Solve without having to register their account in the Real-Time DX console. If you don't enable this option, each user must first register in the Real-Time DX console, or be added to ControlUp using a script.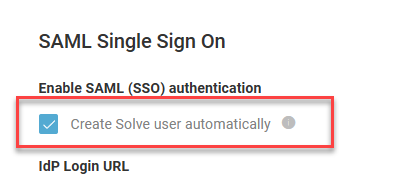
With this option enabled, a Solve user account is created the first time a new user signs in to Solve with SAML. The new user does not necessarily have permission to access Solve, unless the user already belongs to an Active Directory group that has permission to access Solve. After the user account has been created, a ControlUp admin can give the user permission to Use Solve or Manage Solve in the Real-Time DX console security policy.
Use Case Examples
If your IdP is listed, follow the instructions under your IdP. If not, follow the steps below to set up SAML with any IdP.
3rd party Identity Provider applications
We have provided these use case examples for your benefit but do not take responsibility for the screenshots, content, and functionality of these 3rd party applications.
Active Directory Federated Services
Read here to get the basic details of how to configure secure SAML authentication if your Identity Provider (IdP) is ADFS.
Open your ADFS interface.
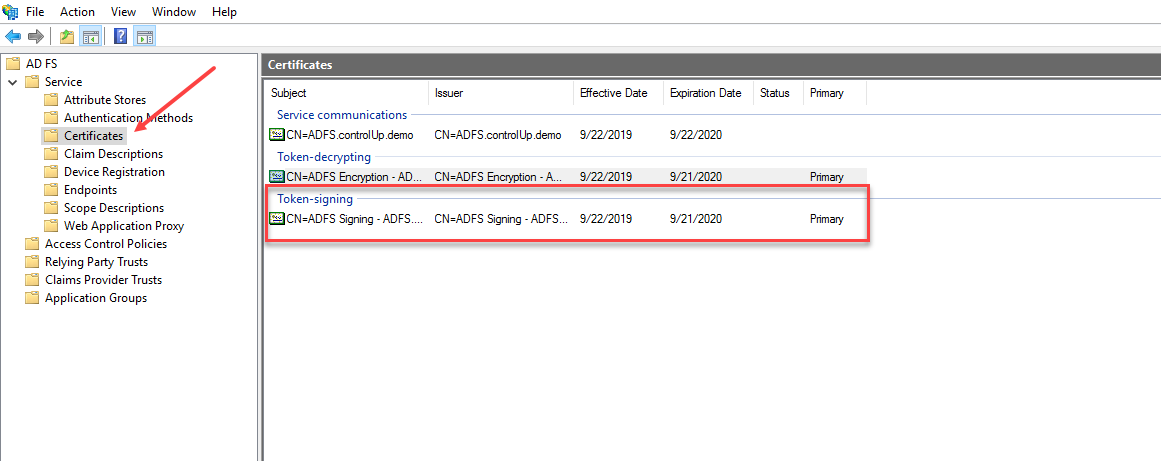
Under the Service folder, click Certificates. Copy the Token-signing certificate and upload it to in the IdP Signing Certificate field on the Solve settings page.
In the ADFS interface, select Relying Party Trusts. Right-click to open the Properties dialog.
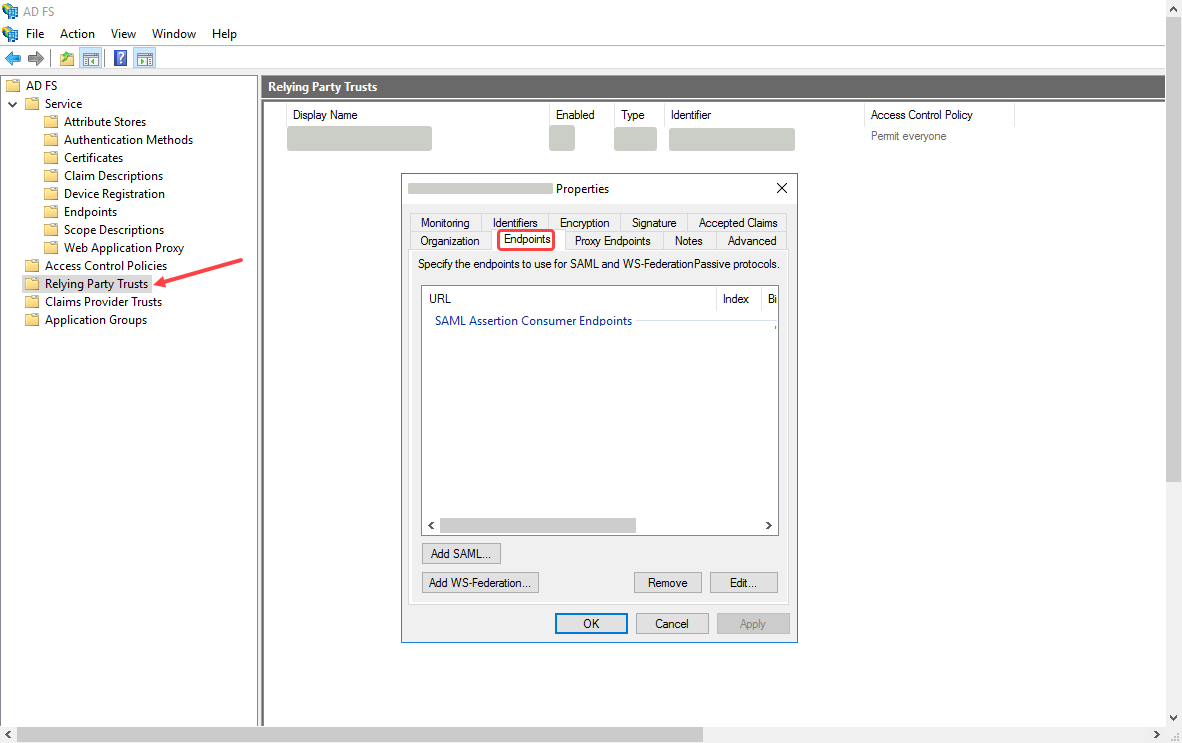
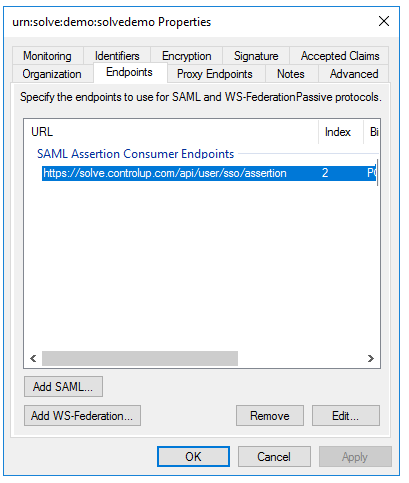
In the Properties dialog, select the Endpoints tab and click Add SAML... The Edit Endpoint dialog opens.
In the Trusted URL field, enter the Endpoint/Assertion URL from the Solve settings page.
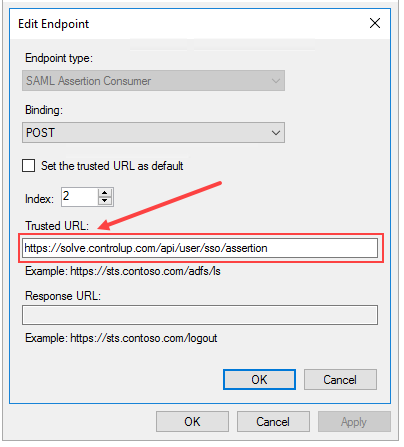
Ensure that:
Endpoint type is SAML Assertion Consumer
Binding is POSTClick OK and this Endpoint is added.
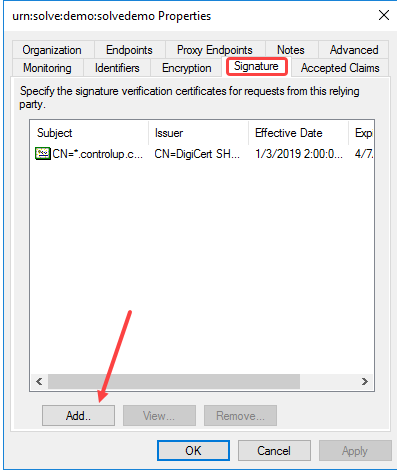
In the same Properties dialog, select the Signature tab, click Add and upload the Solve Signing Certificate that you can download from the Solve settings page.
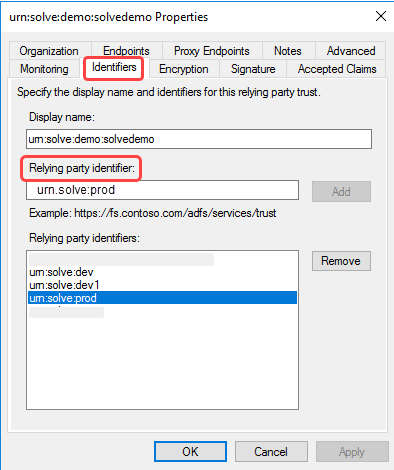
In the same Properties dialog, select the Identifiers tab, and under the Relying party identifier: field, enter the Relying Party Trust Identifier value from the Solve settings page. Click Add next to the field and you'll see the URN added to the list of Relying party identifiers in the dialog.
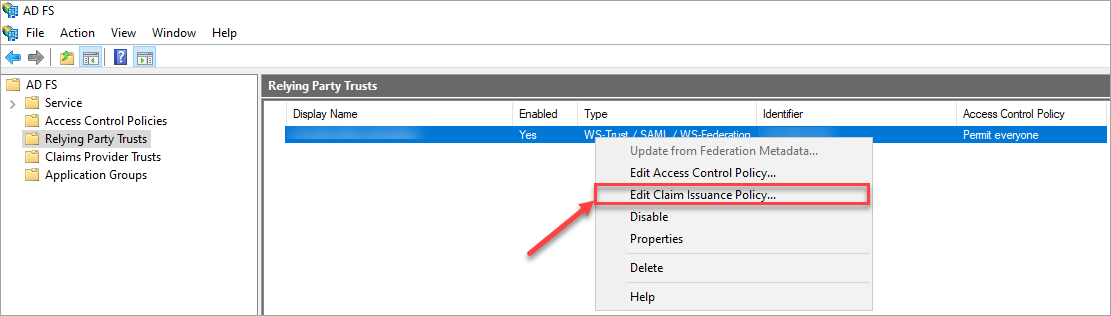
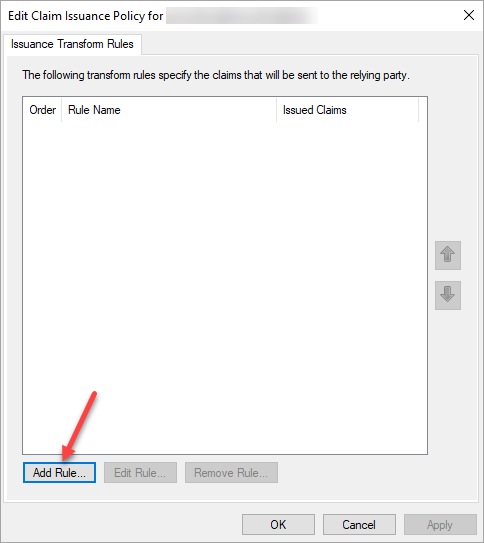
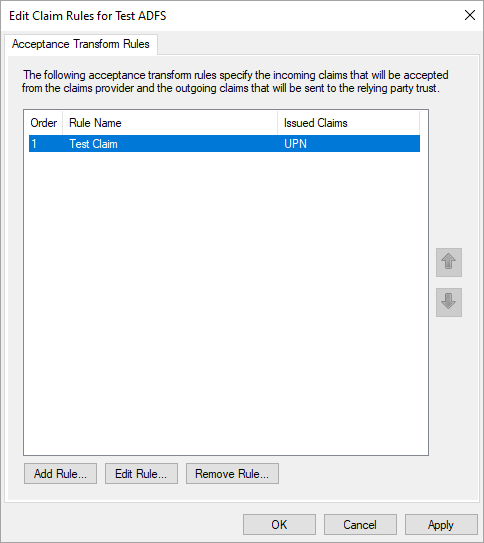
Click the Relying Party Trusts folder, right-click the claim rule, and select Edit Claim Issuance Policy...
In the Edit Claim Issuance Policy wizard, click Add Rule...
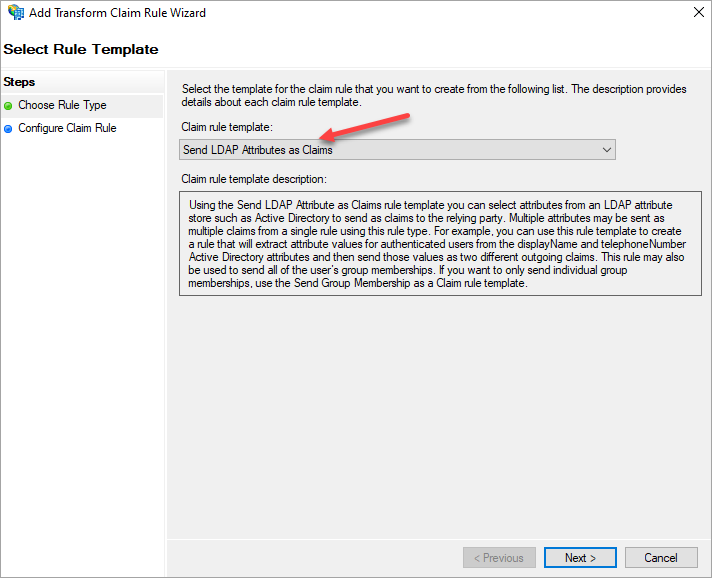
In the Choose Rule Type wizard, select Send LDAP Attributes as Claims as the claim rule template and click Next.
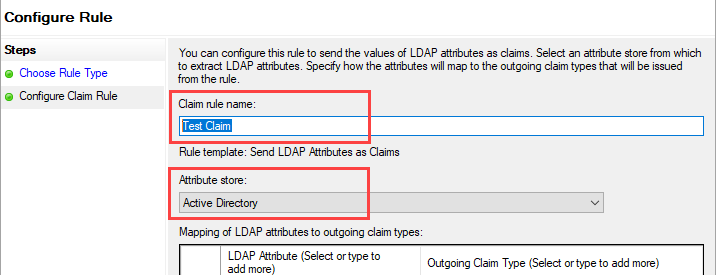
On the Configure Rule screen, enter a Claim rule name, and select Active Directory from the Attribute store dropdown menu.
Under Mapping of LDAP attributes to outgoing claim types, add the required user attributes. The required attributes depend on if you are using SAML to create Solve users.
If you are not using SAML to create Solve users, add the following attribute:
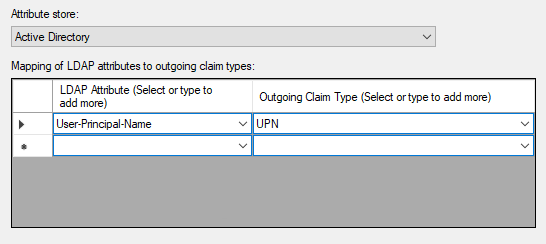
If you are using SAML to create Solve users, add the following attributes:

After you have added the LDAP attributes, click Finish.
Confirm the new rule by clicking OK.
Your Solve users should now be able to authenticate through your ADFS identity provider.
Azure Active Directory
Prerequisites:
Must have an Azure Enterprise account.
Azure Active Directory (AD) must be configured.
Must have the necessary permissions to create the application.
Setup in Azure AD
In Azure AD, go to Enterprise Applications > New application.

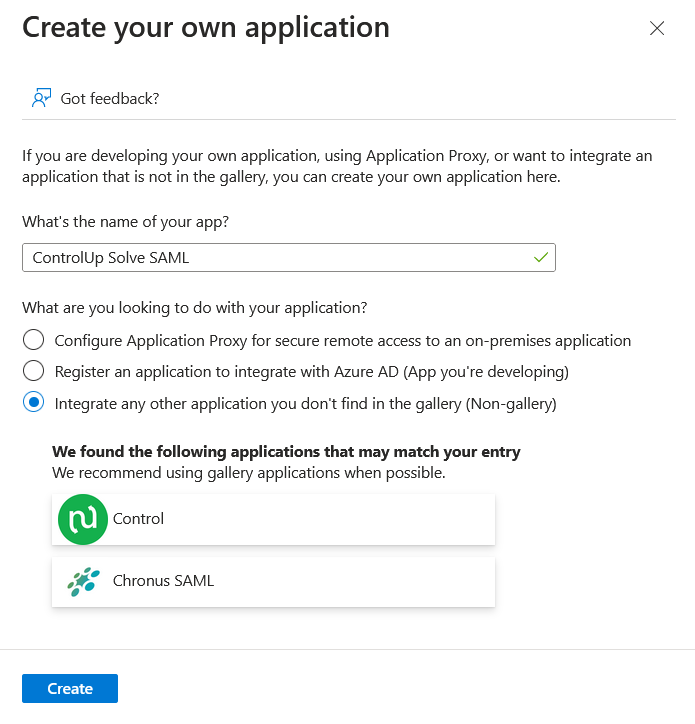
Select Create your own application.
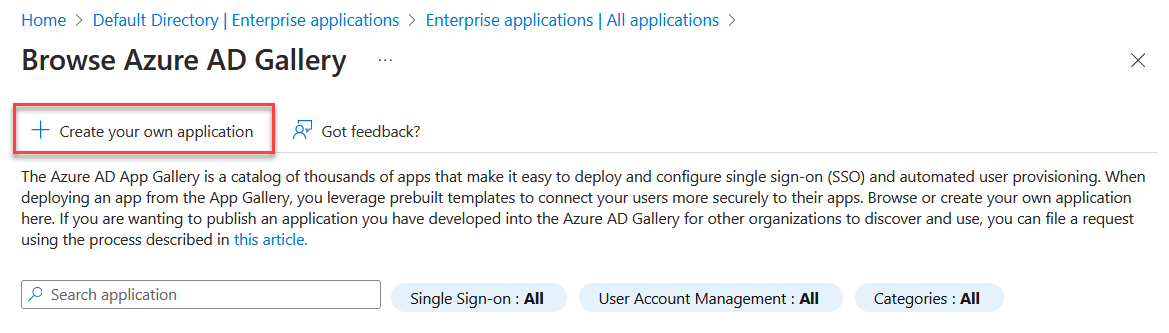
Enter a name for the application, select Integrate any other application you don't find in the gallery, and click Create.
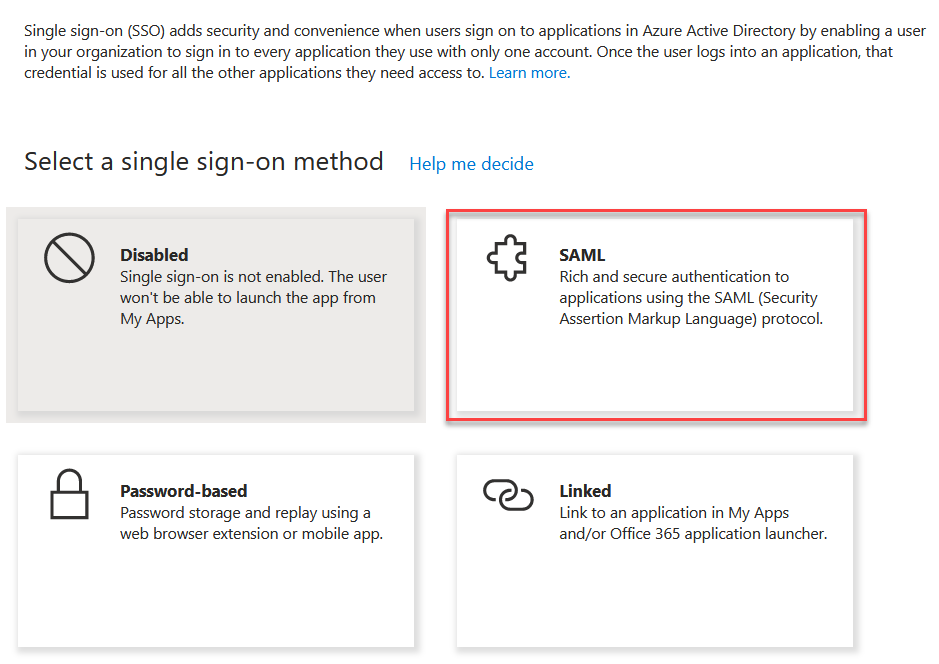
After your application is created, click Set up single sign on.
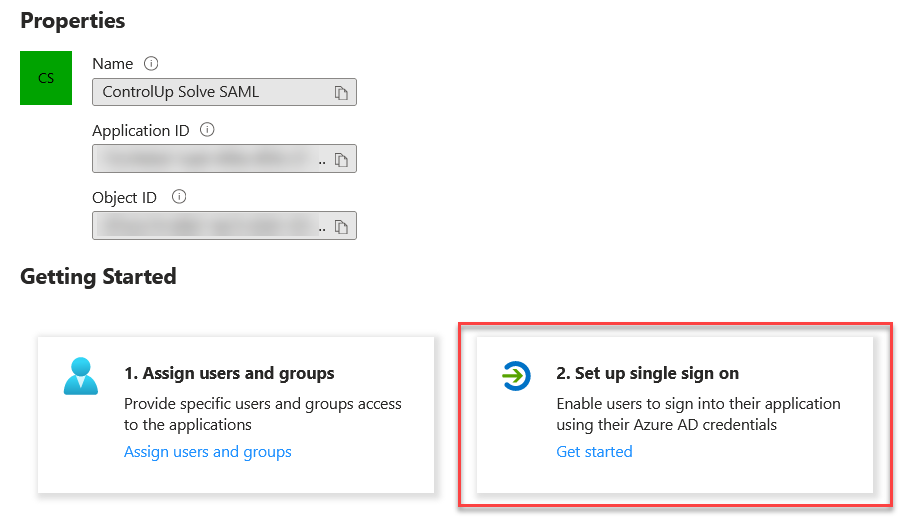
Select SAML as the single sign on method.
Next, you'll need to share several values between Solve and Azure AD. Open your Solve SAML settings next to Azure AD, and use the following side-by-side comparison to see which values need to go where. The arrows indicate where the value comes from and where you need to put it in the other application. For more information about these fields mean, read Configure IdP settings and Configure Solve settings above.
.png)
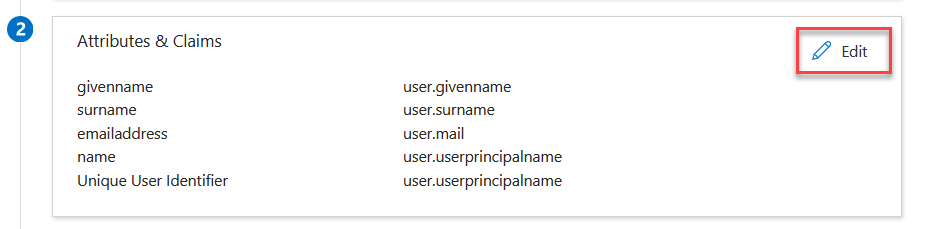
If you have enabled Create Solve user automatically, then you need to add additional attributes in the Attributes & Claims section. Make sure that all users accessing Solve via SAML have the relevant attributes contained in their Azure AD user properties. If you are not using SAML to automatically create ControlUp user accounts, then the default attributes in Azure AD are sufficient for existing user accounts to sign in to Solve with SAML because the Unique User Identifier (NameID) is the UPN. For details about automatic user account creation with SAML, see Create Solve Users from Your IdP.
In the Attributes & Claims section, click Edit.
Click Add new claim.
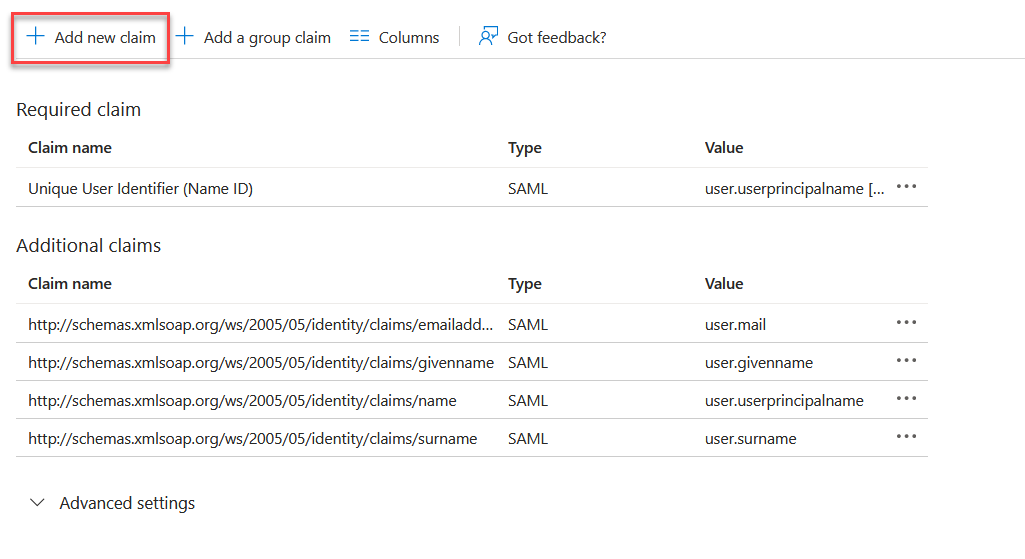
Add the claim sAMAccountName from the attribute user.onpremisessamaccountname and click Save.
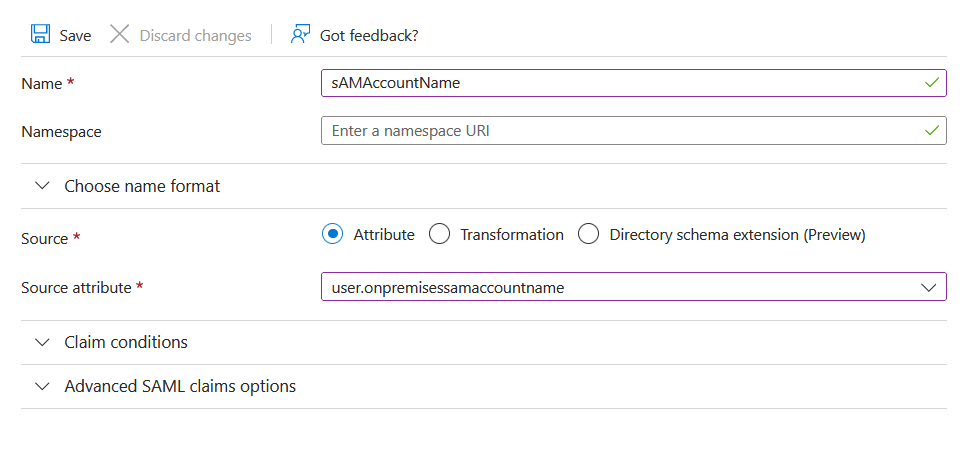
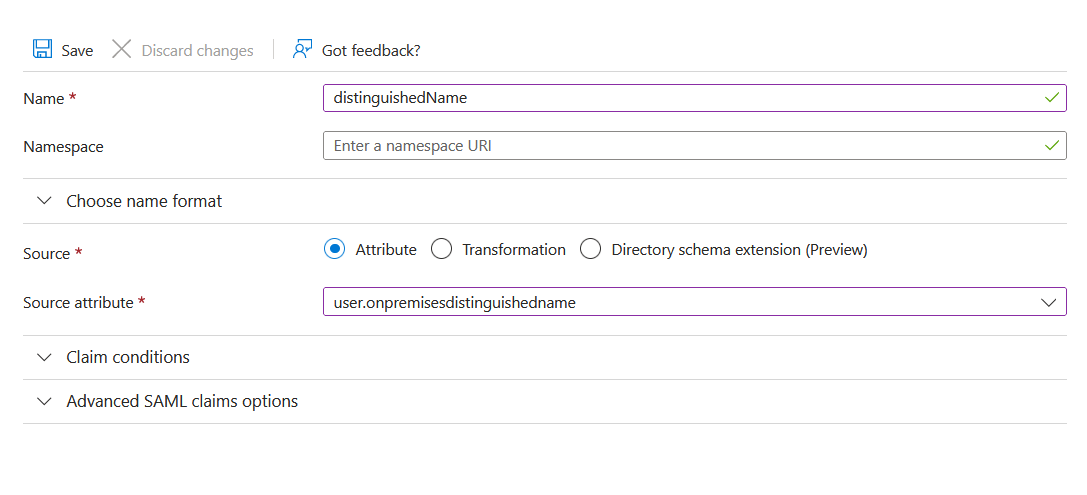
Add another claim distinguishedName from the attribute user.onpremisesdistinguishedname and click Save.
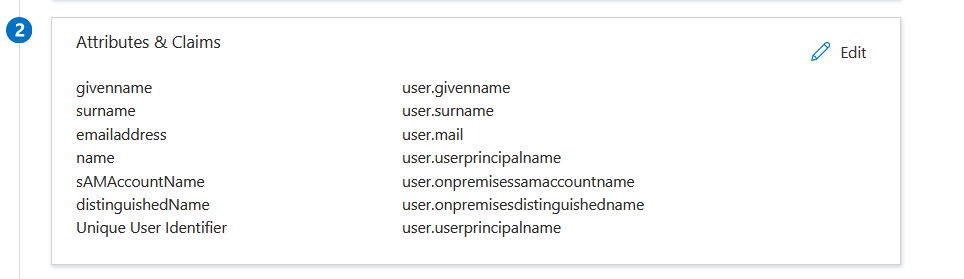
After you add the additional claims required for automatic user creation, your Attributes & Claims section should look like this:
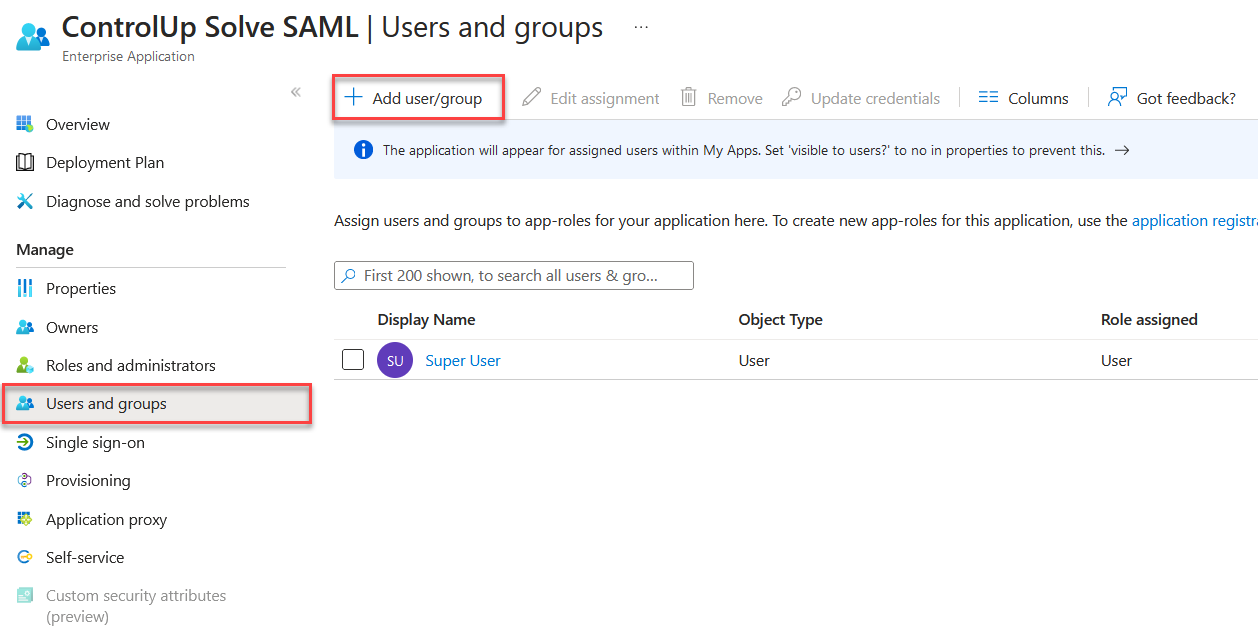
Set which Azure Active Directory users are allowed to access Solve using SAML. You can either:
Go to Users and groups and click Add user/group to add users to the application.
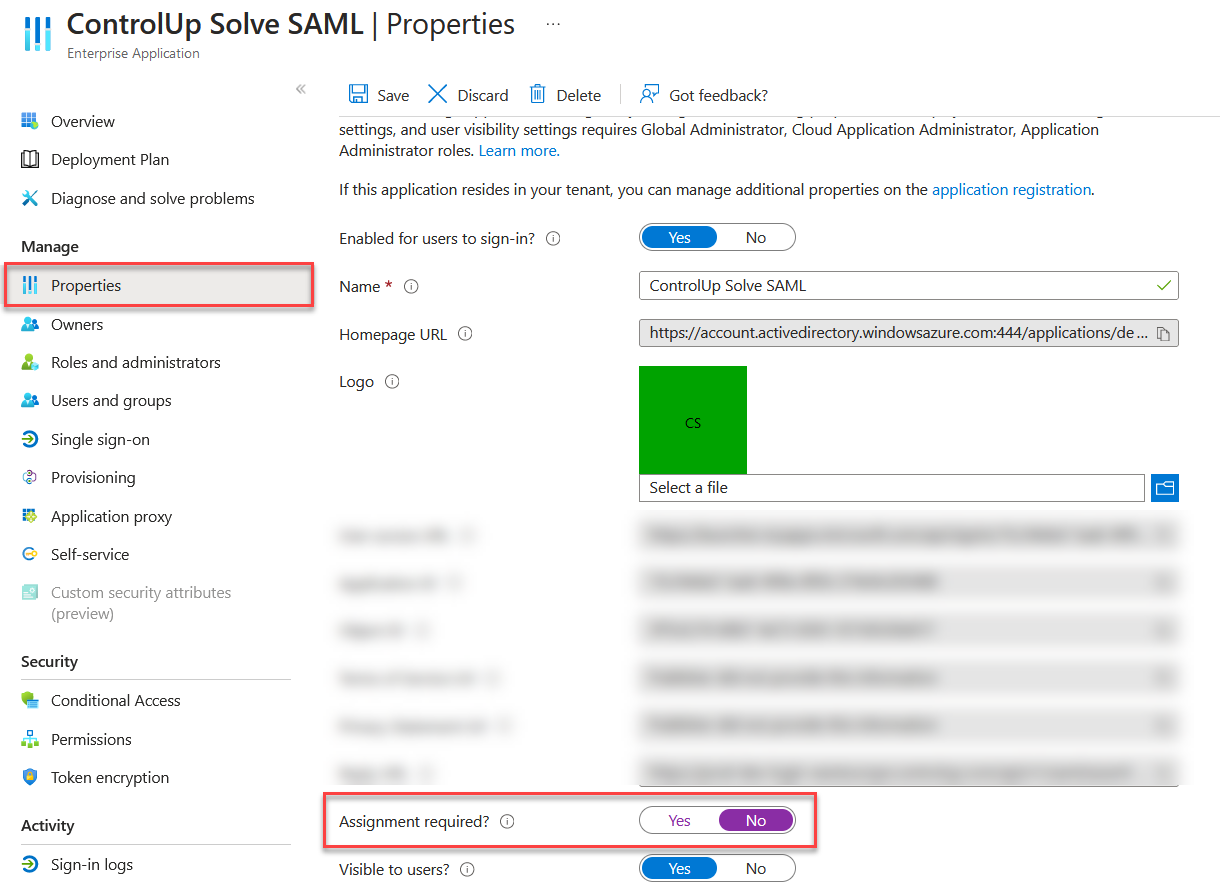
Go to Properties and set Assignment required? to No if you want all users in your Active Directory to be able to access Solve using SAML.
DUO
Prerequisites:
You have a DUO account with the necessary permissions to Protect an Application.
You have set up DUO to use Active Directory as an authentication source for single sign-on.
Set up the SAML application in DUO
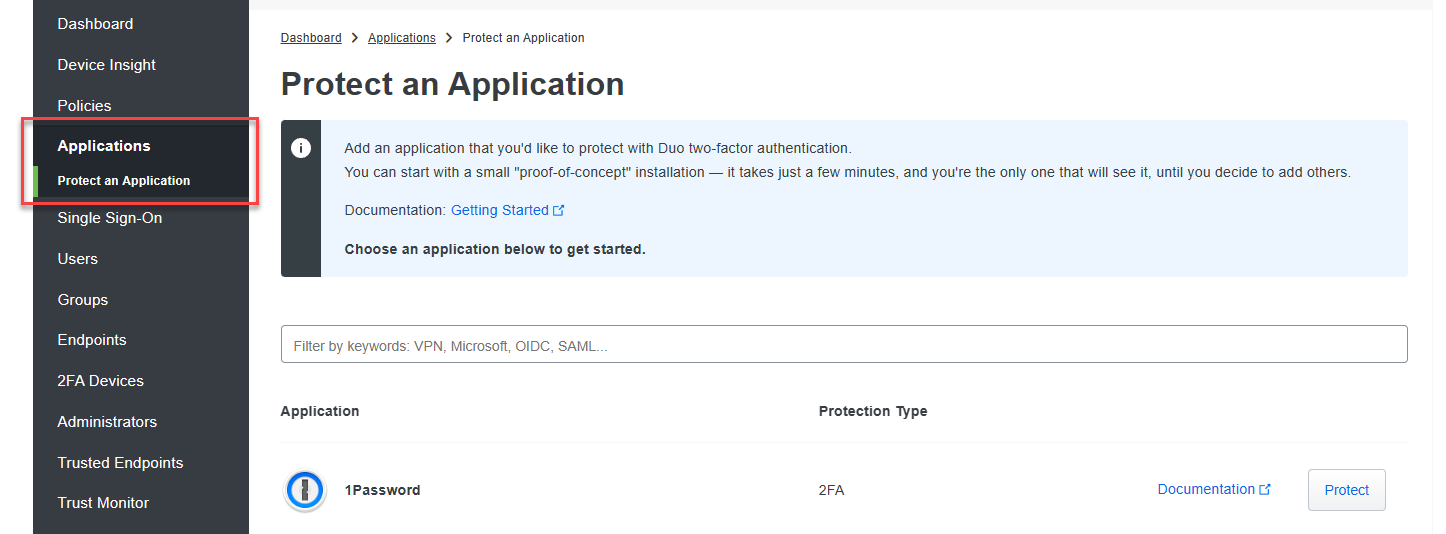
Go to Applications > Protect an application.
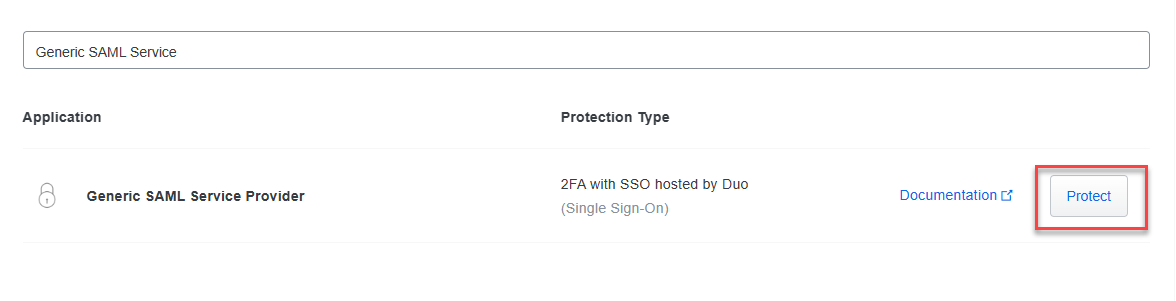
Search for Generic SAML Service Provider and click Protect.
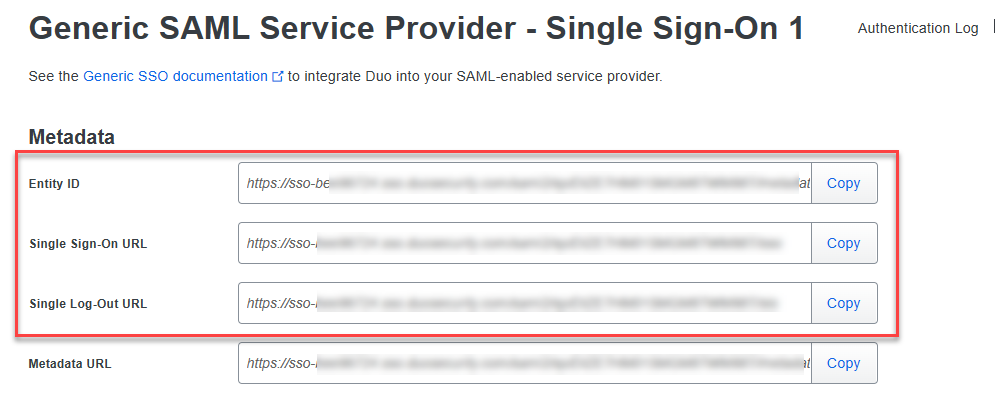
Under the Metadata section, copy the following values and paste them into the fields in the Solve SAML settings page:
Copy the Entity ID and paste it into the Entity/Issuer ID field in Solve.
Copy the Single Sign-On URL and paste it into the IdP Login URL field in Solve.
Copy the Single Log-Out URL and paste it into the IdP Logout URL field in Solve.
Under the Downloads section, click Download certificate and upload the certificate into the IdP Signing Certificate field in Solve.
.png)
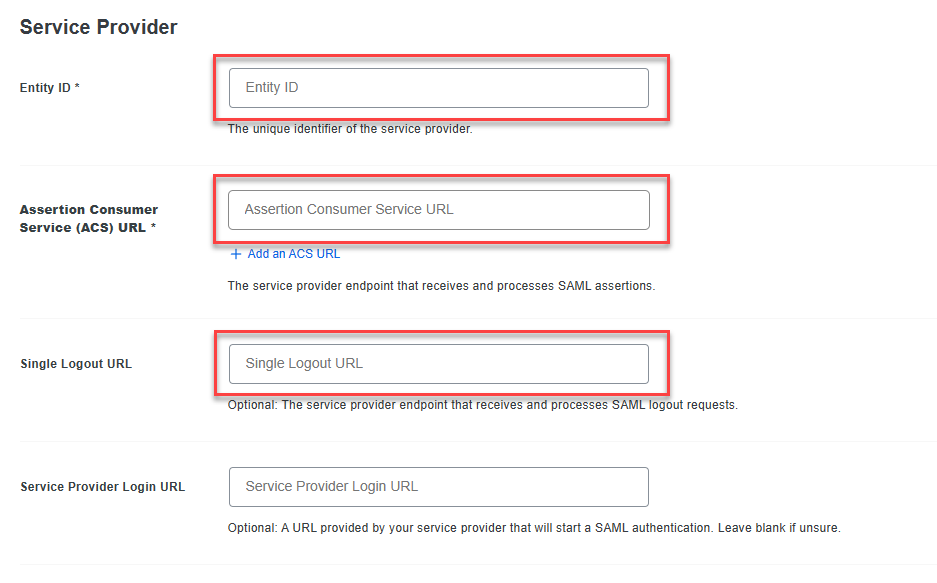
Copy the following values from the Solve SAML settings page and paste them into the fields in DUO under the Service Provider section:
Copy the Relying Party Trust Identifier from Solve and paste it into the Entity ID field in DUO.
Copy the Endpoint/Assertion Login URL from Solve and paste it into the Assertion Consumer Service (ACS) URL field in DUO.
Copy the Assertion Logout URL from Solve and paste it into the Single Logout URL field in DUO.
Under the SAML Response section:
Set the NameID format to urn:oasis:names:tc:SAML:1.1:nameid-format:emailAddress.
In the NameID attribute field, enter UserPrincipalName.
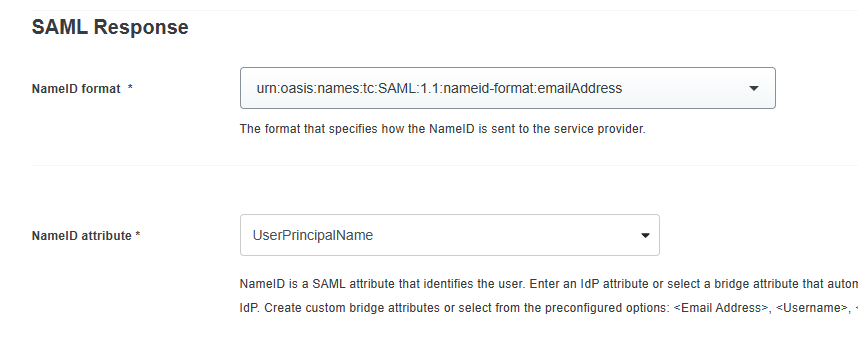
If you are using SAML for automatic user account creation, you must add the following attributes in the Map attributes section exactly as they appear in the image below. The attribute mapping pulls the required IdP attributes from your Active Directory and sends them to ControlUp with the correct attribute names. This step is not required if your users accessing Solve with SAML have already created a ControlUp account using another method.

Scroll to the bottom of the page and click Save.
OKTA
Prerequisite for Automatic Solve User Creation
Note
This section is required only if you are using SAML to provision new ControlUp accounts. You can skip this section if the users accessing Solve with SAML have already created a ControlUp account using another method.
If you are using SAML to Create Solve Users from Your IdP, then you must configure Okta to send the attributes listed in the attribute table above. Not all of these attributes are added to your Okta user profiles by default when you setup the Active Directory integration with Okta.
If the required attributes are not already in your Okta user profiles, then you need to map the Active Directory attributes to your Okta user profiles.
To map the required Active Directory attributes to your Okta user profile:
In Okta, go to Profile Editor and select the Okta User (default) user profile.
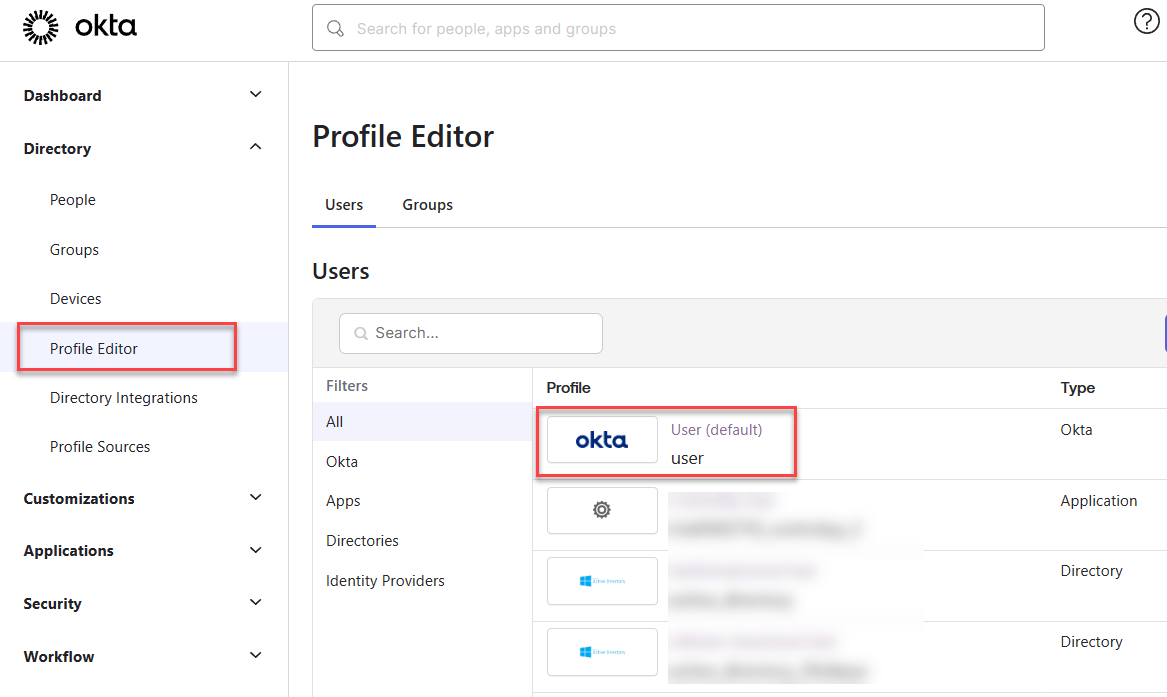
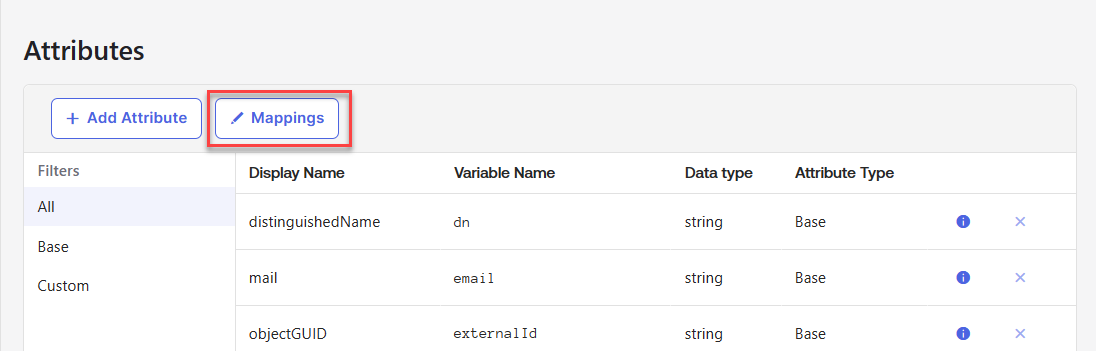
Click Add Attribute.
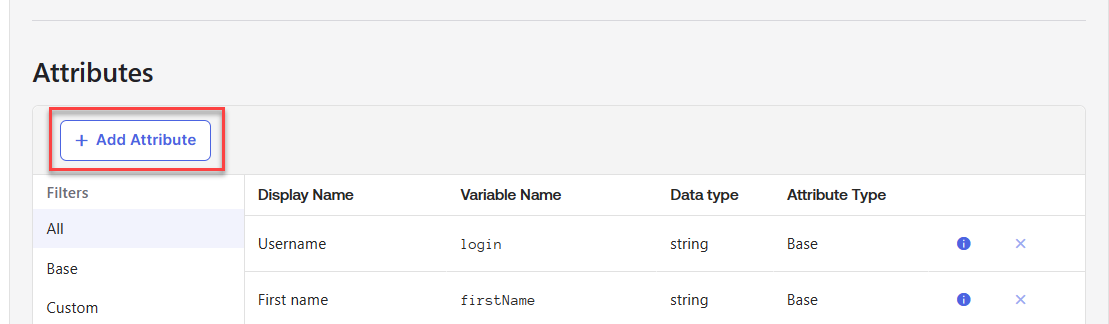
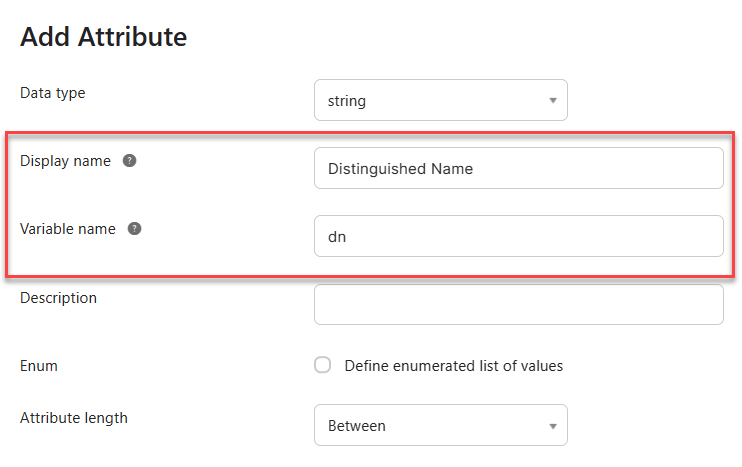
Add three new attributes:
Display name = "Distinguished Name", Variable name = "dn".
Display name = "SAM Account Name", Variable name = "samAccountName".
Display name = "User Principal Name", Variable name = "userName". Note that you might not have to add this attribute to the Okta user profile if you selected to use the UPN as the Okta username when setting up the Active Directory integration.
After saving the attributes, go back to your profiles and select your Active Directory.
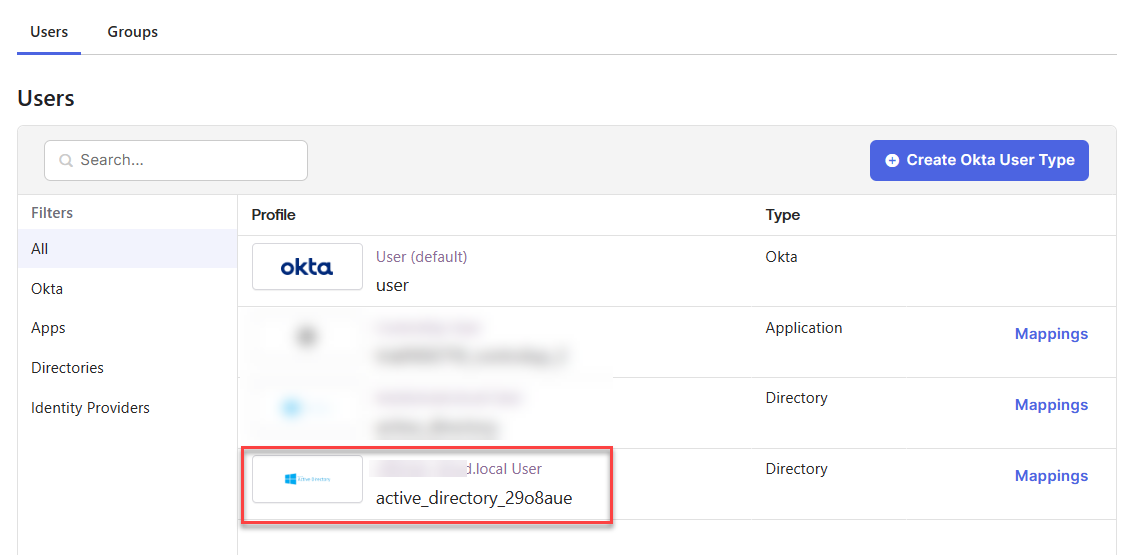
Click Mappings.
Map the following Active Directory attributes to the new Okta user profile attributes you just created, and click Save Mappings.

Set up the SAML Application in Okta
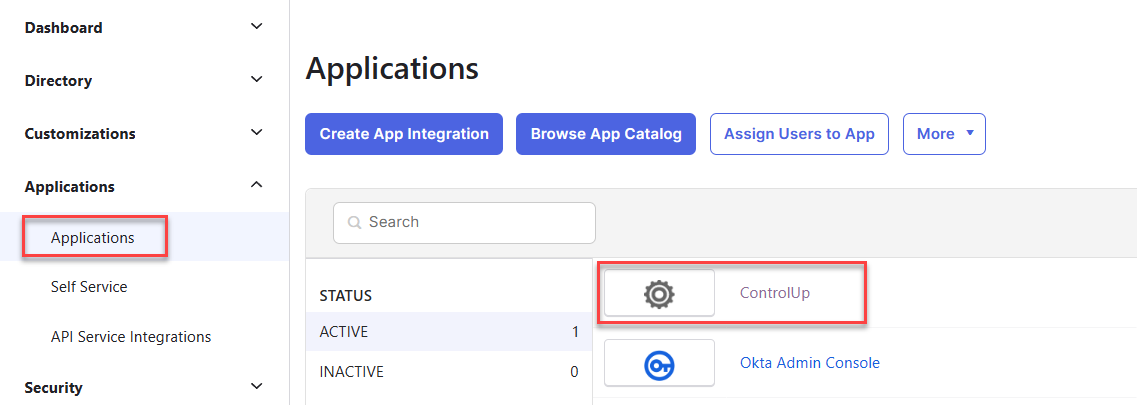
Sign in to the Okta admin dashboard with a user who has the Create App Integration and go to Applications.
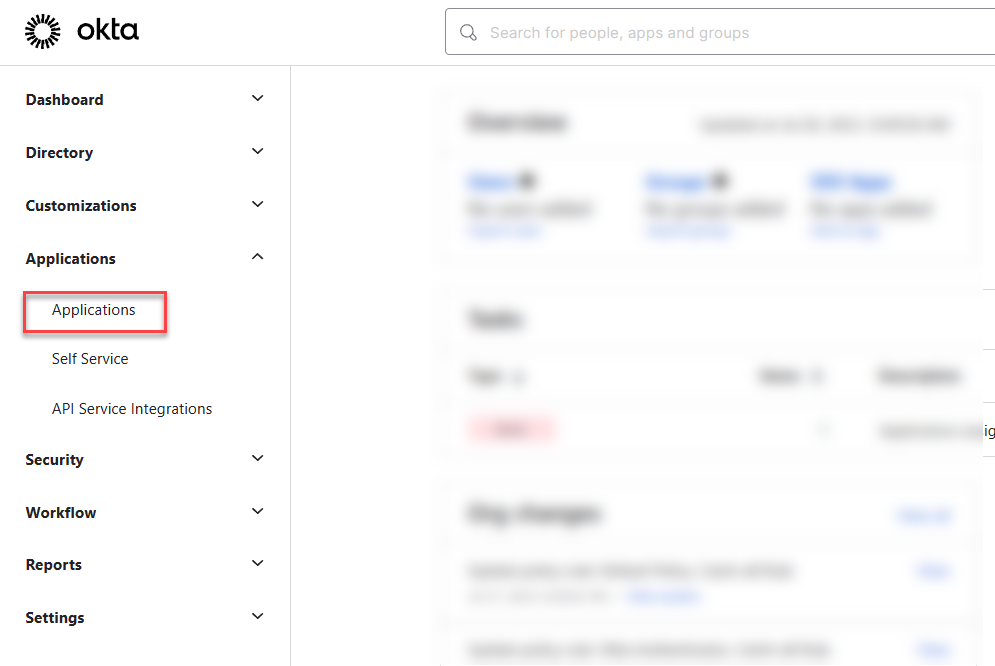
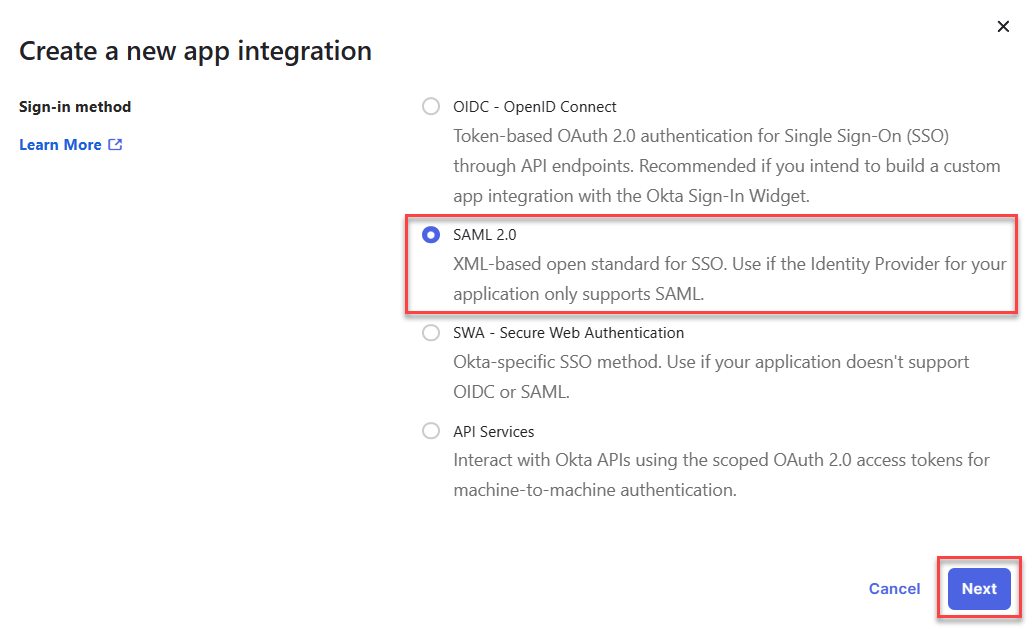
Click Create App Integration.
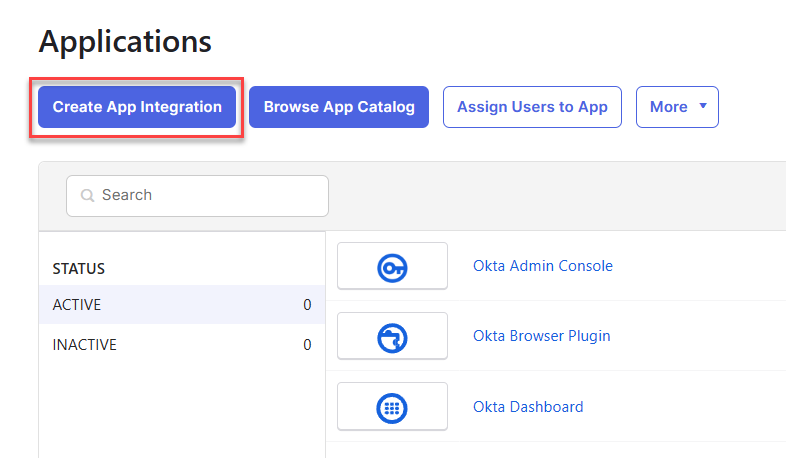
Select SAML 2.0 as the sign-in method and click Next.
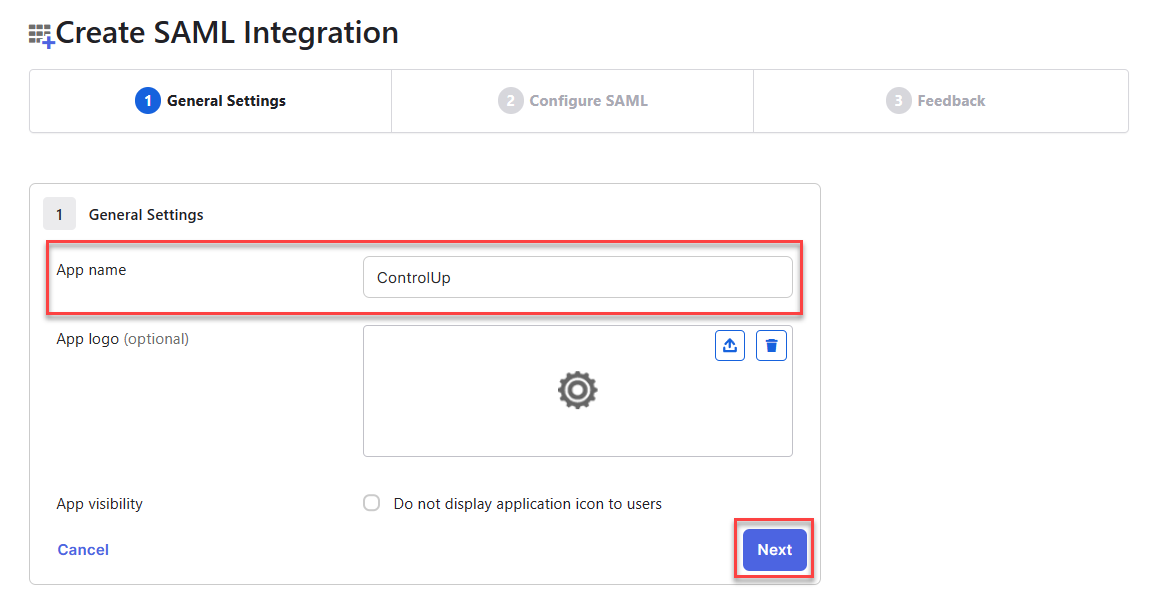
Enter an App name of your choosing and click Next.
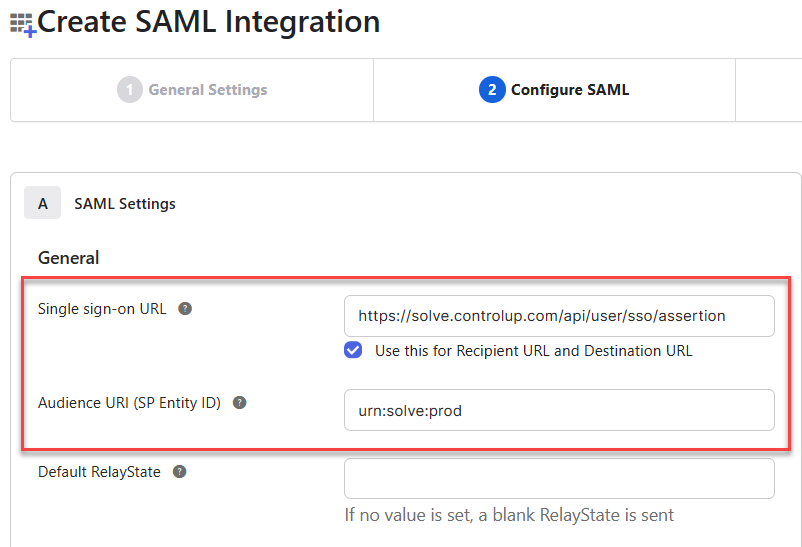
Under SAML Settings, fill out the following fields using values from your Solve SAML settings page.
In the Single sign-on URL field, add the value Endpoint/Assertion Login URL from Solve.
In the Audience URI field, add the value Relying Party Trust Identifier from Solve
If you are using SAML for automatic user account creation, you must add the following attributes under Attribute Statements (optional). This step is not required if your users accessing Solve with SAML have already created a ControlUp account using another method. Note that the following attribute statements are based on the Active Directory attribute mappings described in the prerequisite section above. Your attribute mappings might be set up differently, so ensure that the Values in the attribute statements refer to the correct attributes in your Okta user profiles.
Name
Name format
Value
http://schemas.xmlsoap.org/ws/2005/05/identity/claims/emailaddressUnspecified
user.email
http://schemas.xmlsoap.org/ws/2005/05/identity/claims/givennameUnspecified
user.firstName
http://schemas.xmlsoap.org/ws/2005/05/identity/claims/surnameUnspecified
user.lastName
http://schemas.xmlsoap.org/ws/2005/05/identity/claims/upnUnspecified
user.userName
sAMAccountName
Unspecified
user.samAccountName
distinguishedName
Unspecified
user.dn
After you are finished adding the user attributes, your Attribute Statements should look like this: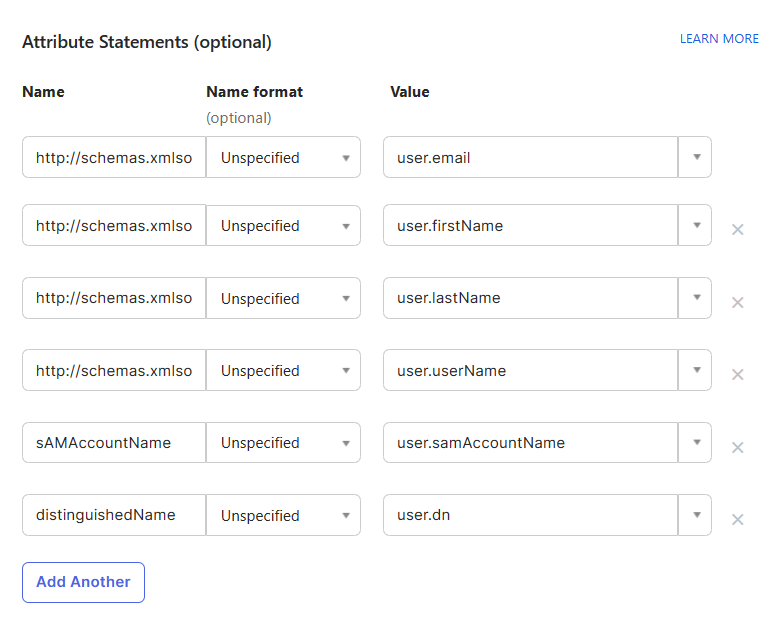
At the bottom of the page, click Next.
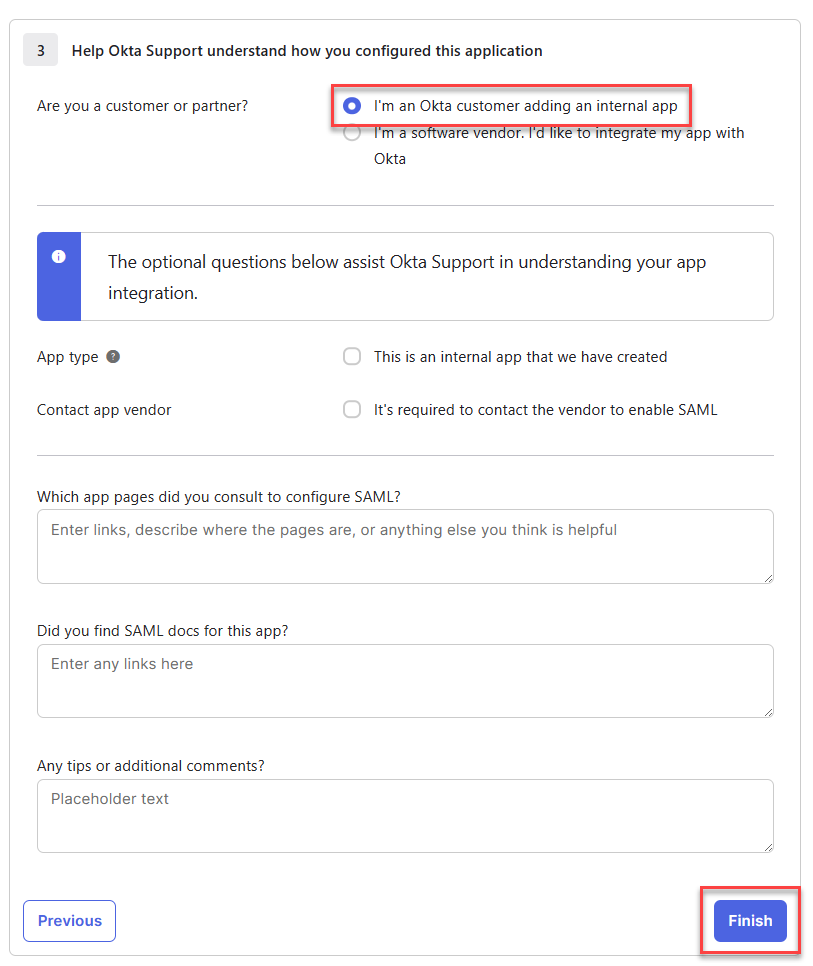
Select I'm an Okta customer adding an internal app and click Finish.
Under the Sign On tab, click View SAML setup instructions.
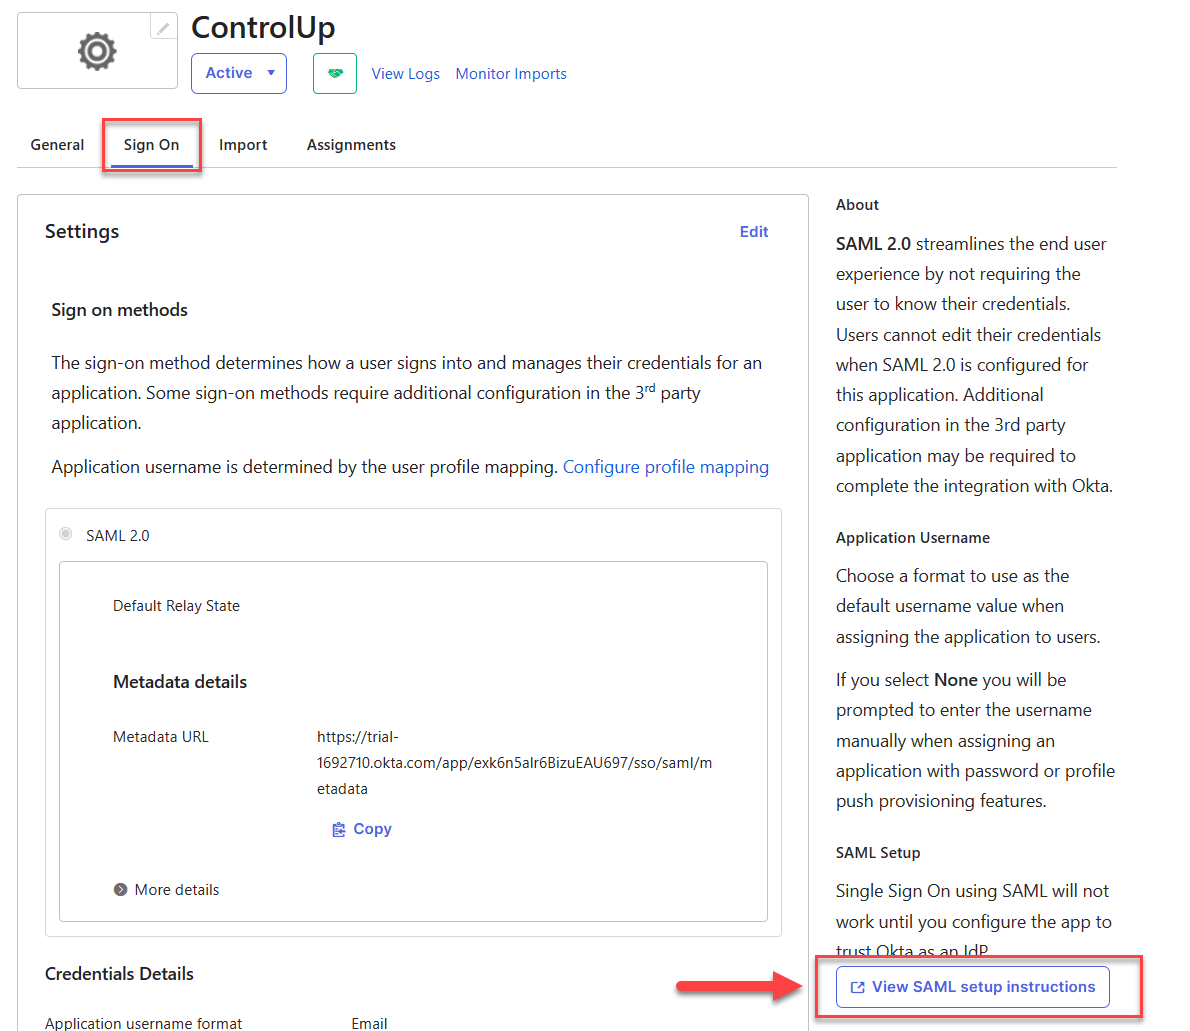
This page shows three values that you must copy or download and add to your Solve SAML settings page.
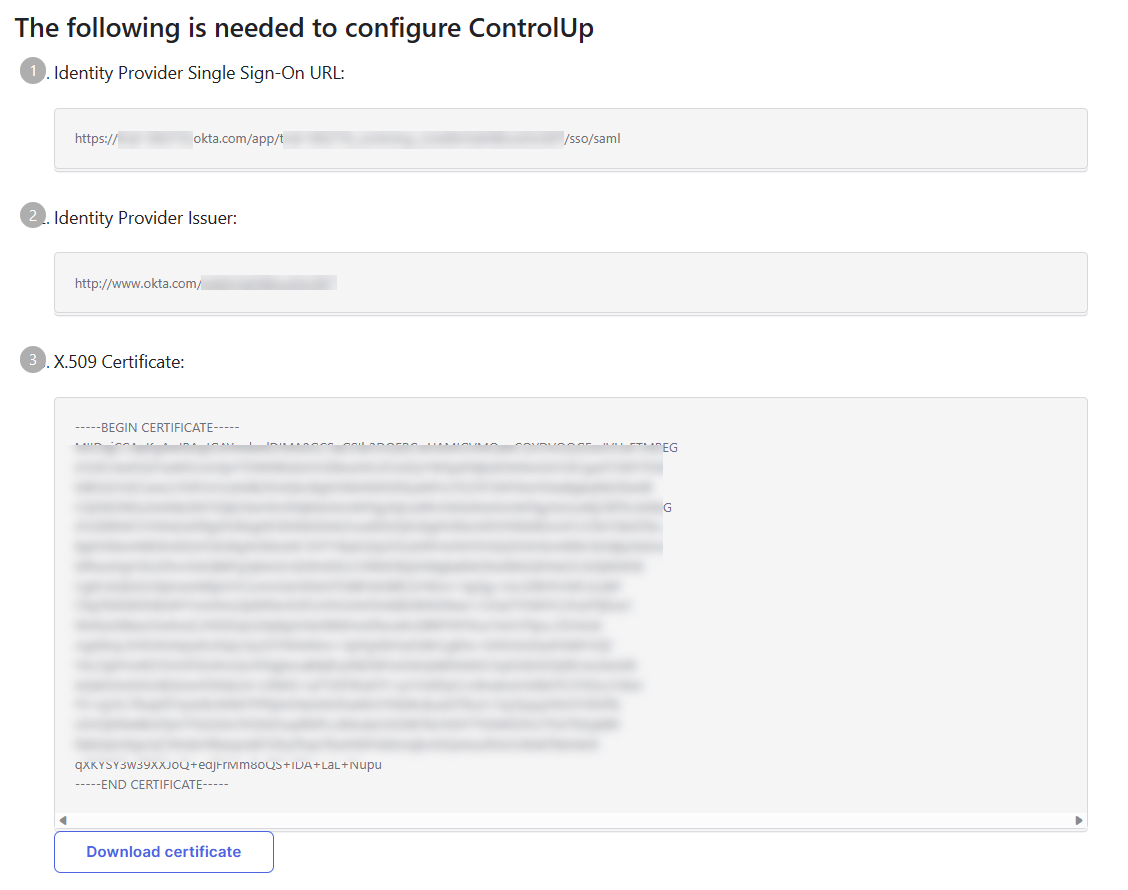
Copy the value Identity Provider Single Sign-On URL and paste it into the field IdP Login URL in Solve.
Copy the value Identity Provider Issuer and paste it into the field Entity/Issuer ID in Solve.
Click Download certificate and upload the certificate under the field IdP Signing Certificate in Solve.
To assign Okta users or groups to the new ControlUp application so that those users are allowed to access Solve using SAML:
Go back to Applications and select the new application you created.
Go to the Assignments tab, click Assign and select to either assign the application to people or groups.
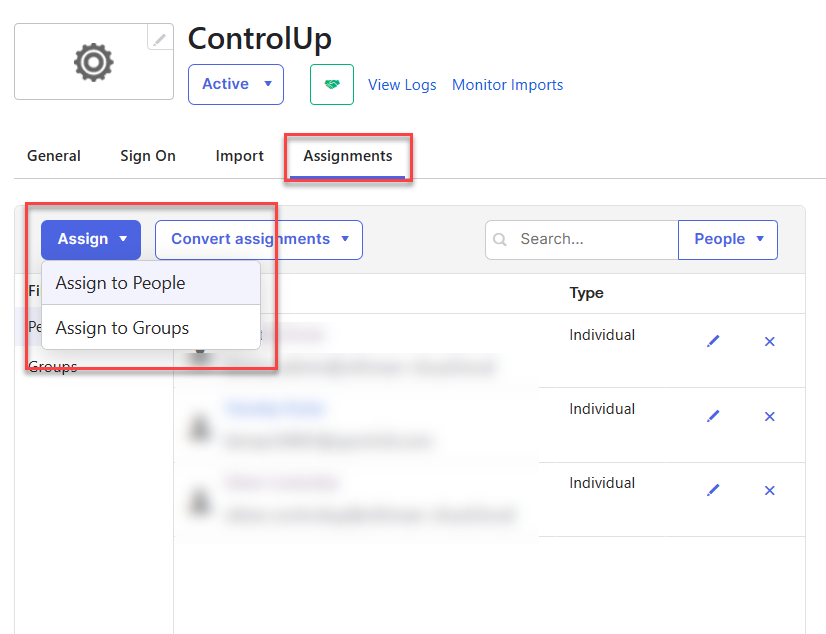
Select the users or groups that will access Solve and assign them to the application. Those users are now able to sign in to your Solve URL using SAML.
Troubleshooting
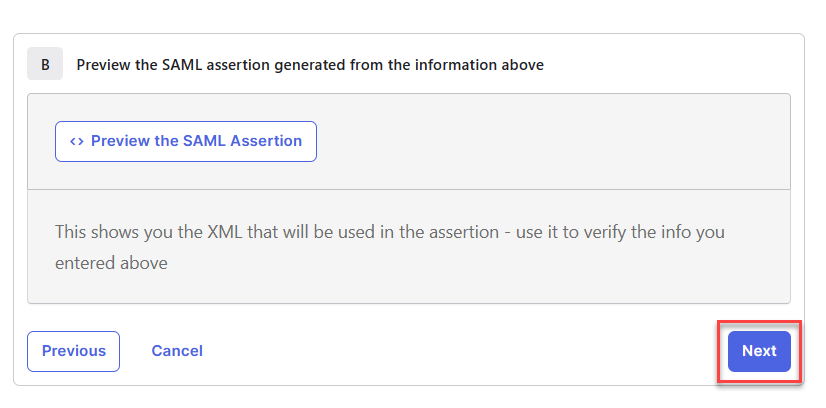
If SAML isn't working correctly after following the procedure above, it's possible that the SAML assertion isn't sending the correct information. To preview the SAML assertion, edit the application and go back to the page where you added the attribute statement, and click Preview the SAML Assertion. Note that your Okta user must be assigned to the application to preview the assertion.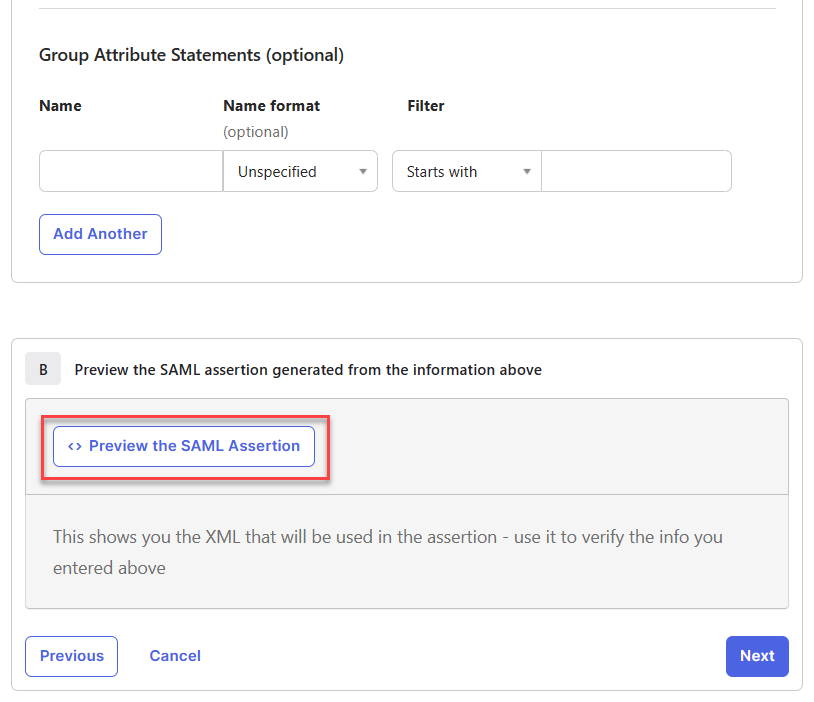
Compare the generated SAML assertion against the attribute table above and make sure that:
The Attribute Name of each attribute is written exactly as it appears in the attribute table.
The AttributeValue of each attribute contains the correct information about the user.
Configure SAML SSO with Solve and Your IdP
This section describes how to set up SAML SSO with Solve with any IdP. See the Use Case Examples above for more details about selected IdPs.
Step 1 - Configure IdP Settings
This table lists the fields that are already filled out in your Solve SAML settings. You need to take the information from these fields and add it in your IdP.
Field in Solve SAML settings | Required | Notes |
|---|---|---|
Relying Party Trust Identifier | Yes | Copy this value from Solve SAML settings and paste it into your IdP settings.
|
Endpoint/Assertion Login URL | Yes | Copy this value from Solve SAML settings and paste it into your IdP settings.
|
Assertion Logout URL | No | If you want to use single log out (SLO), copy the logout URL from your IdP and paste it here. SLO is not supported on all IdPs.
|
Solve Signing Certificate | For some IdPs | If your IdP requires it, download the X.509 certificate from Solve and upload it to your IdP. |
Step 2 - Configure Solve Settings
This table lists the fields that you need to fill out in your Solve SAML settings.
Field in Solve SAML settings | Required | Notes |
|---|---|---|
Create Solve user automatically | No | Enable this option if you want to automatically create a ControlUp user account when a new user signs into Solve using SAML. To use this option, you need to configure your IdP to send the additional attributes described in Step 2. For more details, see Automatically Create ControlUp Users from Your IdP. |
IdP Login URL | Yes | Copy the login URL from your IdP and paste it here.
|
IdP Logout URL | No | If you want to use single log out (SLO), copy the logout URL from your IdP and paste it here. SLO is not supported on all IdPs.
|
IdP Signing Certificate | Yes | Download the X.509 signing certificate from your IdP and upload it here. |
Entity/Issuer ID | Yes | Copy the entity/issuer ID from your IdP and paste it here.
|
Step 3 - Configure User Attributes in Your IdP
Configure your IdP to send the following attributes:
Attribute | Required | Description |
|---|---|---|
NameID | Yes (see note below) | User's UPN. This must match a user in your ControlUp organization. |
| Only to create Solve users from your IdP | User's email address |
| Only to create Solve users from your IdP | User's first name |
| Only to create Solve users from your IdP | User's last name |
| Only to create Solve users from your IdP | User's UPN |
sAMAccountName | Only to create Solve users from your IdP | User's sAMAccountName |
distinguishedName | Only to create Solve users from your IdP | User's distinguished name |
Note
If you can't configure your IdP to send the UPN in the NameID, then you can send the attrbutes http://schemas.xmlsoap.org/ws/2005/05/identity/claims/upn AND http://schemas.xmlsoap.org/ws/2005/05/identity/claims/emailaddress instead. If both of these attributes are sent, then users are able to sign in to an existing account.