You can use the ControlUp Real-Time DX Console or the ControlUp Monitor to automatically create a CSV file that contains all real-time information of a specific grid.
We recommend that you use PowerShell cmdlets to export information.
Create an Export Rule
You can add a new export rule for the monitor to use with the following methods:
PowerShell Cmdlets
From version 9.1, all of the PowerShell cmdlets for export rules have been deprecated from the ControlUp.PowerShell.User module. To configure export rules, use the Export-CUQuery cmdlet.
You can use PowerShell cmdlets to interact with export rules. Learn more here.
To create a new export rule in PowerShell, use the Add-CUScheduledExportRule cmdlet.
Create a New Export Rule in the Console
From version 9.1, the Export Schedule has been deprecated from the Real-Time DX Console. The deprecated Export Schedule screen still displays in Monitors Settings, but we will remove it in a future version. To configure export rules, use the Export-CUQuery cmdlet.
To use the export scheduler in the console, click Settings > Export Schedule and follow the steps described in the section below. Keep in mind that if you choose to use the export schedule in the console settings (instead of the monitor settings), data will only be exported when a console is running within your ControlUp organization, regardless of the user.
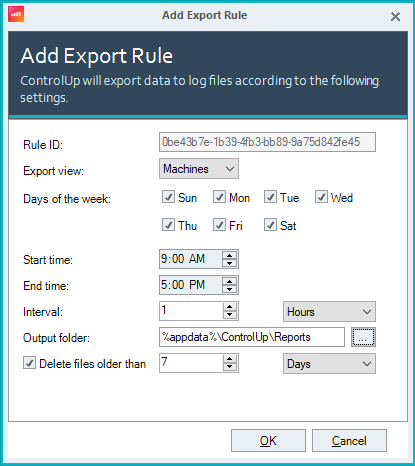
To use the export scheduler in monitor settings, click Settings > Monitors > Monitors Settings > Export Schedule and click Add Export Rule
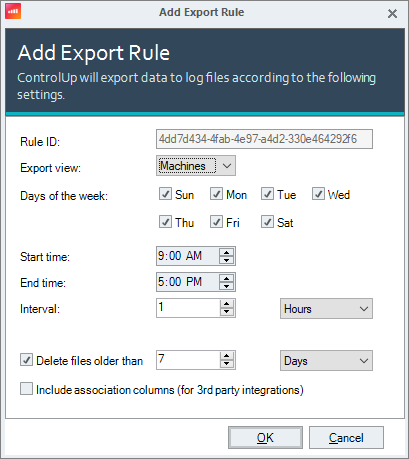
In this window, you can configure a new export rule. The following options are available:
| Export View | The name of the view you see in the Real-Time DX Console. Possible values are Folders, Hosts, Machines, Sessions, Processes, Accounts, Accounts, Applications |
| Days of the week | Days of the week on which the export rule should be executed |
| Start time | Time of day when the export rule should begin execution |
| End time | Time of day at which the export rule will stop running |
| Interval | Interval at which the export rule will run |
| Output folder | Exported files can be saved either locally on the monitor machine or to a UNC path |
| Delete files older than |
Retention period for old export files |
| Include association columns (for 3rd party integrations) |
Includes hidden columns for internal use when expanding the export file |