Use alerts to be notified or automatically perform actions when important events occur.
How do alerts work?
The ControlUp for Desktops alert system runs every minute and searches back through a specified data index for devices that match alert activation conditions. The length of time that the alert system searches back through the data index is called the Time Window. If a device matches the alert conditions a specified number of times (called Number of Hits), within the Time Window then that device activates the alert.
For example, consider an alert with Time Window = 10 minutes and Number of Hits = 2. The alert activates if a device meets the alert conditions at least 2 times within the last 10 minutes.
Note that some data is collected only once every 10 minutes, so we recommend that you use a Time Window of at least 600 seconds. Additionally, make sure that the Number of Hits is not too high for the data collection interval (for example, it is impossible for data collected once every minute to have more than 10 hits in 10 minutes).
When a device meets the conditions for the alert, the configured follow-up actions are executed on the device, and any configured notifications are sent. The notification identifies all devices that have met the conditions for the alert.
You can view triggered alerts in two locations in ControlUp:
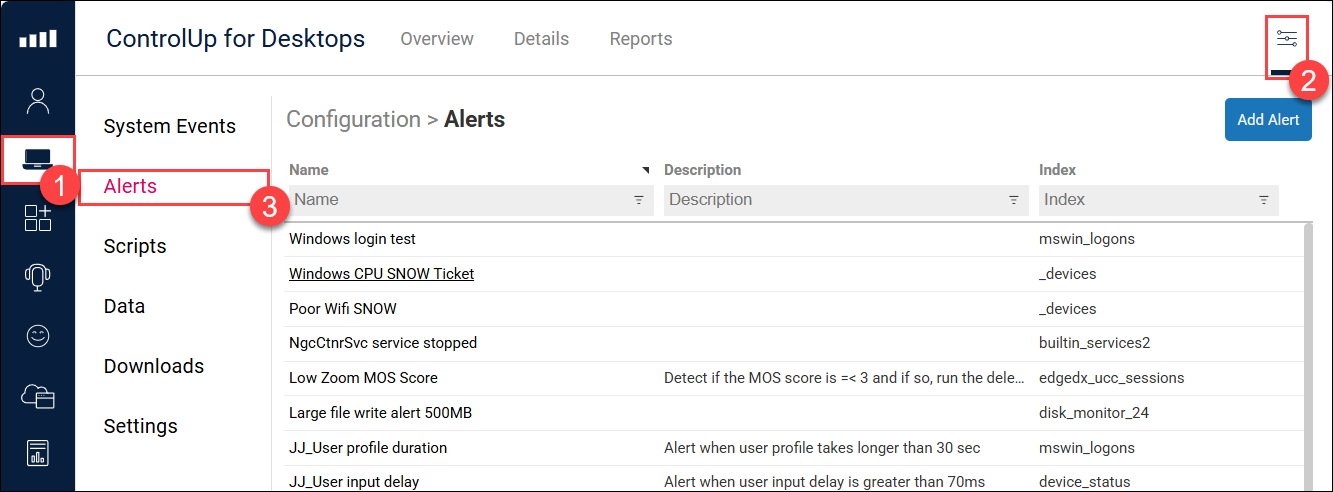
The System Events log shows all alerts from all devices. Alerts are stored with Type=ALERT. To access the System Events log, go to Devices > Configuration > System Events.
When drilling down into the details page for a specific device, the Device Events tab shows alerts that have triggered on that device. Alerts are stored with Type=Alert.
How to access your alerts
To create new alerts or view/edit your existing alerts, go to the ControlUp for Desktops > Configuration > Alerts.

Create an alert
On the Alerts page, click Add Alert.
Enter a Name and a Description for the new alert.
Select the Alert Severity. The severity lets you prioritize and respond to alerts more effectively.
In the Conditions section, define the following fields:
Device Platforms - Determines which scripts are available to be selected as a follow-up action after the alert is activated. Note that the platform selection you make here does not determine which devices can activate the alert. To do this, you can add a condition to the alert based on the
Platformfield (1 = Windows, 2 = macOS, 3 = Linux).Time Window - The length of time that the alert system searches back to check whether the alert's activation conditions were met. Read above for more information.
Number of Hits - The number of times that the activation conditions must be met within the Time Window for the trigger to activate. Read above for more information.
Retrigger Delay - The minimum duration between subsequent alert activations. If the retrigger delay duration has not passed since the last alert activation, then the alert won't activate even if it meets all of its conditions.
Data Index - The data index used for the alert's activation conditions.
Conditions - Click +Add Condition to specify the condition that causes the alert to activate. You can add multiple conditions, but they must be based on fields from the same data index. If you add multiple conditions, they all must be met for the trigger to activate (they are combined with AND operators).
For text fields (strings), you can create a "does not contain" condition by selecting "Contains" and adding
!!before the condition value. For example, the following alert activates when a device's country does not contain "Ireland".

For text fields (strings), you can create an OR condition by selecting "Contains" and adding
||between the condition values. For example, the following alert activates when a device's country contains either "Ireland" or "Netherlands".

For text fields (strings), you can combine "does not contain" and OR conditions by selecting "Contains" and using both
!!and||. For example, the following alert activates when a device's country does not contain either "Ireland" or "Netherlands".

You can use Elastic in conditions. For example, the following alert activates if a device hasn't been online in 15 minutes.

Important
When creating an activation condition based on a text field (string), you must use "Contains" instead of "=". To see the data type of each field, open the relevant data index on the Data settings page and hover over the tooltip next to the list of columns in the index.
Designate follow-up actions for the alert, to be executed when the alert is triggered. Select from the following actions:
Webhook URL - An HTTP POST request is sent to the specified URL.
System Script - The selected system script is executed on the devices that triggered the alert. This option is available only after you select a specific operating system in the Device Platform field in the alert's conditions. Only scripts that match your selected platform and have the Trigger type "Custom Action - System" appear in the dropdown.
User Script - The selected user script is executed on the devices that triggered the alert. This option is available only after you select a specific operating system in the Device Platform field in the alert's conditions. Only scripts that match your selected platform and have the Trigger type "Custom Action - User" appear in the dropdown.
Survey - The selected survey is sent to the devices that triggered the alert. Only on-demand surveys appear in the dropdown.
Email Addresses - An email is sent to the specified email addresses with the names of the devices that triggered the alert. The email is sent from sip_alerts@controlup.com and contains the name of the alert in the subject line. To enter multiple email addresses, use a semi-colon separated list. Note that if more than 50 devices meet the conditions for the alert at the same time, then no emails are sent. To make sure that you are able to successfully receive email notifications, click Send Test Email after entering email addresses and confirm that you receive the test email.
Create a ServiceNow ticket - A serviceNow ticket is created. Read ServiceNow Integration for details on how to set up and use the ServiceNow integration.
Click Create Alert.
Shortcut: create alerts directly from a device metric
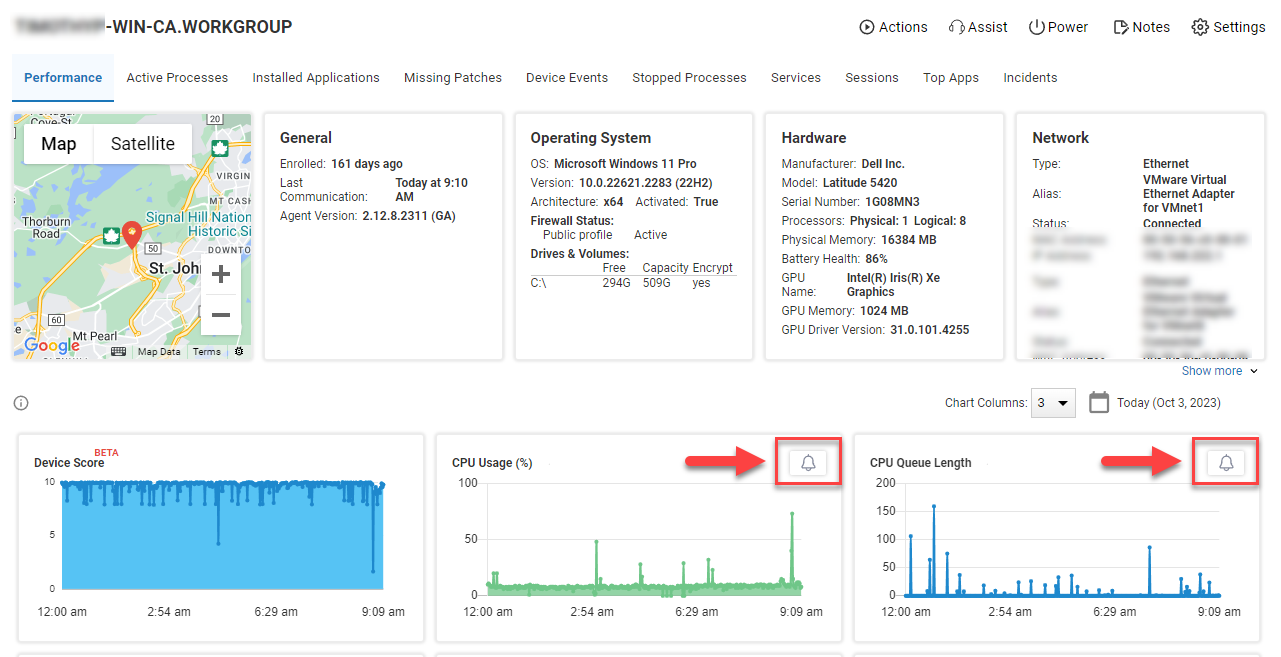
When you are on the device drilldown page, you can click the alert icon next to a widget to quickly create an alert based on the metric shown in the widget. After you click the alerts icon, the relevant fields in the alert configuration page are preconfigured to target that metric.

Edit or delete an alert
To delete an alert, click the trash icon next to its name.
To edit an alert:
Click the alert's name.
Make your changes to the alert configuration.
Click Update Alert.
It is not possible to temporarily disable an alert.
Alerting on a custom data index
To create an Alert based on a custom data index, you must ensure that the following fields are in the index. The Alert uses these fields to evaluate whether the conditions are met.
created_local
_device_id
_device_name
Troubleshooting
If your alerts aren't working as expected, consider the following tips:
If a device comes back online after a few hours and uploads its data you might not get an alert because the system takes into account the time that the event happened, NOT the time when it was uploaded to the server.
Check Configuration > Data to confirm that the the event you think you should have received an alert about was recorded in the database, and that its recorded _created_local time occurred within the configured Time Window.
Check if the Retrigger Delay is set too high. The Retrigger Delay parameter prevents you from being flooded with alerts every 60 seconds, but if it is configured to a value which is too high, you might not receive alerts for an excessively long period of time.