Click here to watch our Academy training video about the HTTP/S Scout.
The HTTP/S Scout checks multiple parameters related to website and web services connectivity. You can use the Scout for the following:
- Check the responsiveness of a website and the phases of the connection.
- Validate SSL certificates, including expiration, duration, and the certificate chain.
- Test web services APIs using GET and POST methods, with custom headers and request bodies.
- Check your proxy's health by sending traffic through a custom proxy server.
Create an HTTP/S Scout:
-
In the Synthetic Monitoring top bar, click Create Scout to open the Add New Scout window.
-
From the Infrastructure tab, select HTTP/S as the Scout Type.
-
Select the locations (Hives) from which you want to initiate the HTTP/S test.
-
Select whether you want the Scout to send a GET or POST request.
-
Enter the Address of the website or API endpoint that you want to send the request to.
-
Enter a Name for the Scout.
-
Select a run interval for the test using the Run Every slider. For the first 10 minutes of the run, you can choose intervals of 1 to 10 minutes. After that, you can choose increments of 5 minutes up to 60 minutes (5, 10, 15, 20, and so on).
-
Optionally, add Tags to your Scout. Tags are key-value pairs which can be used to organize your Scouts. To learn more about tags, visit Centralized Tags Management.
-
Optionally, click on Show additional parameters to configure the following:
- SSL Verify. Sets whether the Scout checks for a trusted SSL certificate. If you select Yes and the certificate isn't trusted, then the test fails. If the Scout is running from a Custom Hive, then the Scout can also accept self-signed certificates that are added to the machine where the Custom Hive is installed.
- Timeout. Sets the maximum wait time for the test to finish.
- Look for a string in the response. Sets a string that the Scout will search for in the response. If the string isn't found, then the test fails.
- Max Redirects. Sets the maximum number of redirects to follow before the test fails.
- Success Codes. Sets which HTTP codes the Scout considers a successful response.
- Authentication. Sets the authentication method for the HTTP request. If you edit the Scout to run from a new location (for example, an additional Custom Hive), then you must re-enter the password.
- Custom Headers. Sets custom headers (Key and Value) to send during the test. You can add multiple headers.
- Request Body. If you are sending a POST request, you can enter a request body to send in the request.
- Proxy. If the Scout is running from a Custom Hive, select whether to send the request directly to the website, or through a proxy server. None sends the request directly to the server. Inherit from Hive uses the proxy server data configured in the Custom Hive. Custom lets you configure a proxy server for the Scout.
- Check Network Path Performance. Sets whether to check the network path to the destination. If enabled, you can set the network Timeout, and the minimum and maximum time to live (TTL). The test fails if the network path is not within your set parameters.
-
Click Next: Alert Policy to set up alerts and notifications on the Scout before saving it. For more information, see Alert Policies.
Test Results
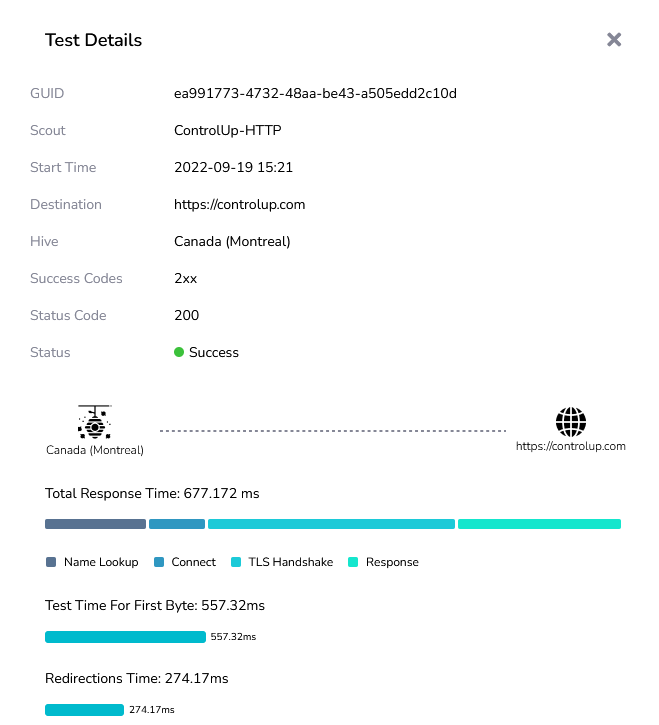
Click on a test result to see the full details of the HTTP/S test. In this example, you can see the type of information that is returned for an HTTP/S test to https://controlup.com.
You can see a summary of the Scout configuration, along with some request and response durations:
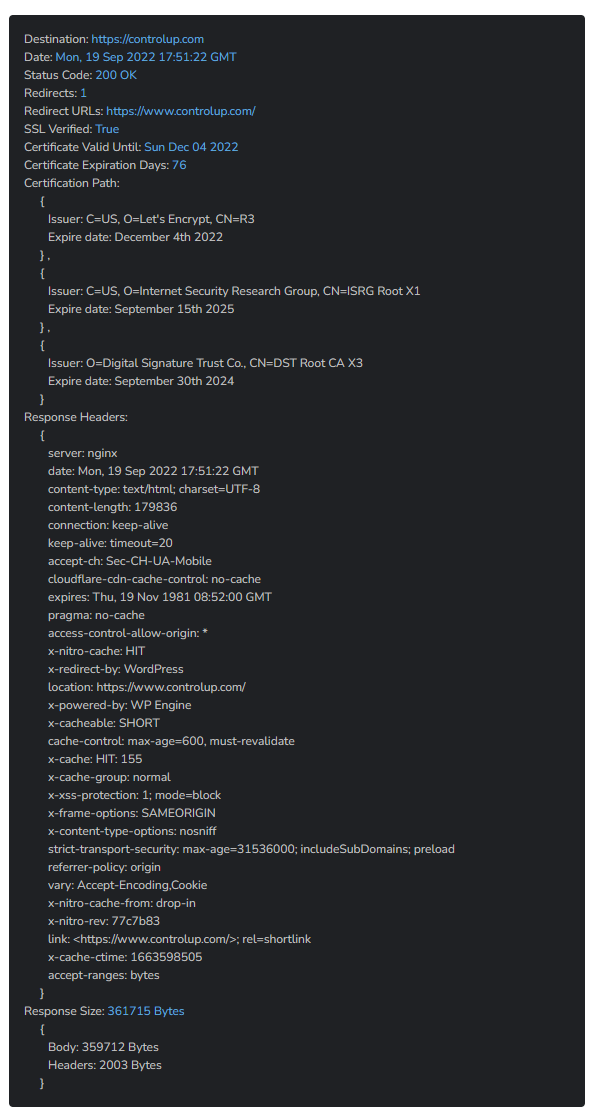
The Scout also shows more detailed information about the request and response:
If you enabled Check Network Path Performance when creating the Scout, you can also see the network path with details for each hop.
