This article includes best practice options for deploying Remote Clients (formerly Remote DX) for Citrix environments, including:
Deploy Remote Clients with Citrix Global App Configuration
This section outlines the procedure to configure the Citrix Workspace App and to deploy plugins automatically, to enable your organization to control how Citrix Workspace App is deployed and configured when users connect to your resources. To learn more, refer to the Citrix documentation.
Prerequisite
Citrix Workspace App. From our Download Center.
Deployment
From the Citrix Workspace configuration screen, select App Configuration for your environment.
Select Citrix Workspace App and find the ControlUp Remote DX plug-in.
Select the Windows checkbox to enable the policy to distribute the Windows version.
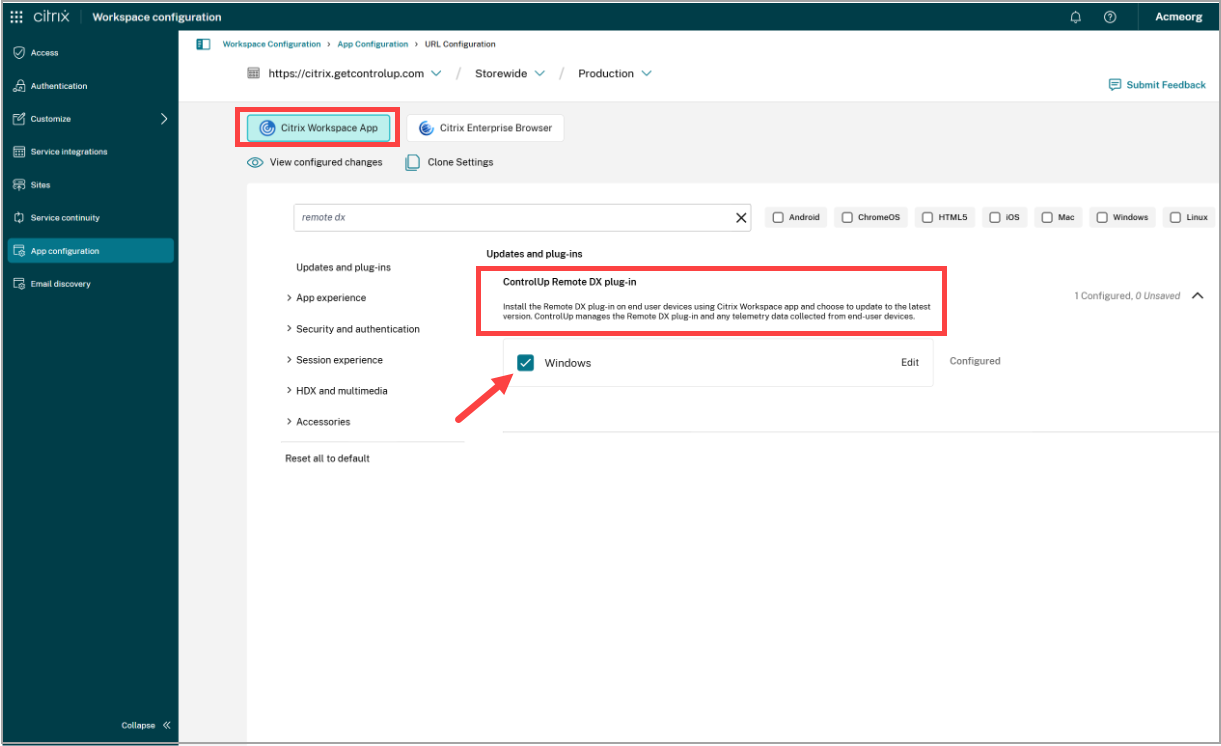
Optionally, you can click Edit to select the Update type and Deployment mode required for your organization.
Click Save Draft and publish your policy.
After the end-user connects to your Citrix environment, they will download the Workspace App configuration and install the Remote DX Plugins Installer service. The Remote DX Plugins Installer will install the ControlUp Remote DX - Citrix plugin and keep it up to date. After the ControlUp Remote DX - Citrix plugin installs on the machine, it will provide your organization visibility into the machine’s local network performance and CPU utilization.
Install Citrix Workspace app already bundled with Remote Clients agent
This section outlines the procedure to install and configure a self-extracting Citrix Workspace App with an integrated bundle for Remote Clients.
Prerequisites
7-Zip. Download the installer according for your platform:
https://www.7-zip.org/download.html7-Zip Extra. Direct download link: http://downloads.sourceforge.net/sevenzip/7z920_extra.7z
Citrix Workspace App. Download link: https://www.citrix.com/downloads/workspace-app/windows/workspace-app-for-windows-latest.html
Remote Clients. Download the Citrix Receiver version from our Download Center:
https://downloads.controlup.com/RemoteDX/citrix/windows/curdx_windows_citrix.exe
Installation
Run and extract the 7-Zip installer. By default, 7-Zip is installed in the C:\Program Files\7-Zip directory.
Extract the 7z920_extra.7z to the folder where you installed 7-Zip.
Copy the CitrixWorkspaceApp.exe and curdx_windows_citrix.exe to a folder. Select both files, right-click > 7-Zip > Add to archive.
In the Add to Archive wizard, specify a new name for the archive. Click OK to start the compression of both files.
Once the file is created, locate the 7zS.sfx in the 7-Zip installation folder.
Copy the 7zS.fsx into the folder where you created the new archive. Both files must be located in the same directory:

In the same folder, create a config.txt file and insert the following script:
;!@Install@!UTF-8!
Title="Citrix Workspace App"
RunProgram="install.cmd"
;!@InstallEnd@!
In the same folder, create a new file install.cmd and insert the following text:
pushd %~dp0
CitrixWorkspaceApp.exe /silent
curdx_windows_citrix.exe /VERYSILENT
Drag and drop the install.cmd into the new archive and confirm the warning with Yes.
Open a command prompt and navigate to the path where the files are located.
In the command prompt, run the following command.
copy /b 7zS.sfx + config.txt + "CitrixAndRemoteDXinstaller.7z" archive.exe
Note
Replace the name of the .7z file according to the file name you created.
This command creates a new self-extracting file (archive.exe) that includes the 7Zs.sfx, config.txt and the archived 7zip file:
Install the bundle and confirm that the installation was successful by pressing CTRL + R. Type appwiz.cpl and check if the Citrix Workspace App and Remote Clients appear.
Add Remote Clients process path to the virtual channel allow list using a wildcard for agent versions
With the introduction of Citrix Virtual Apps and Desktops (CVAD) release 2109, third-party virtual channels must be explicitly allowed. A policy that controls the allow list was automatically enabled with CVAD 2109. To learn more, refer to the official Citrix blog article.
Use a wildcard in the path name for ControlUp agent versions
With CVAD release 2206, you can set wildcards in the path of processes that are added to the virtual channel allow list policy. The process path that runs the ControlUp agent enabling Remote Clients monitoring includes the version number for the agent. By enabling wildcards, the version does not have to be updated and the path can be entered to the virtual channel allow list policy just the one time.
To add the Remote Clients process path to the virtual channel for allow list, refer to the Citrix documentation, and use the following parameters:
Virtual channel name: CUEPUX
Process: C:\Program Files\Smart-X\ControlUpAgent\*\cuAgentHelper.exe
Allow list entry: CUEPUX,C:\Program Files\Smart-X\ControlUpAgent\*\cuAgentHelper.exe
Disable virtual channel allow list
If you don't want to add the virtual channel, you can follow the workaround by disabling the virtual channel allow list policy in CVAD 2109 and higher. Once disabled, restart the VDA to apply the Virtual channel allow list policy.