Synchronizing your EUC environment with ControlUp has become easier than ever before, with our Universal Sync Script. This script lets you synchronize your Omnissa Horizon (formerly VMware Horizon), CVAD or Citrix Cloud environment with ControlUp so that you can view your VDI machines or connection servers as managed machines.
You can use built-in synchronization to synchronize your folders and machines without needing to import and configure the Universal Sync Script.
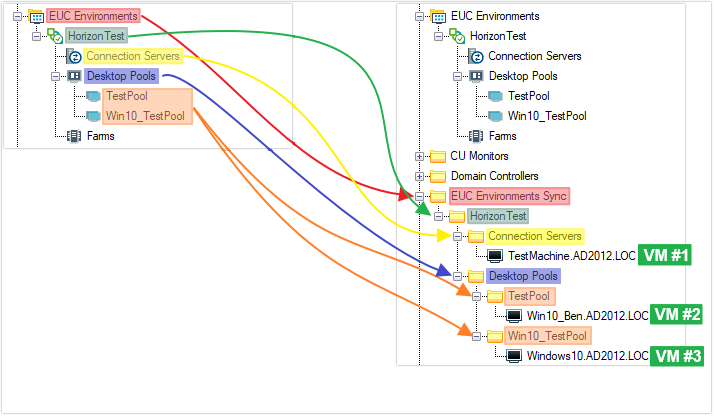
For example, if you connect an Omnissa Horizon environment to ControlUp and you run the sync script, a new folder structure with connection servers, pool machines and RDSH farms is created in the organizational tree.
Regularly running the script will automatically synchronize EUC environment changes to ControlUp. In this article, we walk you through the configuration and functionality of the script. By the end you will have learned how to automate your EUC synchronization with ControlUp.
Benefits
- Faster synchronization of your EUC environment.
- Less overhead as no external APIs are needed. The data is pulled from the ControlUp Monitors via the Powershell Monitor API cmdlets.
- New script features and enhancements are published in the script library.
Prerequisites
- You must already have EUC environments added to the ControlUp organization tree. This can be either Omnissa Horizon, CVAD, or Citrix Cloud
- A running ControlUp Monitor machine
- PowerShell execution policy on the monitor server:
- Bypass or
- Unrestricted
- A service account that has the following permissions:
- Local Administrator privileges
- Log on as a batch job user right
- Password never changes attribute
- User actions to be allowed in the ControlUp Security Policy:
* Add Machine
* Remove Machine
* Add Folder
* Remove Folder
Script arguments
Configure the script behavior by providing the following parameters:
| Argument | Description | Value |
|---|---|---|
| Folder Path | The new folder path to which your EUC environment will be synchronized. | String |
| Add Brokers | Indicate if CVAD Brokers, Citrix Cloud Connectors or Horizon Connection Servers should be synchronized | Yes / No |
| Exclusions List | Machine names that you want to exclude. You can define a comma-separated list with wildcards (*). For example: mac*, serv* will not synchronize machines that start with either "mac" or "serv". |
String |
| Cleanup Folders and Machines | Folders or machines that do not exist anymore will be cleaned up | Yes / No |
| Commit Changes | If set to No, the EUC synchronization will be simulated and no changes are committed to the Real-Time Console | Yes / No |
| Log Path | The log path to which the sync script write the log | Folder path of log file |
| Log Duration | Specifies how long the log file should be retained | Number (in days) |
| VerbosDebug | If set to Yes, verbose output is written to the log file. This provides more detailed information on the synchronization process. | Yes / No |
| Mode | Defines if the script should save the configuration file only ("save") or run the sync process ("run") | Save / Run |
Manual Downloads
If you prefer to download the XML and the PowerShell script manually, use the links below
- Download XML import file
We recommend importing the sync script by importing this XML file in the console. See Step 2 in the section below. - Download PowerShell script
Although we don't recommend running the PowerShell script manually, you can set up a Windows task running this file.
Step 1 - Create the Configuration file
Before you can use the sync script, you need to create configuration files. These files contain the configuration that is loaded each time the sync script runs.
If you want to change the configuration, run the script action again with the changes you want to make. To store the configuration, use the value Set for the Mode parameter.
To create the configuration file in the console:
-
Download the XML and save it to the console machine.
-
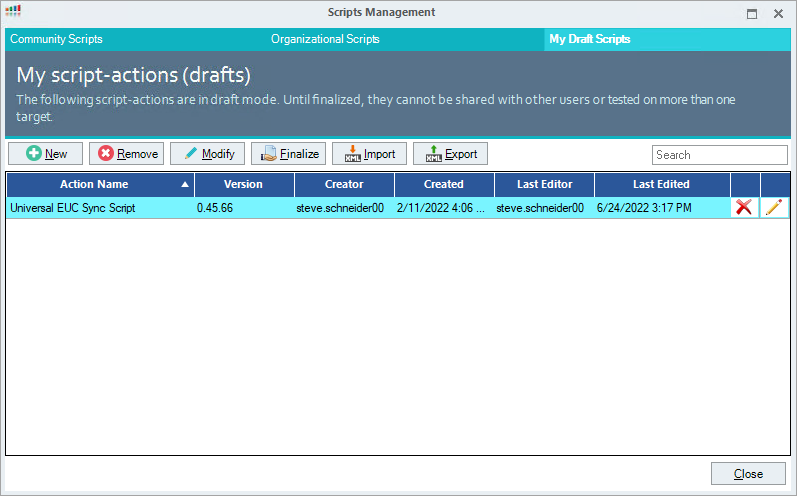
In the Real-Time Console, click Script Actions. In the My Draft Scripts tab, and Import the downloaded XML. Once imported, the script is displayed in the My Draft Scripts tab.
-
Click Modify and open the Settings tab. Set the Execution Context to Other Machine, select a monitor machine on which you want to run the script, and set the user under Shared Credentials. Click OK.
ImportantYou must select a monitor machine, otherwise the script will not work correctly. Ensure the shared credentials belong to a local admin user on the monitor machine, as the user needs to be able to write to the %ProgramData% folder.
-
Create a final version of the script by clicking Finalize.
-
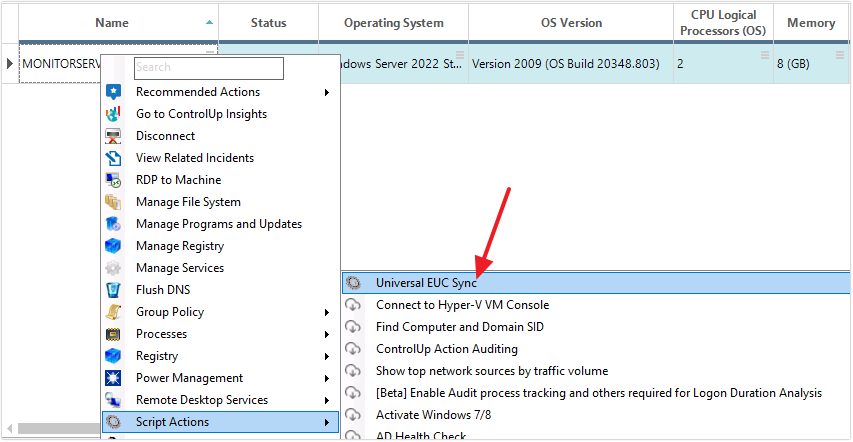
In the console, right-click the monitor machine that you configured in Step 3 and run the script. Right-click the monitor machine > Script Actions > Universal EUC Sync.
-
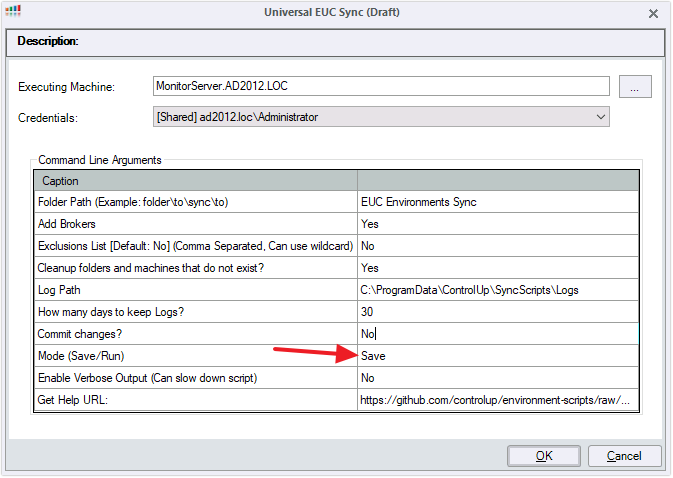
In the script arguments window, configure the script behavior. Make sure you set the Mode parameter to Save. For the first run of the script, we recommend to set the Commit Changes parameter to No to simulate the synchronization at the first run. Refer to the script-arguments section to better understand the meaning of the parameters.
-
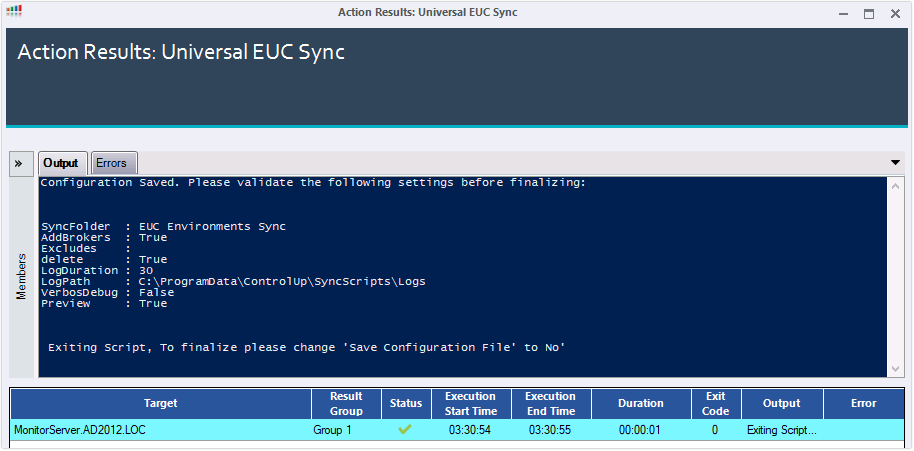
Upon successful execution of the script, the following screen appears:
-
On the monitor machine, a Universal_EUC_Sync.cfg file and other configuration files are created under
%ProgramData%\ControlUp\SyncScripts.

-
The Universal_EUC_Sync.cfg is the configuration file that holds the basic configuration for the sync script.
Step 2 - Run the Script
The previous step explained how to create the configuration file. Now it's time to start the synchronization process. Before you can start, you can start a test run.
Start the test run
- Run the script again by right-clicking the monitor machine.
- Make sure the Preview parameter in the cfg file is set to True. This allows you to simulate the synchronization process.
- Once no errors are shown in the output, you can start the synchronization again. Make sure the Preview parameter in the cfg file is set to False.
For the automatic synchronization, you can use a built-in trigger called Scheduled Trigger or you can run a Windows Task on the monitor machine. Both options are explained in more detail below.
Option 1: Run the Script with a Scheduled Trigger (Recommended)
To set up a Scheduled Trigger:
-
In the console, click Triggers > Add Trigger > Scheduled
-
Select the following options and click Next
- Record Type: Machine
- Schedule: Per Minute
- Recur every 60 minutes
- End. Expiry date of the trigger.
-
Keep the trigger condition empty and click Next.
-
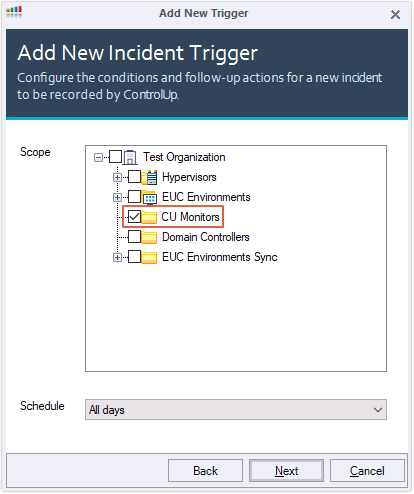
As a trigger scope, select the folder under which the monitor machine resides. In our example, the hostname of the monitor machine MONITORSERVER is located under a customized folder CU Monitors. Click Next
We recommend adding your ControlUp Monitors to a dedicated folder in the ControlUp organizational tree.
-
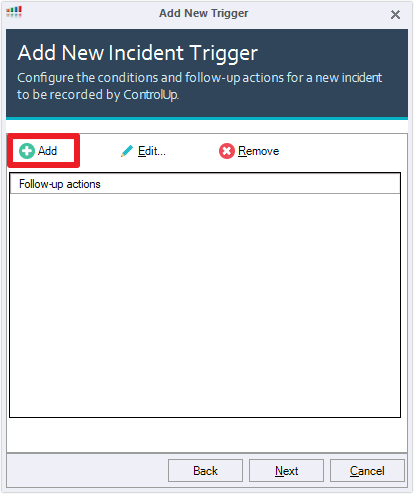
Click Add to add the EUC sync script.
-
Select the Universal EUC Sync script, click Next.
-
Select the user that should run the script on the monitor machine, click Finish.
-
Click OK to save the follow-up action.
-
Additionally, you can configure other follow-up actions, such as sending an email alert. In this example, we will focus on the action itself without setting another follow-up action. Click Next.
-
Provide a user-friendly Trigger name and click Finish.
-
In the Trigger Settings, select the new trigger and click Apply and then OK.

Option 2: Set up a Scheduled Task
Another way to automatically trigger the script is by setting up a Windows task which allows you to run the EUC Sync Script on a schedule.
To create and configure a Scheduled Task:
-
On the monitor machine, open the Windows Task Scheduler (Start > Run > taskschd.msc)
-
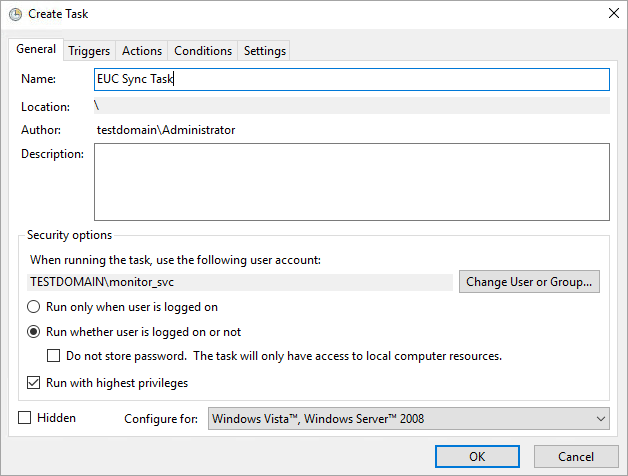
Select Action > Create Task. Under the General tab, provide the following information:
- Name. Name for the task.
- Change User or Group. Service account that should run the task.
- Select Run whether user is logged on or not.
- Select Run with highest privileges
-
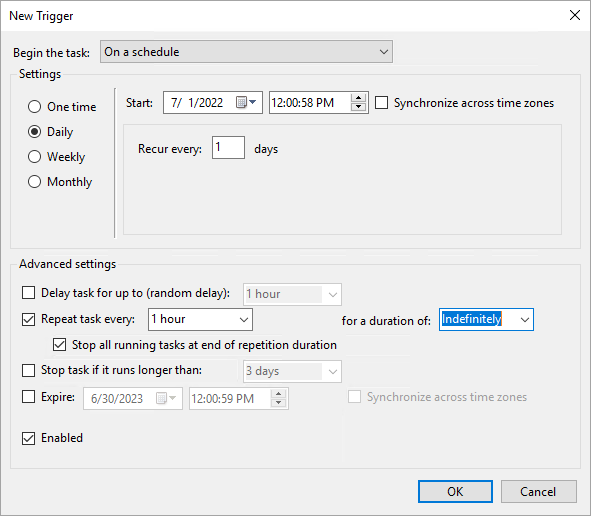
Under Triggers, click New to create a trigger scheduler. We recommend the following values:
- Start Date. Start date of the task.
- Select Daily.
- Set Repeat task every to 1 hour
-
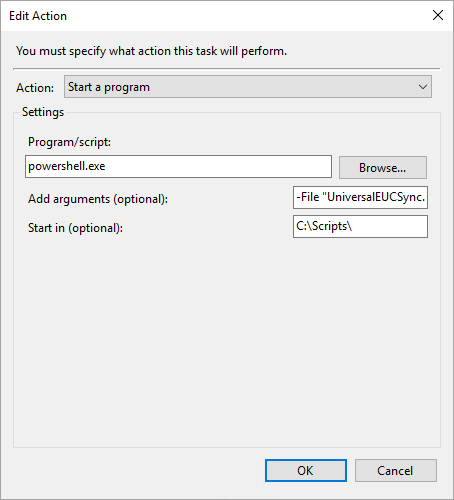
Under Action, click New to create an action.
- Program/script: powershell.exe
- Add arguments (optional): Task argument to call the script. For example: -File "UniversalEUCSync.ps1".
- Start in (optional): Folder where the script is located. For example: C:\Scripts. Make sure you don't use double quotation marks here.
-
Click OK and enter the user information for running the task.
-
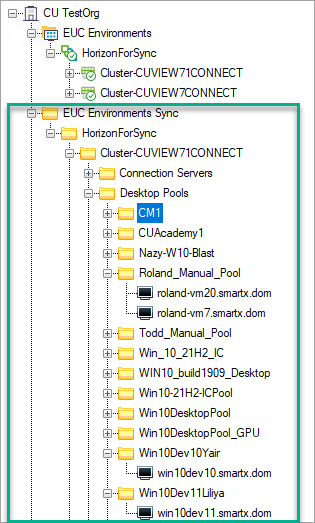
Once the synchronization is complete, you can see the updated organization tree.
Advanced
Custom Folder Mapping
Use %ProgramData%\ControlUp\SyncScripts\folder_map.cfg to customize the folder paths created by the sync scripts, and the folders in which machines are placed.
From version 9.1, you can use the Real-Time DX Console to map folders or machines to folder paths.
Map folder paths
Add mapping rules to replace part of the folder path with a new path, separating the old and new paths with a comma (essentially a 'find and replace' operation).
Consider this example:
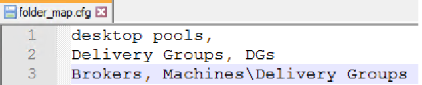
- Line 1 removes a folder from the path.
org\EUC\desktop pools\ICturns intoorg\EUC\IC. - Line 2 replaces a folder.
org\EUC\Delivery Groupsturns intoorg\EUC\DGs. - Line 3 replaces a folder and adds a folder.
org\EUC\Brokersturns intoorg\EUC\Machines\Delivery Groups
Map machines to folders
Add mapping rules to place machines matching a naming pattern into a specific folder.
Enter the machine naming pattern, using asterisks (*) as wildcards. Add a comma as a separator, followed by the full path of the folder in which to place the machines matching the pattern. The full folder path starts with the root of the sync folder (for example, to place machines in orgName\EUC Sync\Horizon Machines, you need to specify EUC Sync\Horizon Machines as the folder path).
When you are mapping machines to a folder, you must use at least one asterisk for the machine name pattern. The sync script searches for machines only if an asterisk is present in the mapping rule.
Consider this example:
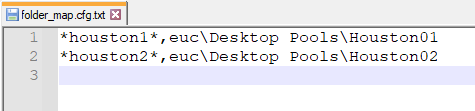
- Line 1 places all machines with "houston1" somewhere in their name into a folder named "Houston01"
- Line 2 places all machines with "houston2" somewhere in their name into a folder named "Houston02"
Custom Site Mapping
Use %ProgramData%\ControlUp\SyncScripts\site_map.cfg to assign folders or machines to a specific site. Enter the folder path or machine naming pattern (using an asterisk as a wildcard). Add a comma as a separator, followed by the name of a ControlUp site.
From version 9.0, you can use the Real-Time DX Console to map folders or machines to sites.
All machines in the folder you specify, or all machines in the folder you specify, will be added to the specified ControlUp site.
Consider this example:
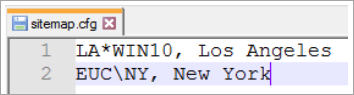
- Line 1 places all machines matching the pattern LA*WIN10 (such as LA-CU-WIN10p01) to the Los Angeles site.
- Line 2 places all machines in the folder EUC\NY (such as org\EUC\NY\CTX-PVS-01) to the New York site.
Custom DNS Mapping
Use %ProgramData%\ControlUp\SyncScripts\dns_map.cfg to assign a specific DNS entry for folders or machines. Enter the folder path or machine naming pattern (using an asterisk as a wildcard). Add a comma as a separator, followed by the DNS entry.
From version 9.0, you can use the Real-Time DX Console to map folders or machines to DNS entries.
Consider this example:
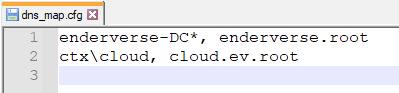
- Line 1 changes the DNS entry for all machines matching the pattern (for example, enderverse-DC01) to enderverse.root
- Line 2 changes the DNS entry for all machines in the folder (for example, org\ctx\cloud\CTX-PVS-01) to cloud.ev.root
Log File
You can set the log file path and retention period by providing the parameters mentioned in the previous section. By default, log files reside in the %ProgramData%\ControlUp\SyncScripts\Logs directory and are kept for 30 days. Every time the task scheduler runs the script, a new log file is written to this folder. The log file contains information that can help you identify synchronization problems.