ControlUp DaaS IQ offers a secure, automated pipeline for the high-risk, manual task of maintaining Azure Virtual Desktop (AVD) golden images. This is accomplished through a non-destructive workflow.
The non-destructive workflow preserves a persistent golden VM that never requires Sysprep (Microsoft's System Preparation Tool). Instead, DaaS IQ clones the golden VM to a temporary builder VM for the capture process. This ensures that every image on your Images List is an editable golden VM, providing you with complete control instead of relying on read-only links to external galleries.
To maintain high performance and security standards, DaaS IQ only supports Azure Generation 2 (Trusted launch) VMs.
Images List

The Images page provides a detailed Images List of all currently configured images within your DaaS IQ environment. The list displays an overview of your images that have already been added and cloned as editable golden VMs. You can see the following:
Image Name: A user-defined name for each golden image.
Status: Current state of the VM, such as Running, Starting, Stopping, or Stopped.
Power State: Current power state of the VM, such as Running, Starting, or Deallocated.
OS Family: Base operating system.
OS Version: Specific build version.
Latest Version: Most recent version number captured for the image.
Target Regions: Geographical Azure locations where the image is stored.
Last Modified: A sortable timestamp that tracks exactly when the image was last updated.
Actions: Menu to perform management tasks on each image, including:
Start
Stop
Connect (RDP)
Publish
Delete
To view the details of a specific image, click the row of the image in the grid.
You can also jump straight to an image's details page from the Overview page Images view by clicking its row.
Image Details
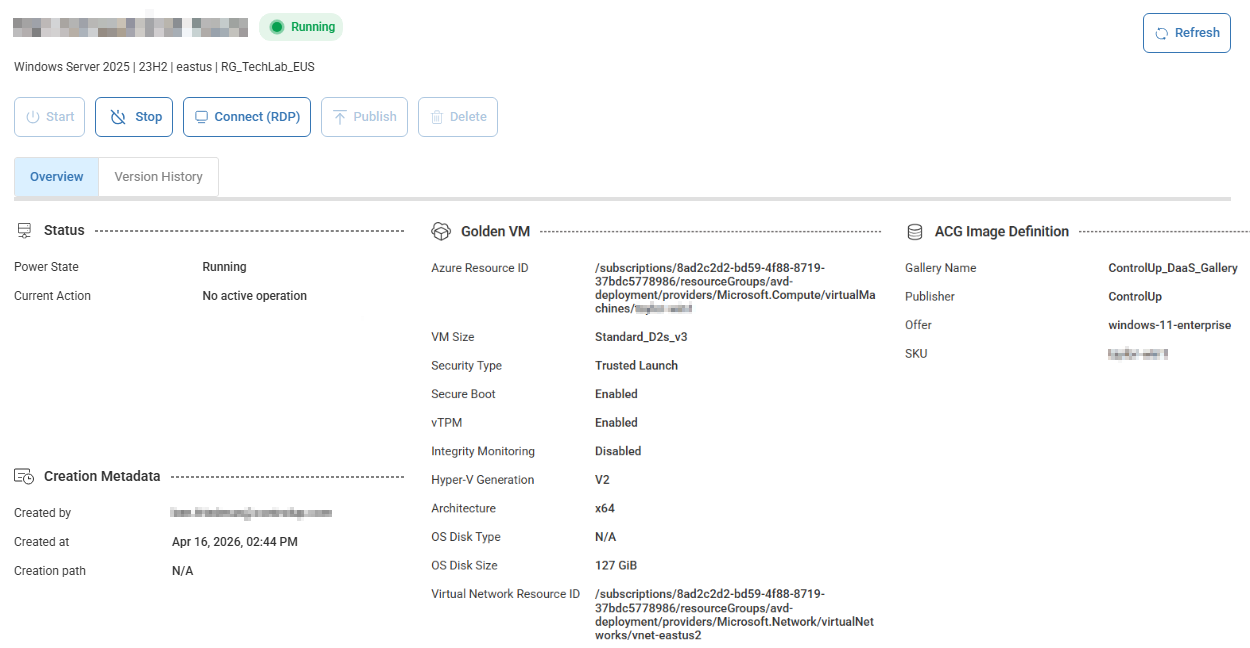
An image’s details page includes an Overview tab that displays metadata for:
Status: Power State, Current Action
Golden VM: Azure Resource ID, VM Size, Security Type, Secure Boot, vTPM, Integrity Monitoring, HYper-V Generation, Architecture, OS Disk Type, OS Disk Size, Virtual Network Resource ID
ACG Image Definition: Gallery Name, Publisher, Offer, SKU
Creation Metadata: Created by, Created at, Creation path
The Version History tab lists each version of the image that was published. You can see the following:
Version Number
Published At
Published By
Regions
Status
Last Updated
Actions: Menu to perform management tasks on each version, including:
Retry Publish. Retry publishing a failed version without restarting the configuration from scratch.
Cleanup Artifacts. Safely remove leftover temporary Azure resources created during the publishing process for both completed and failed image versions.
Delete. To delete an image, you must first stop it.
Add New Image
To add a golden image to DaaS IQ:
From the DaaS IQ Overview page, click the Images tab.
Above the left side of the Images List, click + New Image.

The Add New Image wizard opens.
Select a source type and click Next:
Promote Existing VM:
From the Subscription dropdown, select a subscription.
From the Virtual Machine dropdown, select a VM to promote, or click Browse VMs to select a VM. Note that the VM must be stopped or deallocated before you promote it. You can only promote Azure Gen 2 (Trusted launch) VMs.
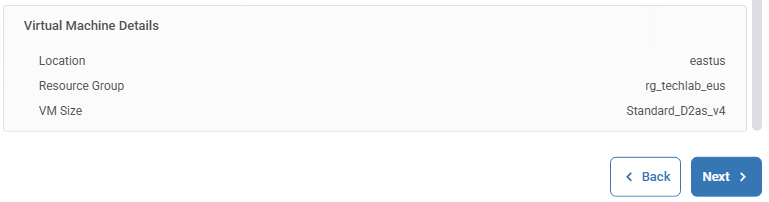
Review the Virtual Machine Details and click Next.
Deploy from Gallery:
From the Subscription dropdown, select a subscription.
From the Gallery dropdown, select a gallery.
From the Image Definition dropdown, select an image definition.
From the Version dropdown, select a version.
Click Next.
From the Subscription dropdown, select a subscription.
Optionally, from the Resource Group dropdown, select a resource group.
Enter a VM Name. Note that the name must start with a letter, include 1–15 characters, alphanumeric and hyphens only.
From the VM Size dropdown, select a VM size.
From the OS Disk Type dropdown, select a disk type.
From the OS Disk Size dropdown, select a disk size.
From the Virtual Network dropdown, select a network.
From the Subnet dropdown, select a subnet.
Enter a Local Admin Username.
Enter a Password twice to confirm and click Next.
Create from Marketplace:
From the Subscription dropdown, select a subscription.
From the OS Image dropdown, select an OS image.
Click Next.
From the Region dropdown, select a region.
Optionally, from the Resource Group dropdown, select a resource group.
From the VM Size dropdown, select a VM size.
From the OS Disk Type dropdown, select a disk type.
From the OS Disk Size dropdown, select a disk size.
From the Virtual Network dropdown, select a network.
From the Subnet dropdown, select a subnet.
Enter a Local Admin Username.
Enter a Password twice to confirm and click Next.
From the Subscription dropdown, select a subscription.
From the Virtual Machine dropdown, select a VM to promote, or click Browse VMs to select a VM. Note that the VM must be stopped or deallocated before you promote it. You can only promote Azure Gen 2 (Trusted launch) VMs.
Review the Virtual Machine Details and click Next.
In the Display Name field, enter a descriptive name that will appear on the Image List.
From the OS Family dropdown, select an OS family.
In the OS Version field, enter an OS version.
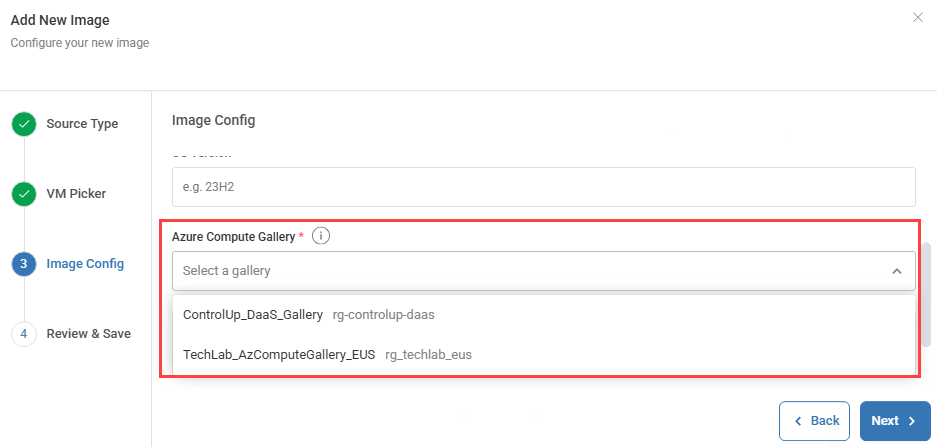
From the Azure Compute Gallery dropdown, select a target gallery for the new image definition.
Review the ACG Image Definition Preview and click Next.
Review all the image configuration details.
To capture the source VM, and to save and submit a new ACG Image Definition, click Create Image. Note that no new image is published until you click Publish on the image’s Actions menu.
The new image is added to the Image List and you can now perform management tasks on it.