This article explains how to create custom notification templates to assign to triggers using the ControlUp Real-Time DX Console. From version 9.0.5, you can configure trigger notification templates with PowerShell cmdlets.
For a list of all the variables that you can use in the templates, see here.
Template Settings
The console uses notification templates to either create follow-up e-mail notifications or to insert a log entry in the Windows Event Log when triggers are activated. You can use templates to configure the following types of follow-up actions:
- Send an e-mail alert
- Record an event in the Application Log
- Send an e-mail alert using a local SMTP server
- Run an action
- Send a RESTful API request
Templates can include both text and variables. The variables are replaced by specific information about the trigger in the actual notification text. The message body might also include built-in text, before and/or after the template text, that you can't modify or remove (e.g., “This is an automated alert...”).
You can create custom templates to add additional information to a notification, or for example, to create a notification whose text is in French.
You can't edit or delete predefined templates, but you can duplicate them, and then edit or delete the duplicates. This is actually how you create custom templates: first you create a duplicate of an existing template, and then modify it.
Using Variables in a Template
Variables that you can use in notification templates have the form $(…), where the name of the variable is in parentheses. For example $(ObjectName) is a variable whose name is ObjectName, and it is used to insert the name of the object whose behavior generated the trigger into a notification. Variables can be included anywhere in the subject line or the body of a template. For example, the template body could include this line:
The $(ObjectName) object has been disconnected from monitoring.
In the actual notification, it would then say something like:
The my-pc.domain.com object has been disconnected from monitoring.
Not all variables are relevant to all triggers. For example, if the trigger is related to machine stress, no process is directly connected to it, so the $(ProcessName) variable is not defined. For a complete list and descriptions of supported variables, see here.
Multi-Counter Variable
In addition to the variables described above, another type of variable exists, ListOfColumns. This variable is invoked multiple times in multi-counter incidents, once for each counter involved. ListOfColumns is only used with Stress Level or Advanced triggers, because these are the only triggers that can include multiple conditions.
ListOfColumns has a special syntax, in which you can include the text and variables you would like to see for each counter involved in the incident. All of the text must be placed within the variable’s parentheses, after a colon and between quotation marks (e.g., $(ListOfColumns: "my text…”)). In addition, the following variables exist only for use with the ListOfColumns variable:
$(Column) | $(ColumnSeverityLevel) | $(ColumnTimestamp) |
$(ColumnUTCTimestamp) | $(ColumnCrossedThreshold) | $(ColumnValueBefore) |
$(ColumnValueAfter) |
|
|
The variables in this category are also marked as such in the variable list.
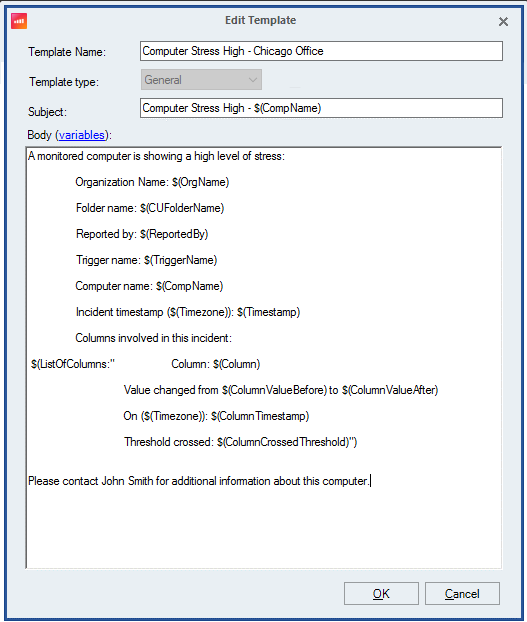
The following is a sample of template text that uses the ListOfColumns variable:
$(ListOfColumns:"                 Column: $(Column)
               Value changed from $(ColumnValueBefore) to $(ColumnValueAfter)
                On ($(Timezone)): $(ColumnTimestamp)
                Threshold crossed: $(ColumnCrossedThreshold)
")
If two columns (CPU, Name) were involved in this incident, the code output in the notification would show as:
Column: CPU
Value changed from 13% to 25%
On (UTC +3 Jerusalem Standard Time): 13/05/2019 16:19:27
Threshold crossed: 20%

Column: Name
Value changed from CPUSTRES.EXE to CPUSTRES.EXE
On (UTC +3 Jerusalem Standard Time): 13/05/2019 16:19:27
Threshold crossed: CPU*
Template Components
Each template contains the following components:
- Template Name: Name that identifies the template in the list of available templates.
- Subject (General type templates only): Title that will appear in the notification. In an e-mail - the subject line, in a log entry - the first line.
- HTTP Headers (RESTful API type templates only): List of strings that will be sent on the HTTP(S) header request.
- Body: Text of the notification.
The Subject, HTTP Headers, and Body fields of the template can include variables.
To create a new template, you first duplicate an existing template, and then modify it. You can select any existing template to duplicate. If you create a new template by selecting Add, the ControlUp Advanced Trigger template is duplicated.
Create a New Template
To create a new notification template:
-
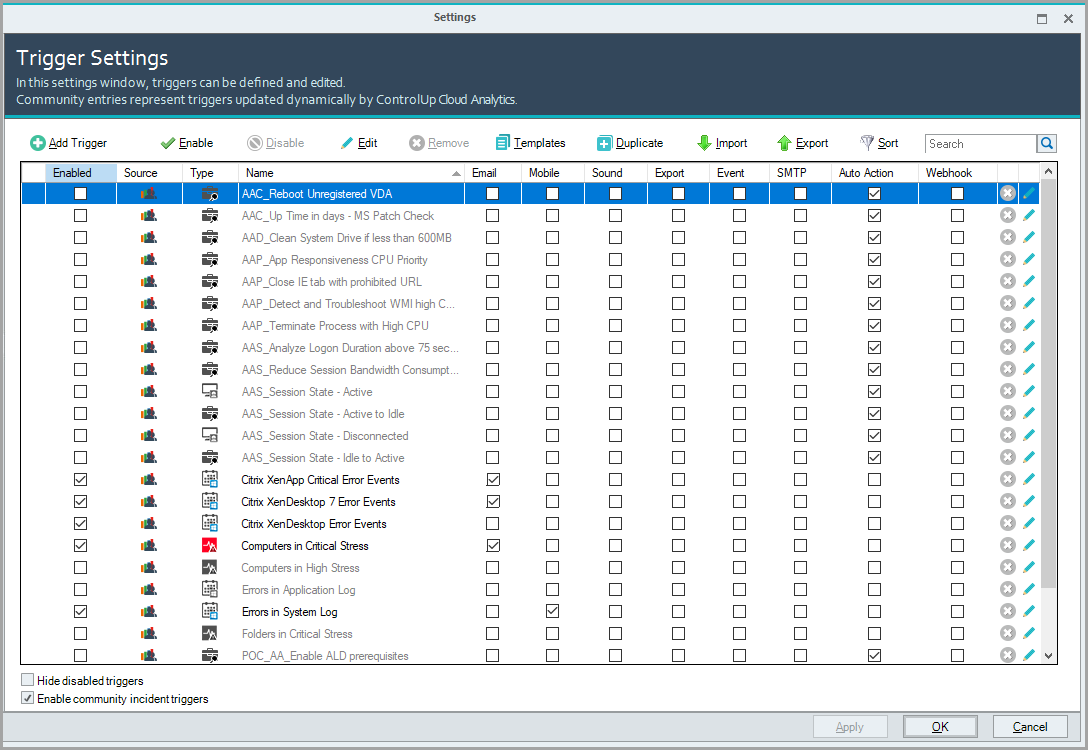
From the Real-Time DX Console, in either the Home or the Settings ribbon bar, click Triggers. The Trigger Settings window opens.
-
Click Templates. The Template Settings dialog box opens and lists the currently defined notification templates. Predefined ControlUp templates are identified by a
 icon, while user-defined templates are identified by a
  icon. You can only edit user-defined templates, not ControlUp templates.
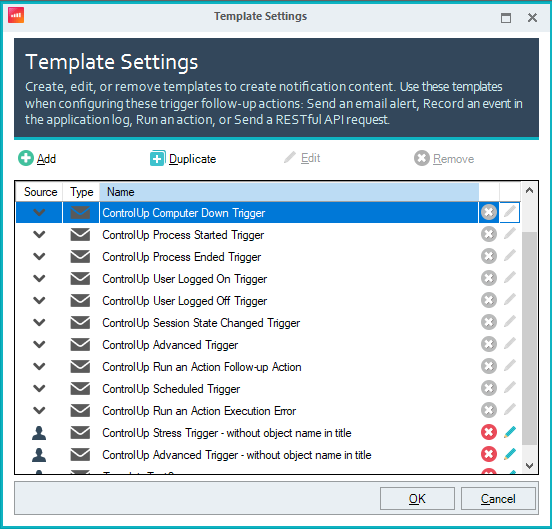
- Select an existing template to use as the basis for the custom template in one of the following options:
- Click Add. The Edit Template window opens a copy of the ControlUp Advanced Trigger template.
- Select an existing template and click Duplicate. The Edit Template window opens a copy of the selected template.
- Under Template Name, enter a name for the custom template.
- Under Template type, select either General or RESTful API.
- Modify the Subject (General type) or HTTP Headers (RESTful API type) and Body fields as required:
For a list of all variables that you can use in the fields, see here.
- After you finish creating the template, click OK. The Edit Template dialog box closes, and the template is added to the list of available templates in the Template Settings dialog box.
To assign the template to a trigger, see below.
Assigning a Template to a Trigger
After you create a template, you can assign it to any trigger. This is done in the trigger’s settings.
For the Run an action follow-up action, if you choose to send an e-mail notification, you must ensure that the trigger also has the Send an e-mail alert or the Send an e-mail alert using a local SMTP server follow-up actions configured. This is because the recipients of the Run an action e-mail notification aren't specified in the Run an action settings. Rather, they are copied from the settings of the Send an e-mail and the Send an e-mail alert using a local SMTP server follow-up-actions.
When the trigger is activated, the Send an e-mail and the Send an e-mail alert using a local SMTP server follow-up actions are implemented immediately; the Run an action notifications are sent to the same recipients, but after the Run an action follow-up action is completed (successfully or not).
If no Send an e-mail and no Send an e-mail alert using a local SMTP server follow-up-actions are defined along with a Run an action follow-up action, no notification e-mails are sent for the trigger.
To assign a template to a trigger:
- In the **Trigger Settings** window, choose one of the following options:
- Click Add Trigger to create a new trigger.
- Select an existing trigger, and then click Edit to edit an existing trigger.
- Define or modify the trigger settings as required until you get to the Follow-up Action screen.
- In the Follow-up Action screen, under Type, select the type of follow-up action. Template assignment is supported in any of the following types:
- Send an e-mail alert
- Dump view/s to disk
- Record an event in the Application Log
- Play a sound alert in the console
- Send an e-mail alert using a local SMTP server
- Run an action
- Send a RESTful API request
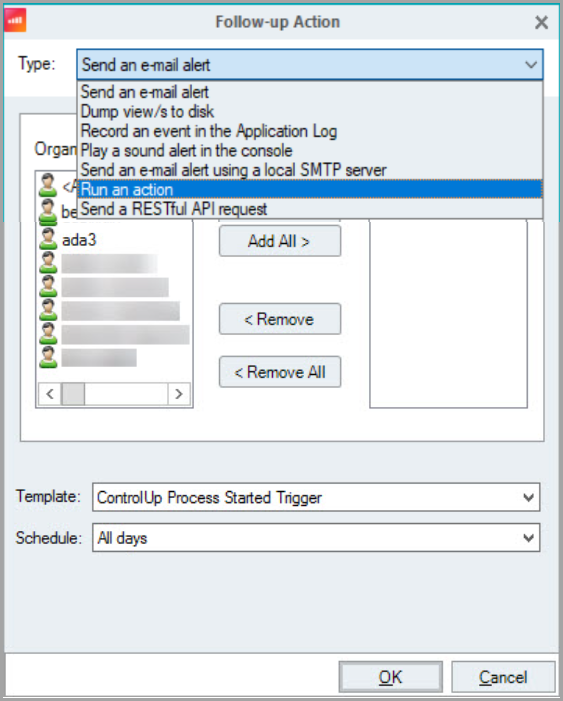
- Under Template, select the template to use for the notification.
Note:
Depending on the follow-up action you chose, the fields in this screen will vary, but a Template field is included for all follow-up actions that handle notifications.
- Optionally, if you are configuring a Run an action follow-up action, in addition to configuring the settings for Run an action, as shown above, you must also configure a Send an e-mail alert and or a Send an e-mail alert using a local SMTP server follow-up action.
- Configure the rest of the settings for the trigger as necessary, and then click Finish. The trigger is configured and the notification will be generated whenever the trigger’s conditions are met.
-
A variable appears in a notification instead of the value of the variable.
The variable doesn't exist. This is most likely caused by a typo in the template, in the name of the variable. Check the variable list above to ensure the variable name is correct. -
A blank space appears in a notification instead of the value of the variable.
The variable name is defined, but it has no value when this type of trigger is activated. This occurs when you include a variable in a template that is not defined in the context of the incident. Check the variable list above to ensure all variables included in the template are defined in the context of the incident (see green cells with ‘v’ in the variable list).
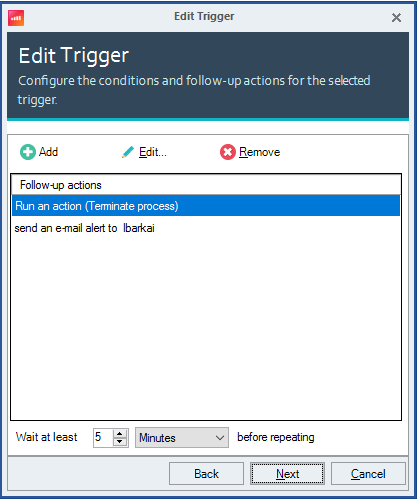
To do this, repeat steps 3-4 above: This time, select Send an e-mail alert or Send an e-mail alert using a local SMTP server. Configure all of the settings. Under Template, you can select any template that is appropriate for the e-mail notification; it does not have to be the same template that you selected in the Run an action settings (Two e-mails will be sent to each recipient whenever the trigger is activated – the one that is selected here, and the one that is selected in the Run an action settings). When you are finished, both follow-up actions should appear in the list: