Silent Install enables you to deploy, configure and update custom hives across multiple hosts (desktops or servers) using automation tools or proprietary scripts. These tools or scripts distribute a Custom Hive Installer (an executable file) to the hosts without requiring user interaction, saving you time and effort.
To see an overview of custom hives, go to Custom Hive Overview.
Note: Silent install can only be executed with admin privileges.
How to Deploy Custom Hives
Step 1 - Create a temporary deployment token
-
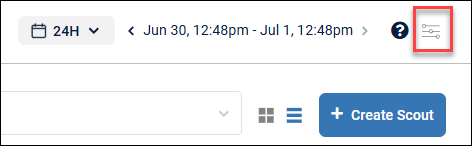
In the Synthetic Monitoring tab, click the configuration icon on the right top corner.
-
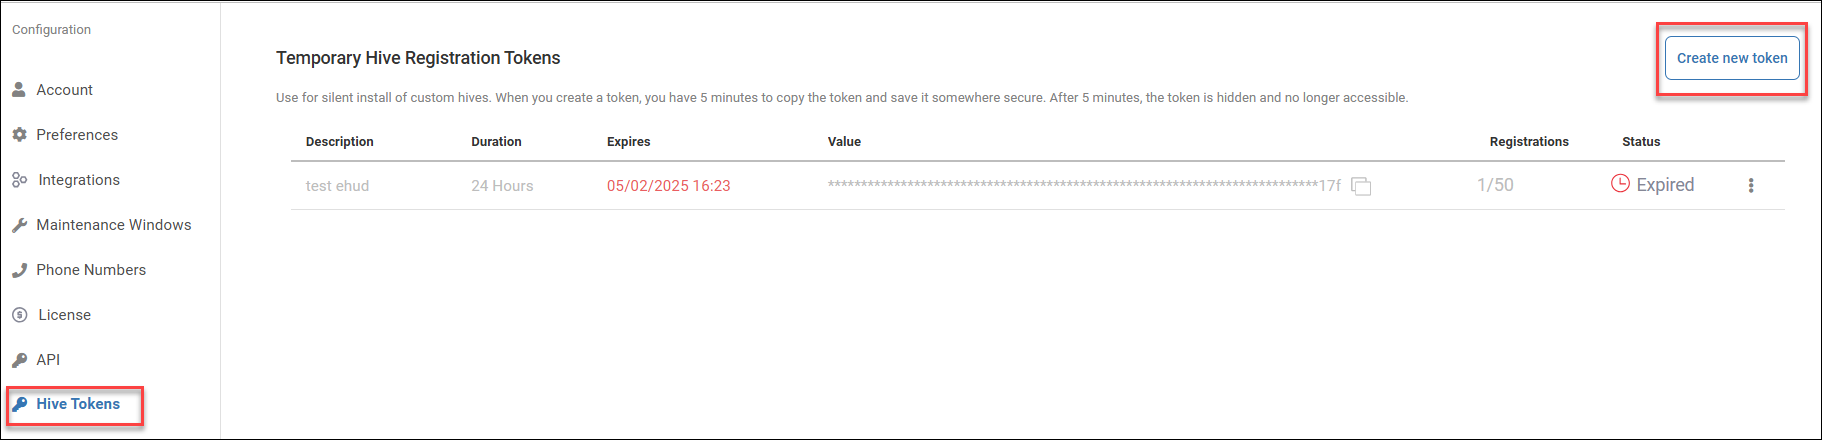
In the configuration menu that opens, select Hive Tokens, and then click Create new token.
This token grants temporary authorization for both Hive creation and retrieval of the Hive key.
-
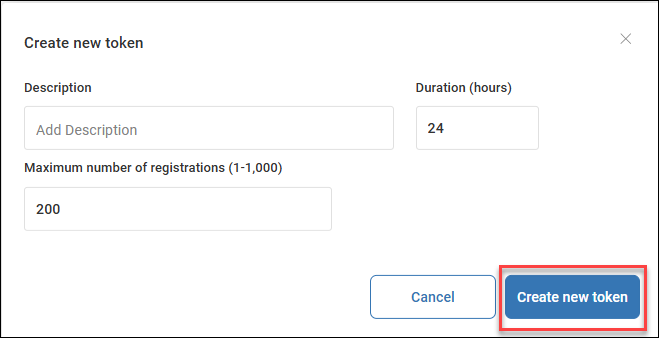
A pop-up window opens for creating the new token. Fill in token parameters:
- Description (optional)
- Maximum number of registrations, i.e., the number of hives it can install (up to 1000)
- Duration - how long the token is active
-
Click Create new token.
-
A Temporary Hive Registration Tokens screen opens. Locate your newly generated token and quickly copy and save it for later use.
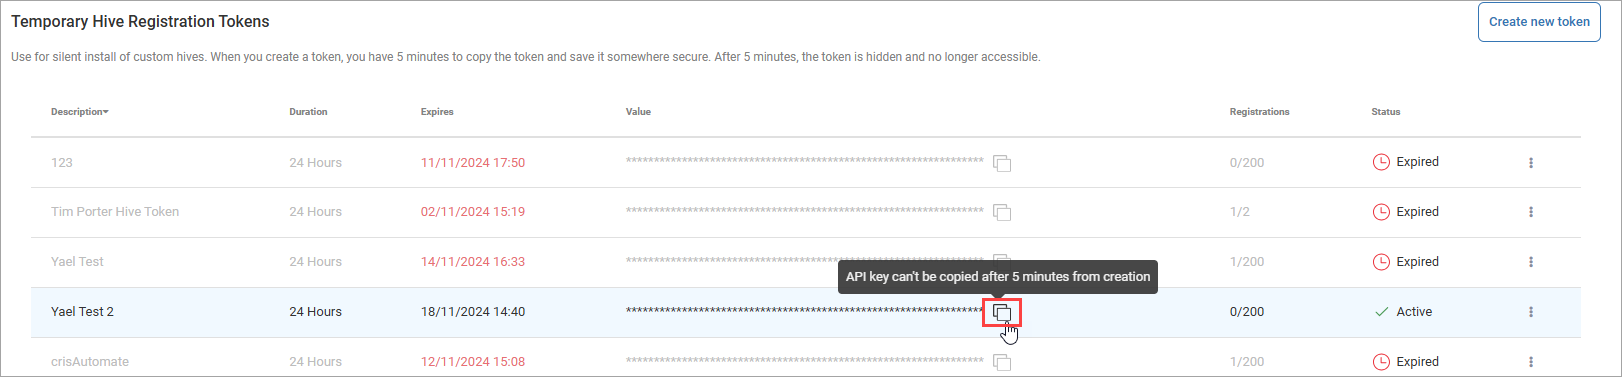
Note: the token is only available for copying for up to 1 week after its generation.
Here is an example of a token:
us_c8c64d4b0c38f40671ac56c7517dd5a0dbca6933c4a5ee33d26c86adcd579349
Note: The token is temporary, valid for up to 24 hours. It can be used for deploying multiple custom hives, and serves to authenticate the custom hive owner against the Synthetic Monitoring backend in the deployment process. It is also used for creating a permanent hive key.
Step 2 - Install and Register Hive
Integrate the Custom Hive Installer and the downloaded token into the automation tool configuration (for example, Puppet manifest).
For instructions on installing and configuring custom hives, go to Install and Configure Custom Hives.
-
To download the latest Custom Hive Installer, go to the Hives tab and click Download Custom Hive.

-
Place the executable file in its target installation directory.
-
To install the hive, run the installer using a script. See Running Command Line and PowerShell scripts below.
-
Once you have completed hive registration, refresh the Hives page. The new custom hive is displayed with a “connected” status.

Running Command Line and PowerShell scripts
To run the hive installer, you can use a Command Line or a PowerShell script. Configure the hive by selecting the arguments that you want to include.
Some arguments in the script are mandatory, and some are optional.
the hive name cannot be changed once the hive is installed.
Supported arguments
General arguments
| Argument | Description | Mandatory or Optional | Syntax |
|---|---|---|---|
| /SILENT | Performs a silent installation (minimal user interaction) | Optional | /SILENT |
| /VERYSILENT | Performs a very silent installation (no user interaction) | Optional | /VERYSILENT |
| /SUPPRESSMSGBOXES | Instructs Setup to suppress message boxes. Only has an effect when combined with ‘/SILENT’ or ‘/VERYSILENT’ | Mandatory | /SUPPRESSMSGBOXES |
| /LOG | The log file. Argument specifies the directory (log path) + name of the log file itself + log file extension | Optional | /log=”path_to/log_file_name>.log” |
| /DIR | Destination folder for the custom hive. Default: C:\Program Files\Scoutbees Custom Hive | Optional | /DIR="<path_to\cust_hive_desired_destination_folder>" |
| /token | The temporary Registration token generated in the first step. The user copies the generated token as is, without editing it. | Mandatory | /token="<env_region>_<registration_token>" |
| /name | Custom hive name. By default, it is the host machine’s name | Required on update, not on registration | /name="Custom hive name" |
| /use-default-values | If specified - resets all configuration except for the specified values | Optional | /use-default-values=true |
Note: To upgrade a custom hive and go back to the default configuration, use the parameter use-default-values. Here is a script for example:

For more information, see Upgrade Custom Hives.
Enrichment Credentials arguments
| Argument | Description | Mandatory or Optional | Syntax |
|---|---|---|---|
| /enrichment-username= |
Username for session enrichment | Optional | /enrichment-username=admin |
| /enrichment-password= |
Password for session enrichment | Optional | /enrichment-password=secret |
Proxy arguments
| Argument | Description | Mandatory or Optional | Syntax |
|---|---|---|---|
| /use-proxy | Enables proxy usage | Optional | /use-proxy |
| /proxy-protocol=<http/https> | Specifies the proxy server protocol | Optional | /proxy-address=proxy.local |
| /proxy-address= | Specifies the proxy server address | Optional | /proxy-address=proxy.local |
| /proxy-port= |
Specifies the proxy server port | Optional | /proxy-port=8080 |
| /proxy-username= |
Specifies the username for proxy authentication | Optional | /proxy-username=proxyuser |
| /proxy-password= |
Specifies the password for proxy authentication | Optional | /proxy-password=proxypass |
Advanced arguments
| Argument | Description | Mandatory or Optional | Syntax |
|---|---|---|---|
| /event-log | Enables event logging | Optional | /event-log=true |
| /debug-mode | Enables debug logging | Optional | /debug-mode=true |
| /ssl-verify | Enables SSL certificate verification | Optional | /ssl-verify=true |
| /interactive-logon | Enables automatic "OK" click for logon prompts (Citrix only) | Optional | /interactive-logon=true |
| /use-citrix-workspace | Enables Citrix Workspace App usage (Citrix only) | Optional | /use-citrix-workspace=true |
| /allow-shell-execution | Enables shell execution scouts | Optional | /allow-shell-execution=true |
Exit codes
When the Command Line or PowerShell scripts have finished running, type echo %ERRORLEVEL% to see the exit codes.
exit code 0 = success
exit code 1 = failure
Example for a Command line script
start /wait hive110_1222x64.exe /VERYSILENT /SUPPRESSMSGBOXES /LOG="C:\projects\scoutbees-hive\dist\setup_log.log" /DIR="C:\Program Files\Scoutbees Custom Hive" /token="us_5a660843412899e0412bbd5e40c096df68ecfdc1ae5aac1fb3919edc45df6933" /name="ScoutbeesCustomHive"

echo %ERRORLEVEL%
Example for a PowerShell script
    # Create an array of arguments (one item per argument)
$arguments = @(
    '/VERYSILENT',
    '/SUPPRESSMSGBOXES',
    '/token="eu_9512925ad295d4936652fa1b470f0bc18efaf46ecdd856df64b26acdc2c30a00"',
    '/LOG="C:\temp\Install.log"',
    '/name="DemoHive"',
    '/debug_mode="True"',
    '/ssl_verify="True"',
    '/event_log="True"',
    '/interactive_logon="True"',
    '/use_citrix_workspace=True',
    '/allow_shell_execution=True'
)

# Join the arguments into a single string, separated by spaces
$argumentList = $arguments -join " "

# Start the process with the specified arguments
$process = Start-Process `
    -FilePath "C:\temp\hive110_1230x64.exe" `
    -ArgumentList $argumentList `
    -NoNewWindow `
    -Wait `
    -PassThru
# Output result
Write-Host "Installer exited with Code: $process.ExitCode()"
To upgrade a hive, see Upgrade Custom Hives.