Note
This feature has limited availability and applies only to MSPs or multi-organization accounts.
If you are interested in accessing this feature, contact us at support@controlup.com.
Tenant Manager Dashboard
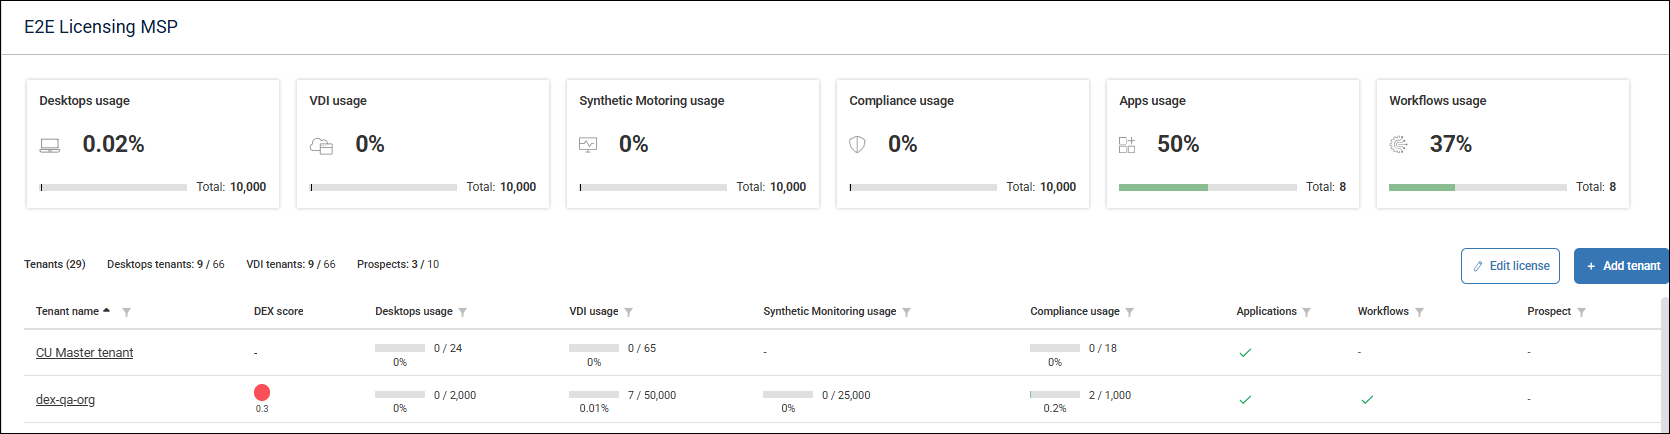
The dashboard provides a centralized view of all tenants associated with your account, including linked organizations and their usage metrics.
The dashboard displays:
Summary widgets showing product usage across tenants
A tenant list with usage metrics per product
DEX score per tenant
Quick access to tenant management actions
Users associated with the Tenant Manager can view all related organizations either from the tenants list or through the organization picker.
Other users can’t see the Tenant Manager or its organizations in the picker.
Filter Tenants
You can filter tenants by:
Name
Product usage (Desktops, VDI, Synthetic Monitoring, Compliance, Applications, Workflows)
Multiple filters can be combined to refine the list.
Add a Tenant
To add a new tenant:
Click Add tenant on the Tenant Manager homepage.
The Add new tenant wizard opens and guides you through the process, using a numbered step flow.
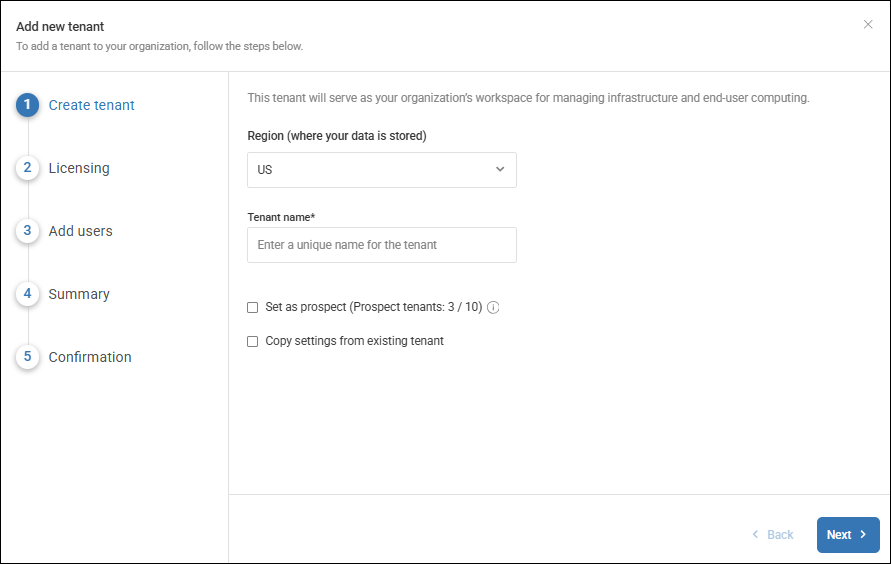
Step 1: Create Tenant
Enter the tenant name and select its region. The tenant name must be unique.
Optionally, you can choose to:
Mark a tenant as prospect. See Prospects below.
Copy settings from an existing tenant. This lets you preconfigure the tenant with ControlUp for Desktops Alerts, Scripts, and Custom Dashboard configuration. You must select which tenant to use as the source tenant.
Step 2: Licensing
Configure license quotas for the tenant and set up the licensing plan.
Select products
Define license quantities
Review used and remaining licenses
To adjust license allocations, click Edit License.
Step 3: Add Users
Add users and assign roles.
You are set as an Admin by default.
Additional Admins or Tenant Manager users can be added as sub-tenants and assigned roles.
Step 4: Summary
Review tenant details, including:
Tenant name and region
Status (Prospect or Licensed)
Licensing configuration
Sub-tenants
You can edit any step before confirmation.
Step 5: Confirm
When the tenant is successfully created, a confirmation message appears. You can:
Return to the Tenant Manager dashboard, or
Open the newly created tenant.
Note: To correct any detail during the creation process, click the pencil icon next to the relevant step.
Prospects
When creating a new tenant, you can mark it as a Prospect. The organization is created immediately, with a 21-day trial license.
This option allows you to quickly create trial tenants for product evaluation, and later convert them into licensed tenants.
Prospect tenants:
Do not consume licenses from the shared pool
Skip the licensing step during creation
By default, a new Prospect organization includes by default:
100 Desktops licenses
100 VDI licenses
100 Compliance licenses
Applications enabled
Workflows enabled
Managing Prospects
Prospect status can be updated from the Edit License page.
Clearing the Prospect checkbox allows admins to allocate licenses from the shared pool.
Once converted, an organization can’t revert to Prospect status.
Each account can have up to 10 active prospects at the same time.
Edit a Tenant
You can update tenant details and licensing after creation. For license changes, see Edit tenant licenses.
.