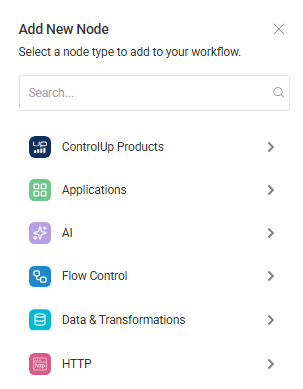
Function Nodes let you add logical operations, data manipulation, and intelligent features to enhance your flows. You can also add AI commands as nodes in your flow. Function Nodes include the following categories:
ControlUp Products
You can configure nodes for the following ControlUp products:
ControlUp for Desktops: Configure actions for device and user management, and to perform system operations.
ControlUp for VDI: Perform Get, List, Run, and Start actions for VDI environments.
ControlUp Synthetic Monitoring: Perform actions on ControlUp Scouts.
Applications
Azure Key Vault
The Azure Key Vault section in the Add New Node sidebar provides tools to manage Azure secret key vault data within your flows. You can also use Mask variables that you configure in the Start nodes or Set variables nodes.
You can add the following data operations to your flow:
Get Secret: Retrieves a secret from Azure Key Vault. Gets the value and metadata of a secret, optionally for a specific version.
Get Secrets: Lists all secrets in Azure Key Vault. Returns metadata for all secrets in the vault with optional pagination.
Get Secret Versions: Lists all versions of a specific secret in Azure Key Vault. Shows the history of changes to a secret over time.
Update Secret: Updates the metadata of a secret in Azure Key Vault without changing its value. Allows modification of properties like content type, tags, enabled status, and expiration dates.
Delete Secret: Deletes a secret from Azure Key Vault (soft delete). The secret is marked for deletion but can be recovered before the purge period expires.
Backup Secret: Creates a backup of a secret from Azure Key Vault. Generates a backup blob that can be used to restore the secret later.
Restore Secret: Restores a secret to Azure Key Vault from a backup blob. Recreates the secret with all its versions and metadata.
Set Secret: Creates or updates a secret in Azure Key Vault. Sets the value along with optional metadata like content type, tags, and expiration dates.
Get Deleted Secret: Retrieves information about a specific deleted secret in Azure Key Vault. Shows details about when it was deleted and when it will be purged.
Get Deleted Secrets: Lists all deleted secrets in Azure Key Vault. Shows secrets that have been soft-deleted but not yet purged.
Recover Deleted Secret: Recovers a deleted secret in Azure Key Vault. Restores a soft-deleted secret back to active state.
Purge Deleted Secret: Permanently deletes a soft-deleted secret from Azure Key Vault. This action is irreversible and can’t be undone.
Add AI to Your Flow
The AI Tool Integrations options offer intelligent capabilities that can be integrated into your flows to analyze data, generate content, and gain insights. We use OpenAI as our AI provider, and the models are hosted externally.
Data handling details:
Only the text that users enter into the AI action nodes are sent to the AI service.
We never transmit sensitive internal data such as credentials, tokens, integration details, or system metadata.
Our strict safeguards prevent any possibility of exposing internal data and align with enterprise-grade security standards.
Here's how you might use each of the listed AI nodes:
Analyze Logs: Let’s say you have a flow that monitors server performance. If it detects an anomaly, you could trigger this node, feeding it recent server logs. The AI could then identify the root cause of the issue by recognizing patterns or errors that might be difficult for a human to spot quickly. The output of this node could then be used to automatically initiate a remediation workflow or generate a detailed support ticket.
Create Email: A workflow could process a form submission for a new service request. You could use this node, providing it with key details from the form like the requester's information and the nature of the request. The AI could then generate a well-formatted confirmation email to the user or a notification email to the relevant IT team.
Create Report: Consider a workflow that gathers data from various monitoring tools. You could use this node to automatically generate a summary report based on this data. You might specify the key metrics you want to include, and the AI could format the report in a readable and insightful way, potentially highlighting trends or areas needing attention.
Device Lifespan Analysis: In a device management workflow, you could periodically feed device inventory and performance data into this node. The AI could then predict which devices are nearing their end-of-life based on historical data and usage patterns. This information could proactively trigger a device replacement process.
Extract Structured Data: Suppose you have a workflow that receives email notifications containing key information in a free-form text. You could use this node to automatically identify and pull out specific details, like ticket numbers, error codes, or user names, and format them into a structured format that can be easily used by subsequent nodes in the workflow.
Generate Text: You could have a workflow that creates knowledge base articles based on resolved support tickets. You could use this node, providing it with the details of the issue and the resolution. The AI could then generate a draft of a knowledge base article that can be reviewed and published.
Summarize Text: If you have a workflow that processes lengthy documents or email threads, you could use this node to automatically create a concise summary of the key information. This can be useful for quickly understanding the content without having to read the entire text.
Support Ticket Analysis: When a new support ticket is created, a workflow could use this node to automatically categorize the ticket based on its content, assign it to the appropriate team, and even suggest potential solutions based on similar past tickets. This can improve the efficiency of your support processes.
These AI-powered nodes offer possibilities for adding intelligence and automation to your IT workflows, enabling more proactive and efficient operations.
Add flow control
The Flow Control Integrations functions provide the structural elements that enable your flows to make decisions, repeat actions, and manage which node occurs next. You can apply the Flow Control nodes to create branching logic or repeat actions based on the data processed by the integration nodes.
Using these Flow Control nodes, you can design sophisticated and adaptable automation flows that can handle a wide range of IT tasks and scenarios.
Decision
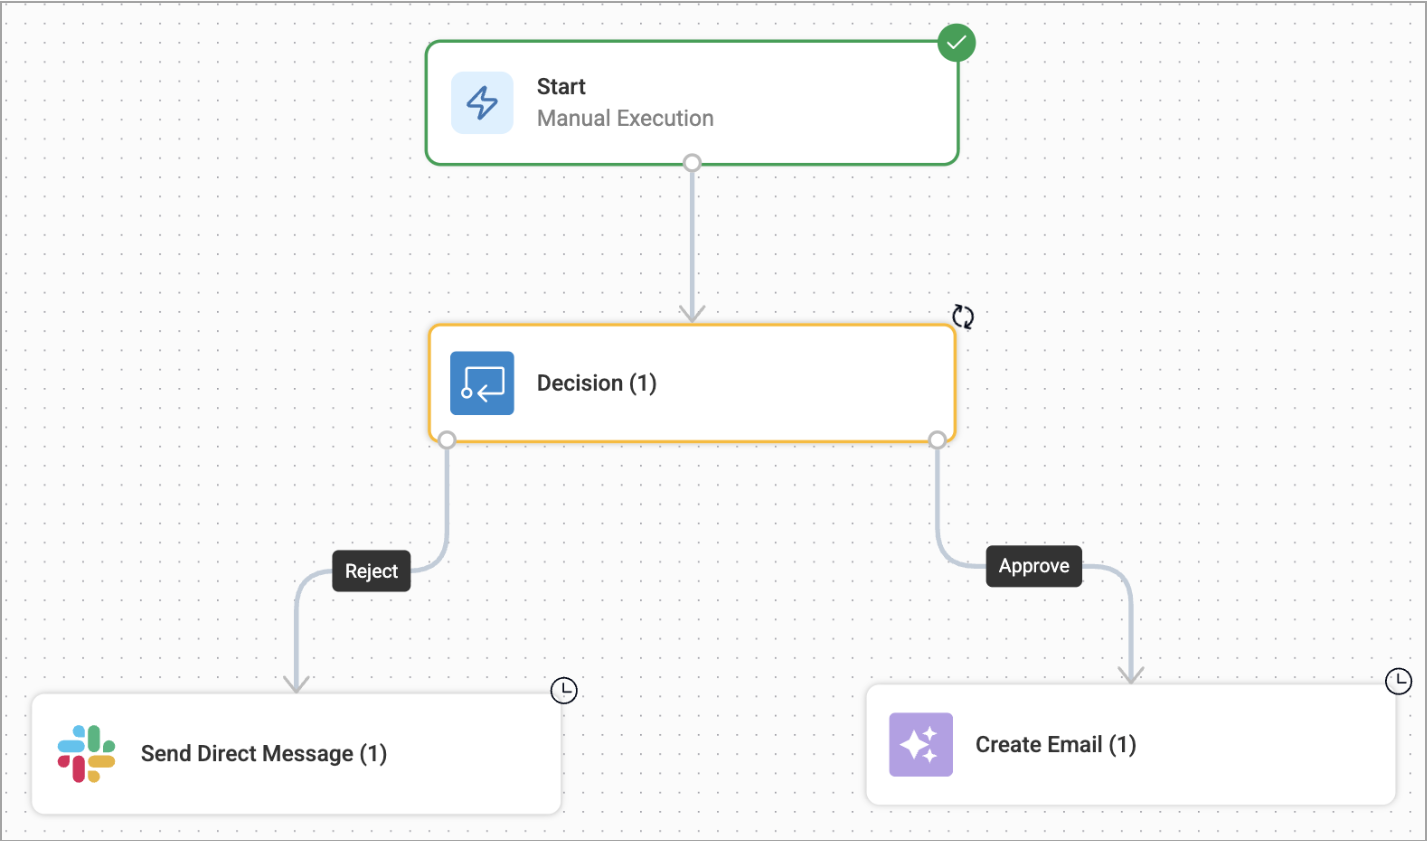
Your flow might require human input at key decision points, for example approvals, user confirmation, or exception handling. The Decision node pauses the flow and sends a message prompt to an external destination such as via Gmail, Microsoft Teams, or Slack. It waits for a user decision, and then branches the flow based on the user’s selected action.
This node allows you to maintain control of your flow while responding to asynchronous, interactive human decisions.
Add a Decision node to your flow
From the Add New Node sidebar, open the Flow Control dropdown and drag and drop the Decision node onto the canvas.
Click the node you just added to open the Decision popup.
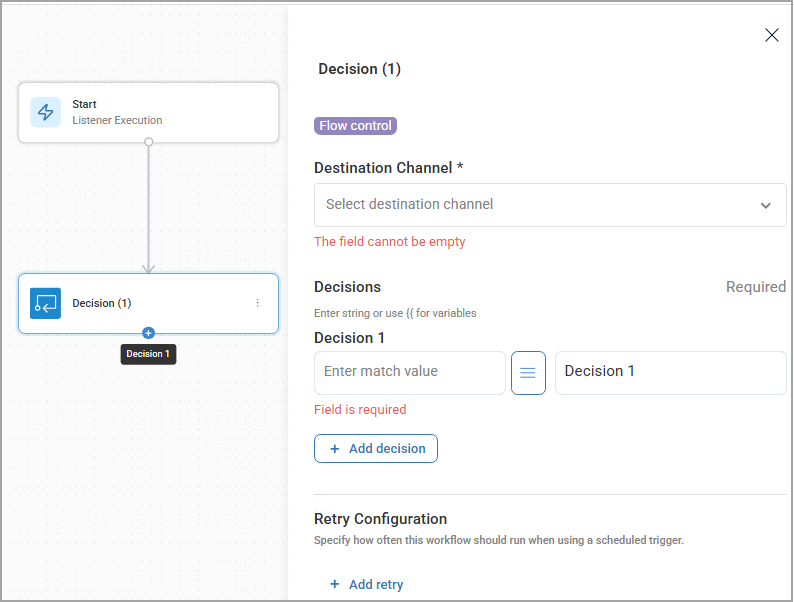
Under Destination Channel, select how the message prompt will be sent. The options dynamically update based on the output from the prompt details dynamically update based on the method you select:
Email: Select Email Type, Email Source, Email Integration, Email To. Enter text for Email Subject and Email Body.
Microsoft Teams: Select Action Type, Microsoft Teams Integration, Team ID/User ID or Email, Channel ID. Enter text for Message Text.
Slack: Select Action Type, Slack Integration, Email or User ID/Channel/Webhook Address. Enter text for Message.
Under Decisions, in the Decision 1 field, enter an input value to decide which action node occurs next.
Optionally, click + Add decision, in the Decision 2 field, enter a different input value to decide which alternate action node occurs next. You can add up to 5 different Decisions.
Optionally, to specify how often the flow should run when using a scheduled trigger:
Under Retry Configuration, click + Add retry.
In the Retry interval field, enter the number of seconds to wait to retry to run the node.
In the Number of Retries field, enter the maximum number of attempts to retry to run the node.
If-Else
This node directs the flow along different paths depending on whether a condition is met. It evaluates a defined condition, and then executes a designated sequence of actions if the condition is true, and an alternative sequence if the condition is false.
Add If-Else to your flow
An If-Else node must be connected from a preceding integration action node so the If-Else action can evaluate the output of the previous action.
From the Add New Node sidebar, open the Flow Control dropdown and drag and drop the If-Else node onto the canvas.
Connect the If-Else node to an action’s output connector. A configuration sidebar opens on the right side of the flow builder canvas.
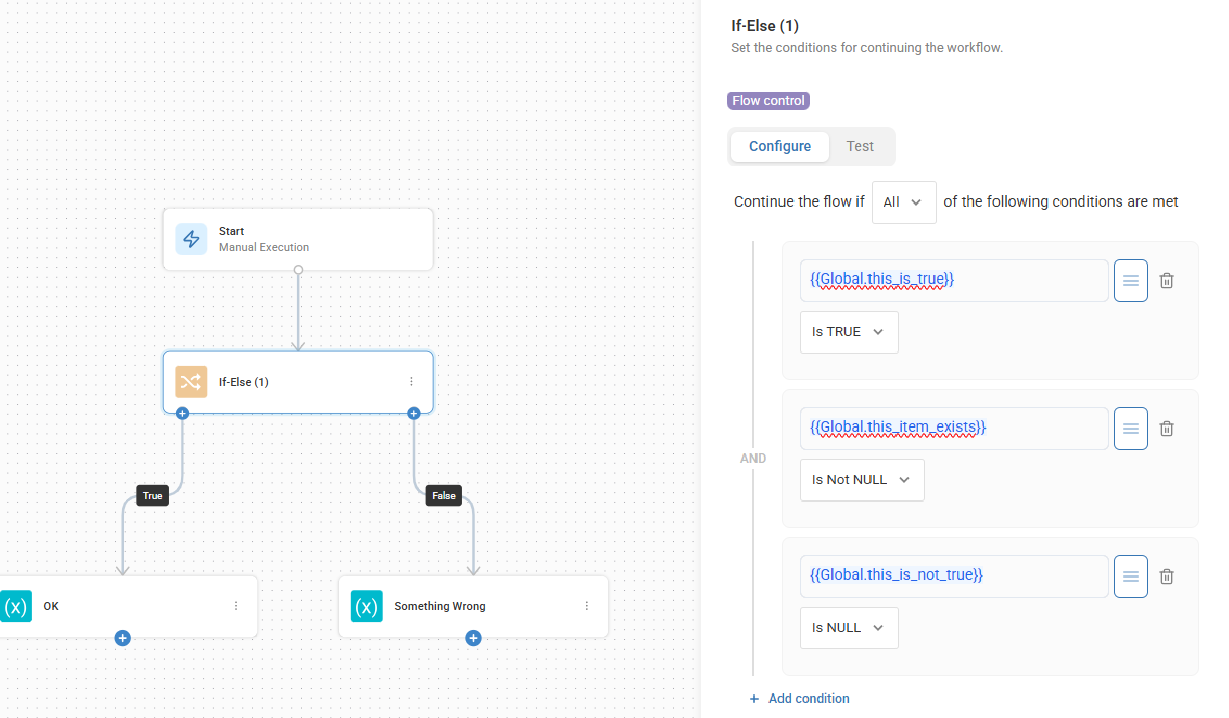
In the configuration sidebar, select whether to continue the flow if either All (AND) or Any (OR) of the following conditions are met.
Define the following Conditions:
If: Select the data point to evaluate in the first dropdown field. These options dynamically update based on the output from the connected node.
Is: Select an operator from the list of logical operators, for example Equal, Not Equal, Greater Than, Less Than, Contains, and more.
To: Enter the value against which to compare the output. This can be a static value, a variable from your workflow, or the output from a different node. To call a variable, enter two curly brackets {{.
Optionally click Add to add more conditions for the If-Else to evaluate against.
For each additional condition:
If you selected All (AND), all conditions linked by AND must evaluate to true for the If branch to be followed in the flow as true. If even one AND condition is false, the flow proceeds down the Else branch to false.
Example: (CPU_Usage > 90%) AND (Memory_Usage > 80%) both CPU and Memory must be high.
If you selected Any (OR), if any of the conditions linked by OR evaluate to true, the If branch is used. The flow proceeds to the Else branch if all OR conditions are false.
Example: (Service_Status == "stopped") OR (Service_Error_Code != "0") either the service is stopped OR it's reporting an error.
Set the If, Is and To conditions as described above.
Once the condition is defined, save the configuration and close the sidebar.
The If-Else node has two output connectors on the canvas labeled True and False. Connect nodes to either or both of these output connectors.
Use case examples for If-Else
Incident Remediation: If a monitoring alert indicates "Service Down," then restart the service and create a high-priority incident. Else (if the alert is for "High CPU"), then log the event and notify the operations team without creating a critical incident.
User Onboarding/Offboarding: If a new user is part of the "Developers" group AND a "Manager", then provision high-level access to specific development tools. Else, provision standard user applications. For offboarding, if an onboarding script fails, then send an alert to the administrator for manual intervention; else, mark the onboarding task as complete and continue with subsequent steps.
Automated Alert Response: If Alert.Severity is "Critical" AND Alert.Type equals "Service Down" OR Alert.Impact equals "All Users", then create a PagerDuty incident and send an urgent Teams notification. Else, send a standard email alert.
Loop
When an action node retrieves data that includes more than one item, the Loop node enables you to repeatedly execute a sequence of actions on each item returned by the node. Without a loop function, the flow would execute only on the first item it encounters from an action.
Add a Loop function to your flow
A Loop node must be connected from a preceding integration action node so the Loop node can repeatedly evaluate the output of the previous action.
From the Add New Node sidebar, open the Flow Control dropdown and drag and drop the Loop node onto the canvas.
Connect the Loop node to an action’s output connector. The Loop Over options at the top of the Loop node dynamically update based on the action node connected to the top of the Loop node. In this example, the Microsoft Entra ID action node to List Users connects into the Loop node and the Loop Over options are updated to include items that can result from listing Microsoft Entra ID users.
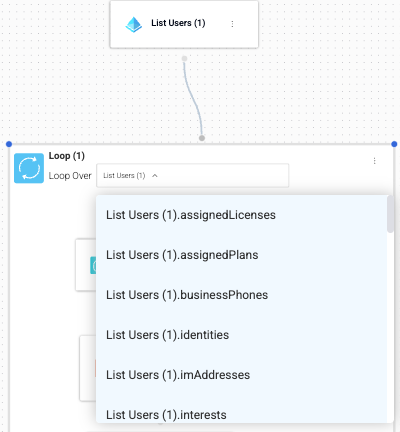
Select a Loop Over option.
Drag and drop any node or nodes into the Loop node. You can add a single or multiple integration action nodes. Optionally nest another Loop node into a Loop, or add an If-Else node.
Note that when you run flows with loop functions, you see the current iterations passed out of the total iterations in the Loop node iteration counters. This makes it easier to keep track of run history.

Use Case Example: Iterate through a list of servers and check their disk space. Then send an email alert if the disk space is lower than expected.
Run sub flow
This node enables you to add another flow into your current flow and run it with its own parameters or those from the parent flow. This feature enables you to break down complex processes into smaller, manageable components and reuse them across different flows.
After you select a sub flow, the node automatically detects and displays all available input parameters from the parent flow. This maintains parameter consistency between parent and sub flows.
Output parameters send values from any node's output within the sub flow back to the parent flow.
Add a sub flow to your flow
From the Add New Node sidebar, open the Flow Control dropdown and drag and drop the Run sub flow node onto the canvas.
Click the node you just added to open the Run sub flow popup.
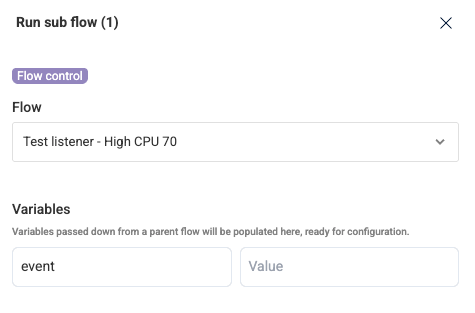
Under Flow, open the dropdown to select from the flows that have already been created. You can select from any of the flows in your Workflows.
The Variables dynamically update for you based on the flow you selected. If there are any variables created in the flow, you can configure the value to execute the sub flow. The values can be: static values, output from previous nodes, or global variables set for the flow.
Optionally, under Output, you can configure values to send data from the sub flow back to the parent flow.
Use Case Example: Create a sub flow for setting up an email account and use it in a flow for onboarding new users. The value of the user can be a variable set from a loop in the parent flow and the email address can be a variable passed from the sub flow to the parent.
Sleep
This node introduces a pause in the flow execution for a specified duration.
Use Case Example: Allow time for a service to restart completely before proceeding with further actions.
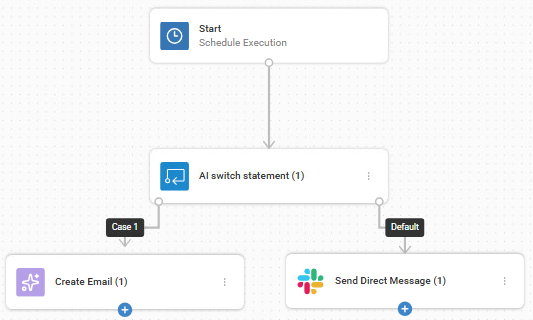
AI switch statement
You can use the AI switch statement node to function as the brain of your automation logic, providing context-aware routing for complex remediation tasks. This node uses AI to evaluate natural language User Instructions that you provide to determine which specific target branches to execute next. It ensures your flow continues exactly where you need it to by making intelligent decisions based on the context of your input Data and instructions.
You enter string or variable Data to be checked. Next you enter User Instructions. Finally you define Cases for the specific scenarios or outcomes and determine if the flow continues along that branch based on the AI's evaluation.
If the AI determines the input in the User Instructions field matches the intent of any of the Cases, then the flow is executed along the branch for which the context matched. Instead of a binary decision or a literal value match, the AI switch statement evaluates instructions against multiple defined cases and executes the branch corresponding to the most relevant match.
If the AI cannot match the input to any of the defined Cases, then the flow is executed along the Default case branch.
Use Case Example: Create a “High CPU” performance alert that triggers a flow when a process consumes excessive resources. Determine the best remediation path based on whether this is a known business app, a system service, or a potential security risk.
Switch statement
You can use the switch statement node to direct the execution of your flow to different possible steps depending on the case you define. The flow can handle multiple decision paths efficiently. It's an alternative to nested If-Else statements when you have many possible outcomes for a single value.
You enter the value to be checked in the Switch Expression field. You can enter a string or a variable. You then add Cases, where you assign the value and determine if the flow continues along that case.
If the value in the Switch Expression field matches the value in any of the Cases, then the flow is executed along the branch for which the value matched. Instead of a binary (true/false) decision, the switch statement evaluates an input value against multiple defined cases and executes the branch corresponding to the matching case.
If the input value doesn’t match the value in any of the Cases, then the flow is executed along the default branch.
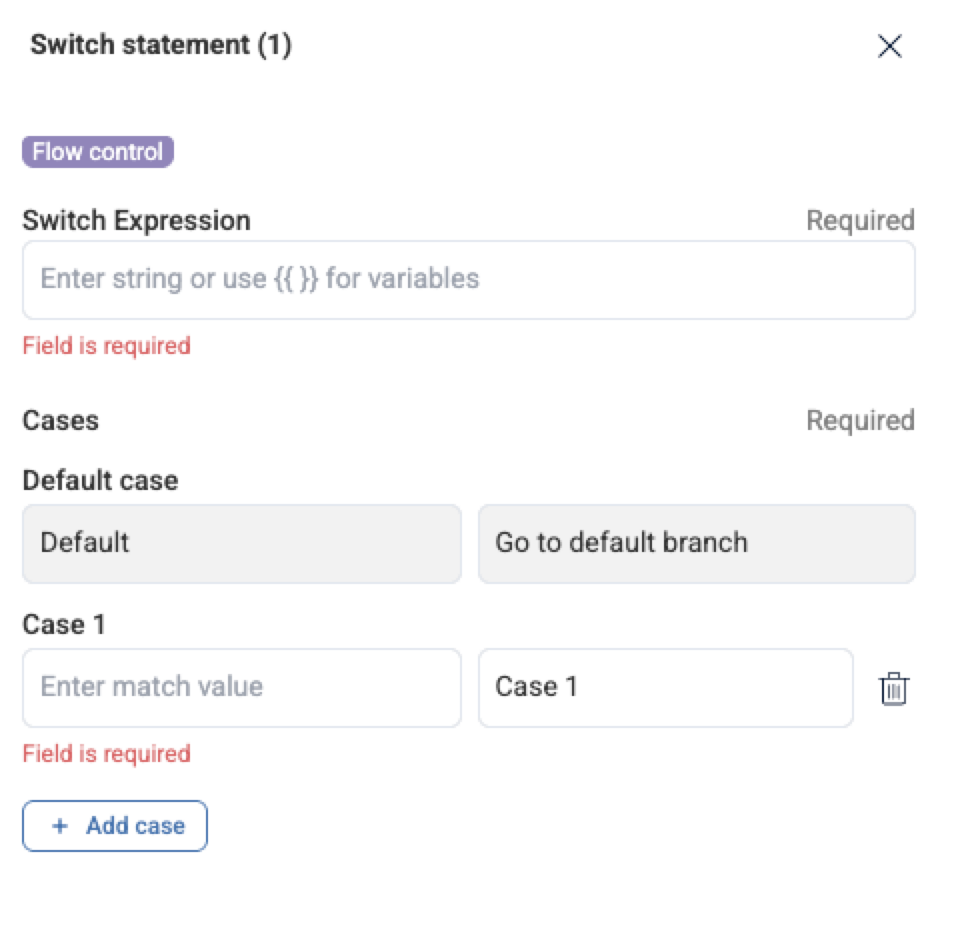
Add a switch statement node to your flow
Add a Flow Control > Switch statement node to your flow.
In the Switch Expression field, enter the value to evaluate. This can be a string or a variable (e.g., {{userInput}}).
Under Cases, click + Add case to define each possible match:
Enter the match value in the input field.
Each case will automatically be labeled (e.g., Case 1, Case 2).
To remove any case, click the trash icon.

Connect the output port of each case to the appropriate next step in your flow.
The flow will follow the branch that matches the Switch Expression value, making your logic cleaner and easier to manage.
Data & Transformations
Use Data Operations
The Data Operations section in the Add New Node sidebar provides tools for manipulating and managing data within your flows.
You can add the following data operations to your flow:
Append to Array: Adds one or more items to the end of an existing array that you have previously created with the Create Array node (see below). You need to specify the target array and the item(s) to be appended. This is useful for dynamically building lists based on flow execution. For example, you can add an action to get a list of all devices that are connected to a virtual machine session in Azure and you want to add the devices that also connected to Windows 365.
Count Array: Takes an array as input and outputs the total number of elements within that array. This is helpful for determining the size of a data collection for iteration or conditional logic. For example, you can use this function to determine how many devices in your infrastructure require updating.
Create Array: Allows you to initialize a new array with a defined set of initial values. You can specify the elements you want to include in the array when the node executes.
Difference Between Arrays: Identifies elements present in the first array, but missing from the second array, or vice-versa.
Intersection Between Arrays: Returns only the elements found in both arrays.
Set variables: This node allows you to create or update the value of a variable within your flow. Variables can store different data types, including arrays, and are used to store and pass data between different steps in your automation. For example, you can store the hostname of a problematic server in a variable and use it in subsequent notification actions. To explicitly conceal sensitive values throughout your flow the Workflows UI, you can click the lock icon next to the field name of individual variables in this node. You can use the Mask variables that you configure in Set variables nodes in HTTP nodes.
Symmetric Difference Between Arrays: Finds elements present in either array, but not in both arrays.
Union of Arrays: Combines unique elements from two arrays into a single list.
Math Operations
The Math Operations section in the Add New Node sidebar provides actions for calculations and number transformations within your flows.
You can add the following math operations to your flow:
Absolute Value: Returns the positive value of a number.
Ceil: Rounds a number up to the nearest integer.
Decimal to Percent: Converts a decimal value to a percentage.
Floor: Rounds a number down to the nearest integer.
Format Number: Formats a number using the selected formatting options.
Is NaN: Checks whether a value is not a number.
Max: Returns the highest value from a set of numbers.
Min: Returns the lowest value from a set of numbers.
Modulo: Returns the remainder after division.
Parse Number: Converts a numeric string to a number.
Percent to Decimal: Converts a percentage to a decimal value.
Power: Raises a number to a specified exponent.
Random Number: Generates a random number.
Round: Rounds a number to the selected precision.
Square Root: Returns the square root of a number.
Date Manipulations
This node retrieves the current date and time, with timezone and format options that you can customize. This can be used for:
Time-stamping: Adding the current time to logs or records.
Scheduling: Triggering actions at specific times or after certain durations.
Calculations: Determining the duration of a process or the time elapsed since a specific event.
Conversions: Converts a date from one timezone to another.
Apply String Manipulation
The String Manipulations section in the Add New Node sidebar allows you to transform, encode, decode, and analyze strings to suit your automation needs when working with strings within your flows.
Here are the current options:
Base64 Encode: Converts a given string into its Base64 representation, an ASCII string format often used for transmitting binary data over text-only channels.
Base64 Decode: Reverses Base64 encoding, converting a Base64 string back to its original format (which could be binary or text).
URL Encode: Encodes a string to be safely included in a URL by replacing unsafe characters with percent-encoded equivalents (e.g., space becomes %20).
URL Decode: Decodes a URL-encoded string back to its original form.
HTML Encode: Converts characters with special meaning in HTML into their corresponding HTML entities (e.g., < becomes <), crucial for preventing cross-site scripting (XSS) vulnerabilities.
HTML Decode: Reverses HTML encoding, converting HTML entities back to their original characters.
Unicode Encode: Encodes a string into a Unicode representation (e.g., UTF-8, UTF-16) to support a wide range of characters from different languages.
Unicode Decode: Decodes a Unicode-encoded string back to its original character representation.
JWT Encode: Encodes a JSON Web Token (JWT), a compact and secure way to transmit information as a JSON object, typically requiring a payload and a signing key.
JWT Decode: Decodes a JSON Web Token (JWT), allowing you to access the information within its payload and verify its signature.
To Lowercase: Converts all characters in a string to lowercase for standardization and case-insensitive comparisons.
To Uppercase: Converts all characters in a string to uppercase for standardization.
Trim: Removes leading and trailing whitespace characters (spaces, tabs, newlines) from a string, often used for data cleaning.
Strip: Similar to Trim, but offers more control over which characters are removed from the beginning and end of a string.
Regex Match: Tests if a string matches a defined regular expression pattern, allowing for sophisticated text searching and validation. It typically outputs a Boolean indicating a match and may capture matching groups.
These nodes are useful for tasks such as data cleansing, formatting messages, interacting with web services, and handling security-related operations within your automated flows.
HTTP
HTTP Request
The HTTP Request node allows your flow to interact with external web services and APIs by sending HTTP requests including:
GET
POST
PUT
PATCH
DELETE
HEAD
OPTIONS
Start by selecting the desired method from the Method dropdown and entering the target URL. You can include headers and URL parameters to customize the request, and use variables for dynamic values. You can also use Mask variables that you configure in the Start nodes or Set variables nodes.
The HTTP Request node also supports GraphQL request bodies. Select GraphQL in the request body, enter a query or mutation, and optionally include GraphQL variables.
For secure and reliable execution, you can enable SSL verification, choose to follow redirects, and configure retry settings including the interval and number of attempts. This node is ideal for integrating third-party services, retrieving data, or triggering actions outside your flow.