To monitor Microsoft Entra ID-joined AVD (formerly Azure Active Directory) session hosts, you must install a ControlUp Agent on the same machine as the ControlUp Monitor.
To monitor and manage entities in an Azure Virtual Desktop (AVD) environment, you must establish communication between your ControlUp environment and Azure. When you create an Azure connection, you are required to set up at least one ControlUp data collector machine to communicate with the Azure API. The data collector must have a ControlUp Agent installed.
Benefit
- From ControlUp versions 9.0 and higher, you no longer need to use the Real-Time Console to add non-domain joined machines to your organization tree or to configure them. Instead, use these PowerShell cmdlets to configure your monitors.
Prerequisite
- If your organization already exists in the Real-Time DX Console, the user you use to install the agent must be a Roles Manager.
- If your organization doesn’t exist in the Console, you must be assigned the DEX Admin role for permission to deploy agents.
Syntax
Set-CUAPIToken -Token <string> -Profile <string>Parameters
| Parameter | Description | Required |
|---|---|---|
| -Token | Token string generated by web UI for authentication and authorization. If not provided, the default token profile will be used. For more details, see manage API tokens. | Only if monitor installed on workgroup machine |
| -Profile | Provides the name of the token profile. If not provided, the default token profile name will be used, usually the name of your Real-Time DX organization. | No |
Install Agent on a Workgroup Machine
To install a ControlUp Agent on a workgroup machine:
- On the monitor machine, open a PowerShell session with elevated permissions and import the module:
Import-Module "C:\Program Files\Smart-X\ControlUpMonitor\Version 9.0.5.413\ControlUp.PowerShell.User.dll"
2. Add a profile with the API Key you created in DEX:
Set-CUAPIToken -Token "[APIKey]"
3. Verify that the API Profile was created:
Get-CUAPIProfile
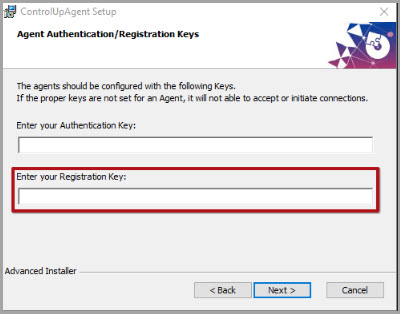
4. Get the agent Authentication Key and Registration Key:
Import-Module "C:\Program Files\Smart-X\ControlUpMonitor\Version 9.0.5.413\ControlUp.PowerShell.User.dll"
Get-AgentPublicKey
Get-AgentRegistrationKey
5. On the agent machine, extract the agent MSI package. The ControlUp Agent Setup Wizard opens:
Or if you install with PowerShell, run the following script:
$authkey = [Authentication Key from step above]
$registrationKey = [Registration Key from step above]
$msiPath = "C:\tmp\ControlUpAgent-net48-x64-9.0.5.413-signed.msi"
$arguments = @(
'/i',
"`"$msiPath`"",
 '/qb',
"AUTHKEY=$authkey",
"RegistrationKey=$registrationKey",
"MASTER_IMAGE=true"
)
Start-Process -FilePath 'msiexec.exe' -ArgumentList $arguments -Wait -NoNewWindow
6. Enter your Authentication Key and Registration Key, and click Next to complete the installation. Or run the following command prompt:
msiexec /i C:\ControlUpAgent-net48-x64-9.0.5.413.msi /qb AUTHKEY=[Authentication Key] RegistrationKey=[Registration Key]ipconfig /all
Import-Module "C:\Program Files\Smart-X\ControlUpMonitor\Version 9.0.5.413\ControlUp.PowerShell.User.dll"
Add-CUComputer -name [Machine Name] -DnsName [Machine Name].[Connection-specific DNS Suffix]
Example:
Add-CuComputer -name PSDC01 -DnsName PSDC01.4rgvsyeccjuujimhr5m1ljkc2d.bx.internal.cloudapp.netPrepare AVD Base Image
If you use a base image to deploy your AVD session hosts, you must first install the ControlUp Agent on that base image.
- To change your Authentication Key and Registration Key values, run the following command prompt:
$authkey = [Authentication Key]
$registrationKey = [Registration Key]
$msiPath = "C:\tmp\ControlUpAgent-net48-x64-9.0.0.1680-signed.msi"
$arguments = @(
'/i',
"`"$msiPath`"",
 '/qb',
"AUTHKEY=$authkey",
"RegistrationKey=$registrationKey",
"MASTER_IMAGE=true"
)
Start-Process -FilePath 'msiexec.exe' -ArgumentList $arguments -Wait -NoNewWindow
If you use the GUI, select the Configure this installation as a master image option and click Next to complete the installation.
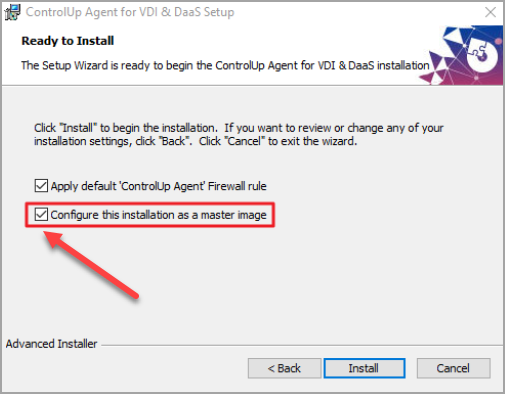
All of your new AVD session hosts now have the ControlUp Agent installed and can use the Agent Outbound Communication feature.