The DNS Lookup Scout tests the availability and health of DNS servers, and whether the response of a query for a selected domain returns the desired result.
Create a DNS Lookup Scout
-
In the Synthetic Monitoring top bar, click Create Scout to open the Add New Scout window
-
From the Infrastructure tab, select DNS Lookup as the Scout Type.
-
Select the locations (Hives) from which you want to initiate the DNS lookup test.
-
Enter the Hostname to test.
-
Enter a Name for the Scout.
-
Select a run interval for the test using the Run Every slider. For the first 10 minutes of the run, you can choose intervals of 1 to 10 minutes. After that, you can choose increments of 5 minutes up to 60 minutes (5, 10, 15, 20, and so on).
-
Optionally, add Tags to your Scout. Tags are key-value pairs which can be used to organize your Scouts. To learn more about tags, visit Centralized Tags Management.
-
Optionally, click Show additional parameters to configure the following:
- DNS Server. Sets the DNS server to use for the query. If you do not enter a value, the test uses the default DNS server of the selected Hive.
- Expected IP Response. Sets an IP address that is used to determine if the test is successful. If the query responds with the IP address, then the test succeeds; otherwise, the test fails.
- Type. Sets the query type A or MX.
- Timeout. Sets the maximum wait time for the test to finish.
-
Click Next: Alert Policy to set up alerts and notifications on the Scout before saving it. For more information, see Alert Policies.
Test Results
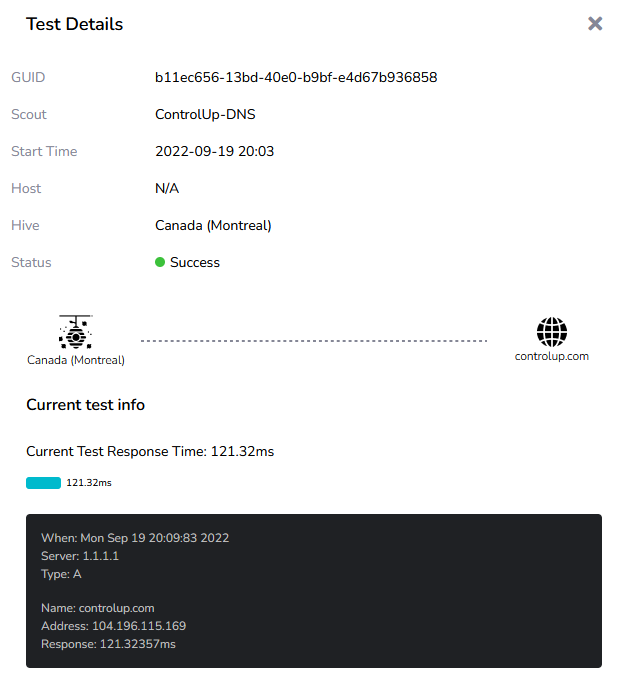
Click on a test result to see the full details of the DNS lookup test. In this example, you can see the type of information that is returned for a DNS lookup test to controlup.com.
You can see a summary of the Scout configuration, along with the resulting IP address and response time.